Restoration Process Explained: Step-by-Step Property Recovery
Nearly one in three American homeowners faces property damage from natural disasters every year. Rapid response is crucial because delayed action can make a bad situation much worse. This guide gives you clear steps for protecting yourself, securing your home, and beginning the recovery process so you can move forward with more confidence after disaster strikes.
Table of Contents
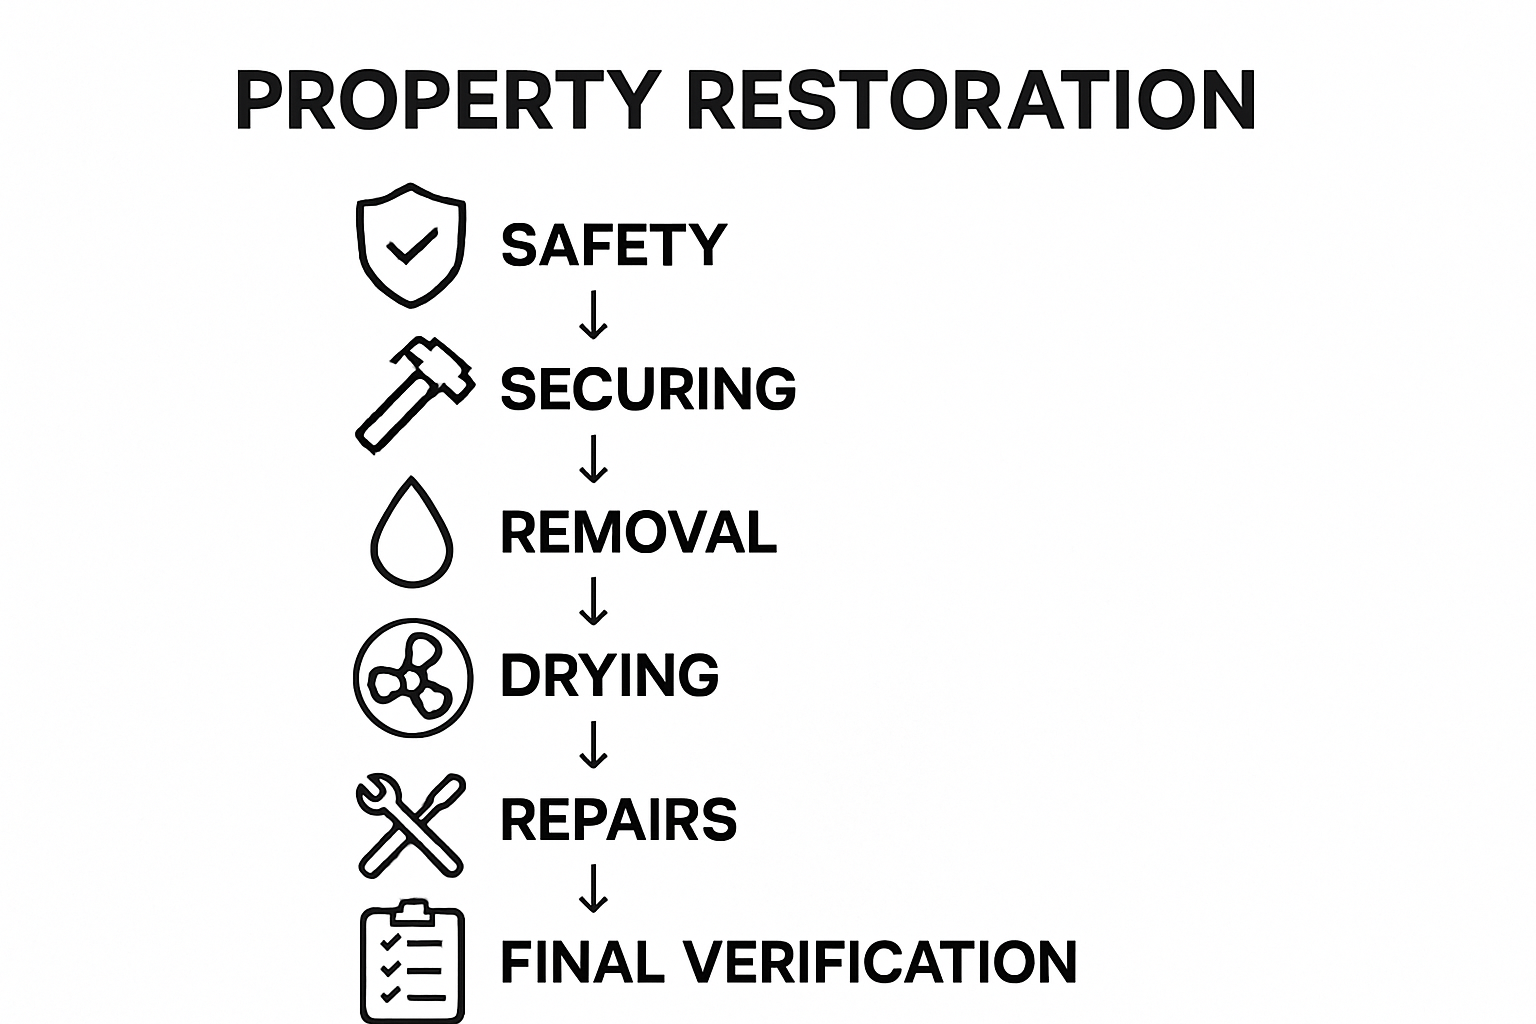
- Step 1: Assess Damage And Ensure Safety
- Step 2: Secure Property And Prevent Further Loss
- Step 3: Remove Water, Debris, Or Contaminants
- Step 4: Dry, Clean, And Sanitize Affected Areas
- Step 5: Repair Structure And Restore Belongings
- Step 6: Verify Completion And Support Insurance Claims
Quick Summary
| Key Point | Explanation |
|---|---|
| 1. Assess damage safely | Begin with a visual inspection from a distance, document damage and avoid unstable structures. Your safety is the priority. |
| 2. Secure property to prevent loss | Cover exposed areas, board up windows, and create barriers to minimize further destruction. Document your efforts for insurance claims. |
| 3. Remove water and contaminants systematically | Use professional tools to remove water and debris. Sanitize affected areas to prevent mold and health risks. Wear protective gear. |
| 4. Dry and sanitize thoroughly | Employ dehumidifiers and antimicrobial treatments to eliminate moisture and ensure all areas are clean to avoid future hazards. |
| 5. Verify work for insurance claims | Schedule a final inspection with a certified expert, document all repairs, and organize all related receipts and assessments for your insurance claims. |
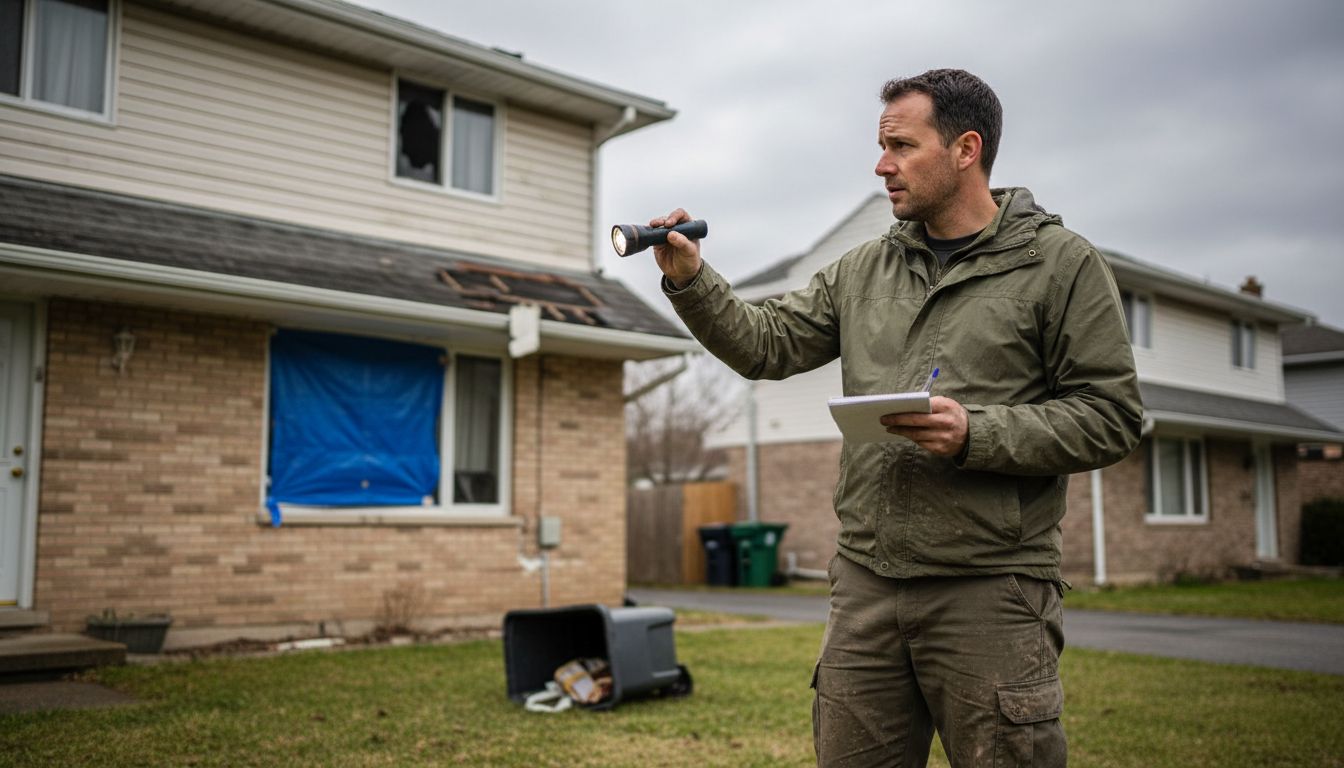
Step 1: Assess Damage and Ensure Safety
When disaster strikes your property, understanding how to assess damage and prioritize safety becomes your first critical mission. Your initial actions can prevent further destruction and protect you and your family from potential hazards. Preliminary damage assessments are essential in determining the extent of destruction and creating a strategic recovery plan.
Begin by conducting a careful visual inspection of your property from a safe distance. Look for structural compromise such as sagging roofs, cracked walls, or visible foundation damage. Never enter a building that appears unstable. Wear protective equipment like sturdy boots, work gloves, and a respirator if there is potential for airborne debris or toxic materials. Document everything with photographs and notes for insurance purposes and potential federal assistance claims.
Warning: If you smell gas, observe electrical hazards, or notice significant structural damage, evacuate immediately and contact local authorities. Your personal safety always takes precedence over property assessment. The next step in your restoration journey will involve contacting professional restoration experts who can perform a comprehensive damage evaluation and begin the recovery process.
Pro Tip: Always keep an emergency kit with first aid supplies, flashlight, batteries, and important documents readily accessible to help you navigate unexpected property damage scenarios.
Step 2: Secure Property and Prevent Further Loss
After assessing damage, your next crucial mission is securing your property and minimizing potential additional destruction. Proper property procedures can significantly reduce long-term repair costs and protect your valuable assets from progressive deterioration.
Start by covering exposed areas with heavy duty waterproof tarps or plywood to prevent water intrusion and further structural damage. Board up broken windows, seal roof punctures, and create temporary barriers around compromised sections of your property. Use heavy plastic sheeting secured with wooden planks or construction grade fasteners. Carefully remove valuable and salvageable items from damaged areas to prevent additional loss. Document every protective measure with photographs for insurance purposes.
Warning: When handling debris or securing damaged areas, always wear protective equipment including work gloves, safety glasses, and sturdy boots. Be cautious of potential electrical hazards, unstable structures, and hidden damage. If you are uncertain about safely securing an area, contact professional restoration experts who can assess and mitigate risks effectively.
Pro Tip: Create a temporary inventory of removed items and store them in a dry, secure location to facilitate insurance claims and recovery tracking. Your methodical approach now will streamline the restoration process in the coming weeks.
Step 3: Remove Water, Debris, or Contaminants
After securing your property, the critical next phase involves systematically removing water, debris, and potential contaminants that threaten your property’s structural integrity and health safety. Comprehensive cleanup procedures require careful planning and methodical execution to prevent further damage and potential health risks.
Begin by extracting standing water using industrial wet vacuums, pumps, or professional water removal equipment. Prioritize removing saturated materials like carpeting, drywall, and insulation that can harbor mold and bacteria. Separate debris into categories like construction materials, organic waste, and potential hazardous items. Wear protective gear including waterproof gloves, respirator masks, and sturdy boots to minimize exposure to potentially harmful substances. Use disinfectant solutions to clean and sanitize affected surfaces, paying special attention to areas with potential microbial growth.
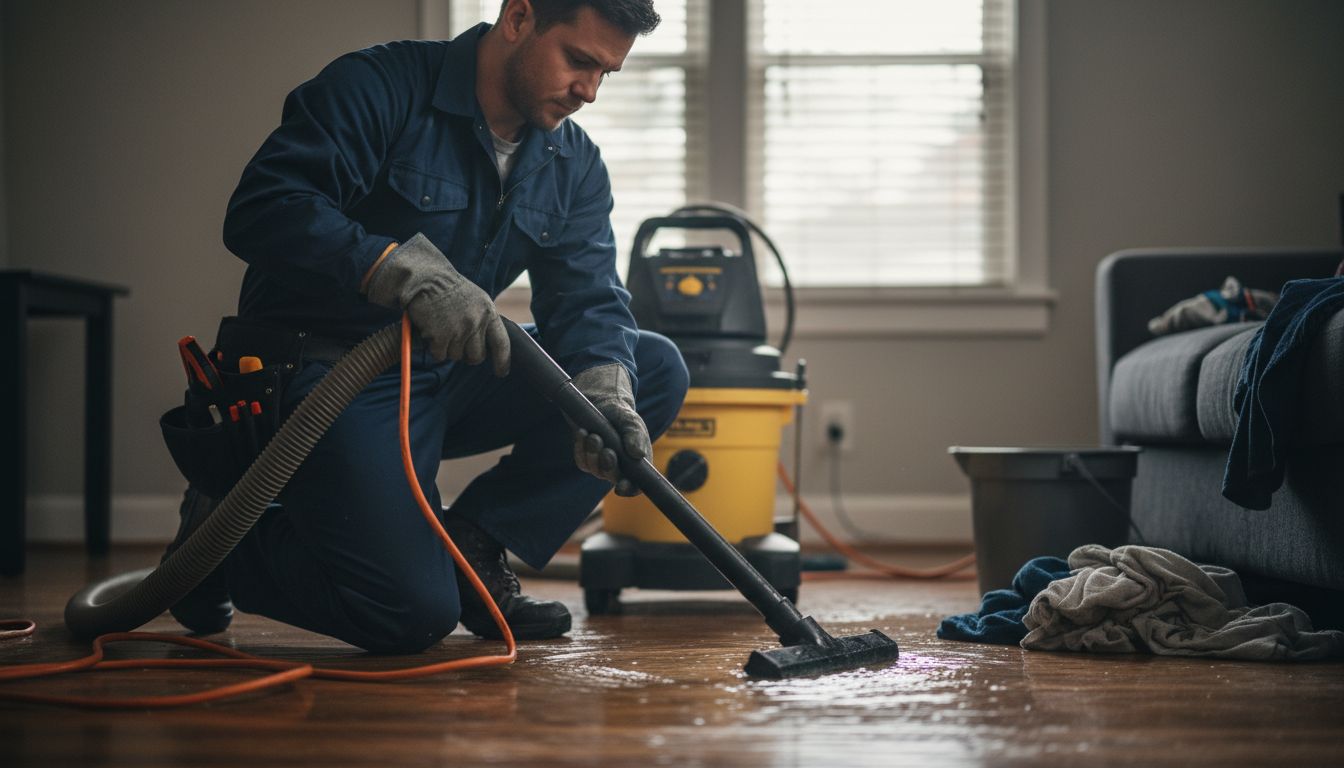
Warning: Never mix different cleaning chemicals, as this can create toxic fumes. Electrical equipment and water are a dangerous combination, so ensure all power sources are disconnected before beginning cleanup. If water damage is extensive or you notice signs of significant contamination, contact professional restoration specialists who can safely manage complex removal processes.
Pro Tip: Document every removal and cleaning step with photographs and detailed notes. This documentation will be crucial for insurance claims and helps track the restoration progress systematically.
Step 4: Dry, Clean, and Sanitize Affected Areas
With water removed, your next critical mission is thoroughly drying, cleaning, and sanitizing affected areas to prevent long-term damage and potential health hazards. Storm recovery strategies emphasize the importance of comprehensive moisture elimination and thorough sanitization to mitigate risks of mold, bacterial growth, and structural deterioration.
Begin the drying process by strategically positioning high-capacity dehumidifiers and industrial air movers to circulate air and extract moisture from walls, floors, and hidden spaces. Use moisture detection tools to identify damp areas that might not be immediately visible. Apply specialized antimicrobial treatments to all surfaces, focusing on areas prone to microbial growth like baseboards, corners, and porous materials. Wear protective equipment including respirator masks, gloves, and eye protection during the cleaning process to minimize exposure to potentially harmful substances.
Warning: Complete drying is crucial. Residual moisture creates perfect conditions for mold and bacterial proliferation. If humidity levels remain high or you detect persistent dampness, consult professional restoration experts who can perform comprehensive moisture assessment and advanced drying techniques.
Pro Tip: Document the entire drying and sanitization process with detailed photographs and humidity readings. This documentation serves as critical evidence for insurance claims and helps track the restoration progress systematically.
Step 5: Repair Structure and Restore Belongings
With cleaning completed, you now enter the critical phase of structural repair and belongings restoration. Comprehensive restoration planning requires a systematic approach to rebuilding your property and salvaging valuable items while ensuring long-term structural integrity.
Begin by conducting a thorough structural assessment to identify damage levels in walls, floors, foundations, and supporting elements. Prioritize repairs that prevent further deterioration such as replacing water damaged drywall, reinforcing compromised wooden structures, and addressing potential foundational issues. For personal belongings, carefully sort items into categories repairable, salvageable, or beyond restoration. Use professional cleaning techniques for fabric items, carefully clean and sanitize electronics, and consider specialized restoration services for valuable or sentimental objects like artwork, antiques, or family heirlooms.
Warning: Structural repairs require professional expertise. Do not attempt complex repairs without consulting licensed contractors who can assess potential hidden damage and ensure code compliance. Improper repairs can compromise your property’s safety and potentially invalidate insurance claims.
Pro Tip: Maintain detailed documentation of all repairs, including photographs, professional assessments, and receipts. This comprehensive record will be crucial for insurance purposes and future property valuation.
Step 6: Verify Completion and Support Insurance Claims
As you approach the final stage of property restoration, your focus shifts to comprehensive verification and strategic insurance claim documentation. Initial damage assessment procedures are critical in ensuring that all restoration work meets professional standards and provides the necessary evidence for successful insurance claims.
Begin by scheduling a professional final inspection with a certified restoration expert who can provide an official assessment of the completed work. Request a detailed written report that documents all repairs, materials used, and restoration techniques. Organize all repair receipts, photographs documenting the damage and restoration process, professional assessment reports, and communication records with contractors and insurance representatives. Create a comprehensive claim file that includes before and after documentation, itemized repair costs, and expert evaluations to support your insurance claim.
Warning: Be meticulous in your documentation. Missing or incomplete records can potentially delay or reduce your insurance reimbursement. Ensure every repair, expense, and communication is carefully tracked and preserved.
Pro Tip: Consider requesting a follow up inspection several weeks after restoration to confirm the long term effectiveness of repairs and address any potential emerging issues before they become significant problems.
Get Professional Help for Every Step of Your Property Restoration Journey
Dealing with property damage can feel overwhelming with so many challenges like assessing damage safely, securing your home, removing contaminants, and restoring belongings. This article breaks down the essential steps to recovery but navigating these complex tasks alone puts you at risk of costly mistakes and delays. PuroClean of Northeast Sacramento understands how critical each phase of the restoration process is to preventing long-term damage and ensuring health safety.
Take advantage of expert emergency response and comprehensive restoration services from PuroClean. Our certified technicians are available 24/7 to manage water damage, fire and smoke restoration, mold removal, and more using advanced technology and proven methods. Visit PuroClean of Northeast Sacramento now to get immediate help and guidance through every restoration step. Don’t wait until problems worsen—protect your property and peace of mind by contacting professionals who prioritize your safety and insurance claim success today.
Frequently Asked Questions
What should I do first after experiencing property damage?
Begin by assessing the damage and ensuring your safety. Conduct a careful visual inspection from a safe distance, and if you notice any hazards, evacuate and contact local authorities.
How can I prevent further damage to my property after an incident?
To secure your property, cover exposed areas with waterproof tarps or plywood and board up broken windows. Act quickly to minimize additional damage and document your protective measures with photographs for insurance claims.
What steps should I follow to effectively remove water and debris?
Start by extracting standing water using industrial wet vacuums or pumps, then remove saturated materials like carpeting and insulation. Wear protective gear during this process and categorize debris for safe disposal, ensuring you keep detailed records for insurance purposes.
How do I ensure my property is thoroughly dried and sanitized?
Use high-capacity dehumidifiers and industrial air movers to dry affected areas, and apply antimicrobial treatments to prevent mold growth. Monitor moisture levels closely until everything is completely dry, as residual moisture can lead to further issues.
What should I include in my insurance claim documentation?
Document all repairs and restoration efforts with photographs, receipts, and written reports from professionals. Organize this information into a comprehensive claim file that will support your insurance submission.
Why is it important to have a final inspection after repairs?
Scheduling a final inspection with a certified restoration expert ensures all work meets professional standards. This step also gives you an opportunity to document the completed repairs and confirm the effectiveness of the restoration efforts.
Recommended
Understanding Cabinet Restoration Techniques for Your Home
Property Restoration – Disaster Recovery – PuroClean Emergency Property Recovery
Property Damage? Take Control with Residential Reconstruction
