Your one-line policy: “Upon discovery of water, fire, or smoke damage, the property owner or manager will contact a licensed restoration contractor and the insurance carrier within one hour, document all visible damage before any mitigation begins, and authorize emergency stabilization to prevent further loss.” Call your restoration contractor and insurer immediately, and photograph everything before anyone touches a mop or a tarp. That single sequence protects your claim more than anything else you’ll do this week.
Table of Contents
- What Goes Into A Disaster Recovery Policy Template
- What Should You Do In The First 24 Hours?
- How Do You Work With Restoration Pros And Your Insurer?
- How Long Does Restoration Actually Take?
- What Documentation Do You Need For Your Claim?
- Contact List And Authorization Blocks You Can Paste In
- What Restoration Crews Wish Every Property Owner Knew
- PuroClean Of Northeast Sacramento Puts This Policy Into Action
- Where To Learn More About Restoration Standards
- Sources
What Goes Into A Disaster Recovery Policy Template
A working disaster recovery policy for property damage isn’t a legal document. It’s a one-page reference that tells everyone in a crisis exactly who does what, in what order, so nobody wastes the first critical hours arguing about next steps. Insurance professionals and property managers who handle multiple units benefit from writing this once and reusing it for every property in a portfolio.
Here’s the skeleton to fill in for your own address or building.
Purpose and scope. State plainly which perils the policy covers: water intrusion, fire, and smoke. Most homeowner policies treat these as separate claim categories, and non-weather water losses like burst pipes and appliance failures alone account for roughly 29% of homeowner insurance claims by count. That’s worth naming in your scope section, since it’s the scenario your policy will probably face first.
Roles and defined contacts. List these positions and fill in a real name and phone number for each:
- Property owner or manager (final decision authority)
- On-site emergency contact (tenant, caretaker, or family member)
- Restoration contractor (primary and backup)
- Insurance agent or claims adjuster
- Utility shutoff contact, if different from the owner
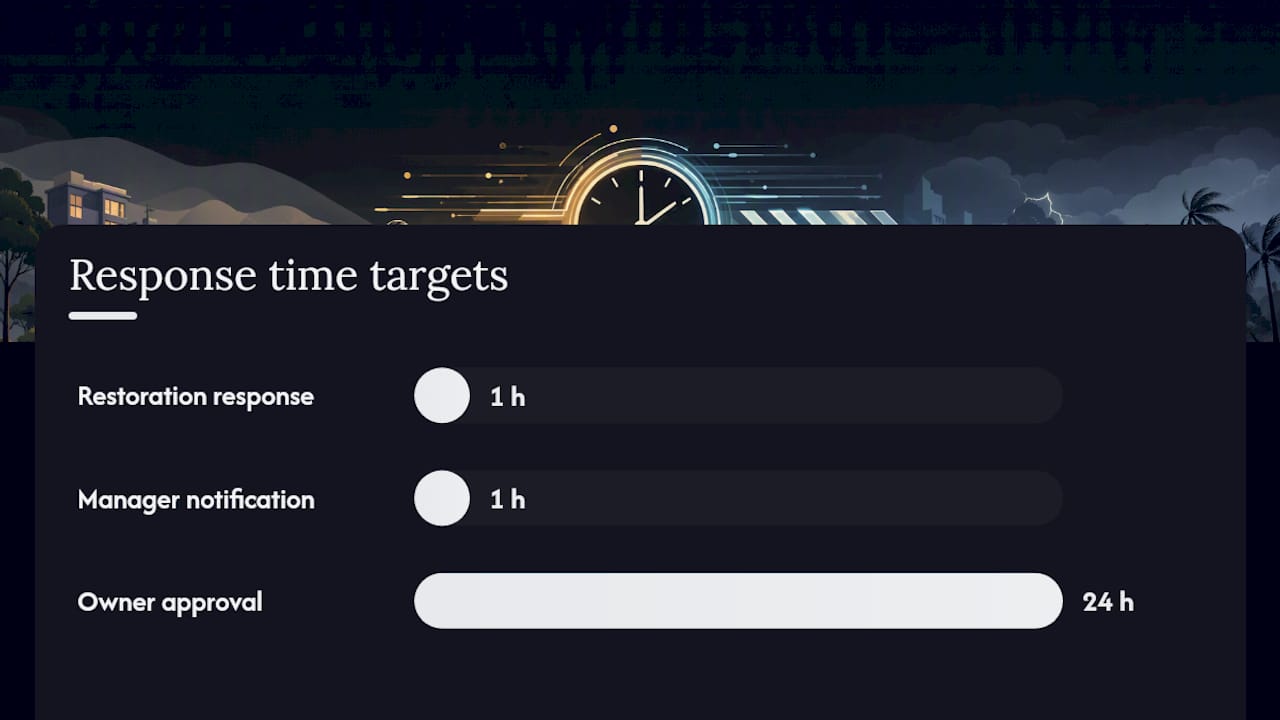
Authority and approval matrix. Spell out who can authorize emergency mitigation work without waiting for sign-off, and what dollar threshold requires a second approval. For a single-family home, this is usually just the owner. For a multi-unit property, put it in writing: the property manager can authorize emergency stabilization up to a set amount immediately, with the owner or asset manager approving anything beyond that within 24 hours.
- Property manager authorizes emergency mitigation on sight
- Manager notifies owner and insurer within one hour
- Owner reviews and approves full scope within 24 hours
- Insurer adjuster inspects and confirms coverage
Notification protocol. Set a response time standard, such as “restoration contractor must respond within one hour, 24/7.” Reputable restoration companies build their service around that expectation already.
Pro Tip: Store a laminated or digital copy of this policy with every property file, and keep a duplicate in your phone’s notes app. The moment you need it is the moment you won’t have time to search for it.
What Should You Do In The First 24 Hours?
The first day determines whether your claim goes smoothly or turns into a dispute. Follow this order.
- Confirm everyone is safe. Evacuate if there’s fire, smoke, or structural risk before worrying about property.
- Shut off utilities safely. Kill the water supply at the main valve or the affected fixture; cut power to any area with standing water if you can reach the breaker without wading through it.
- Stop the active source if it’s safe to. Close a valve, throw a tarp over a roof breach, or move furniture off a wet floor.
- Document before you touch anything else. Photograph and video every affected room, timestamp the images, and note the date and time of discovery.
- Call your restoration contractor and insurer. Give them the peril type, rough square footage affected, and whether the source is still active.
- Apply short-term containment while you wait. Buckets, fans, and moved furniture limit damage, but leave the real drying to equipment professionals bring.
A short, prioritized list like this beats a long preparedness binder, mainly because nobody actually reads the binder during a crisis.
Pro Tip: Text yourself a one-line summary of what happened and when, right after you call for help. That timestamped message becomes surprisingly useful evidence later.
How Do You Work With Restoration Pros And Your Insurer?
Once a contractor is on-site, your job shifts from acting to coordinating. Expect these deliverables from a professional restoration crew:
- A moisture map showing wet zones and readings taken with calibrated equipment
- A daily drying log tracking humidity and moisture levels against target drying goals
- A written scope of work before major mitigation begins
- Photos and notes matching your own pre-mitigation documentation
Emergency mitigation, like extracting standing water or boarding a broken window, generally doesn’t need to wait for the adjuster. Most policies expect you to prevent further loss as soon as possible. Full reconstruction decisions, though, usually wait for adjuster confirmation of coverage.
When the adjuster visits, walk the property together if you can, and ask for a written explanation of any denied or reduced line items. If the contractor’s estimate and the adjuster’s numbers don’t match, a supplement request supported by the drying logs and moisture readings is usually the fastest path to resolution. A public adjuster or attorney becomes worth considering when the claim involves structural damage, a denial you believe is wrong, or a fire loss with contents pack-out disputes. For guidance on vetting a contractor before you’re mid-crisis, see this restoration professional checklist.
How Long Does Restoration Actually Take?
Restoration follows a predictable sequence: stabilization, assessment and documentation, mitigation, remediation or cleaning, and finally reconstruction or move-back.
- Stabilization: hours, not days. Stop the source, secure the structure.
- Mitigation and drying: typically 3 to 5 days for water losses, longer for widespread flooding.
- Remediation and cleaning: varies widely; smoke odor removal and content cleaning can extend this phase for fire losses.
- Reconstruction: anywhere from a few weeks to several months, depending on the scope of drywall, flooring, or structural repair.
Response speed changes everything about that timeline. Stabilization within 24 to 48 hours meaningfully reduces the risk of secondary damage and microbial growth, while delayed response tends to push every later phase further out. Fire losses complicate the picture further, since smoke often migrates through HVAC systems into unaffected rooms, and fire claims average significantly higher dollar amounts than water claims, which is part of why additional living expense coverage for temporary housing comes up so often in fire recovery. For a longer breakdown of what each phase involves, see this property restoration timeline guide.
What Documentation Do You Need For Your Claim?
Insurers and contractors both expect a specific evidence trail, and gaps here are what turn a routine claim into a slow one.
- Pre-mitigation photos and video, timestamped, of every affected area
- Daily drying logs with moisture readings from professional equipment, since these logs are the most defensible evidence for proving proper mitigation
- Written estimates, the scope of work, any change orders, and all receipts
- A contents inventory, especially for items removed during pack-out
- A simple communication log noting every call, date, and who you spoke with
Keep digital copies in cloud storage and a printed folder on-site. Note also that homeowners can legally handle simple cleanup tasks themselves, but licensed contractors and permits are required for structural, electrical, or plumbing repairs, and insurers can and do inspect finished work. For a quick reference on what’s safe to tackle yourself versus what to leave to professionals, this emergency property cleanup guide breaks it down room by room.
Contact List And Authorization Blocks You Can Paste In
Fill in these blocks now, before you need them.
- Escalation order: 911 or fire department (life safety) → restoration contractor (24/7 line) → insurance carrier claims number → property manager/owner → utility company if shutoff needed
- Authorization text: “I authorize [Contractor Name] to begin emergency water/fire/smoke mitigation immediately to prevent further loss, pending full scope approval within 24 hours. Signed: ___ Date: ___”
- File storage: Keep policy documents, photos, and receipts in one shared cloud folder plus a physical copy in a fireproof box, accessible to every listed contact.
For homeowners tackling a full checklist for the first time, this homeowner’s recovery guide walks through the same categories in more depth. Property managers overseeing exterior upkeep between incidents might also find this property maintenance checklist useful for catching small problems before they become claims. For a broader library of recovery resources organized by topic, this restoration guide collection is worth bookmarking.
What Restoration Crews Wish Every Property Owner Knew
The single biggest mistake isn’t panic. It’s hesitation. Owners who wait a day to call anyone, hoping the water will dry itself or the smoke smell will fade, lose the window where fast action actually prevents secondary damage. The second most common mistake is skipping photos because the situation feels too urgent to stop and document. Applying a framework built around recognized ANSI/IICRC standards for water, fire, and mold work gives both homeowners and insurers a shared language for what “properly mitigated” actually means.
PuroClean Of Northeast Sacramento Puts This Policy Into Action
Every step in the policy above, the 24/7 call, the documentation, the moisture readings, the adjuster coordination, is what a professional restoration company typically does on-site. When you call, expect to be asked the same facts your policy tells you to gather: peril type, affected area, and whether the source is still active. That’s how a technician can dispatch with the right equipment on the first trip instead of a second one.
Restoration companies handle water extraction, structural drying, leak detection, and fire and smoke restoration for homes and commercial properties, plus direct coordination with insurance carriers so documentation lines up with what adjusters expect. If your property is dealing with active water, fire, or smoke damage right now, contact PuroClean’s 24/7 emergency response team and get a technician started on stabilization today.
Where To Learn More About Restoration Standards
The ANSI/IICRC S500, S700, and S520 standards set the technical benchmark for water, fire and smoke, and mold restoration work in the United States. The IICRC maintains contractor certification programs built around these same standards. For homeowner-facing detail on timelines and what to expect during mitigation, the emergency restoration overview is a solid next read.
Sources
- Residential Restoration: The Complete Professional Guide (2026) – Restoration Intel
- Residential Disaster Restoration Services | Disaster Restoration Authority
- Emergency Restoration 101 – What To Know