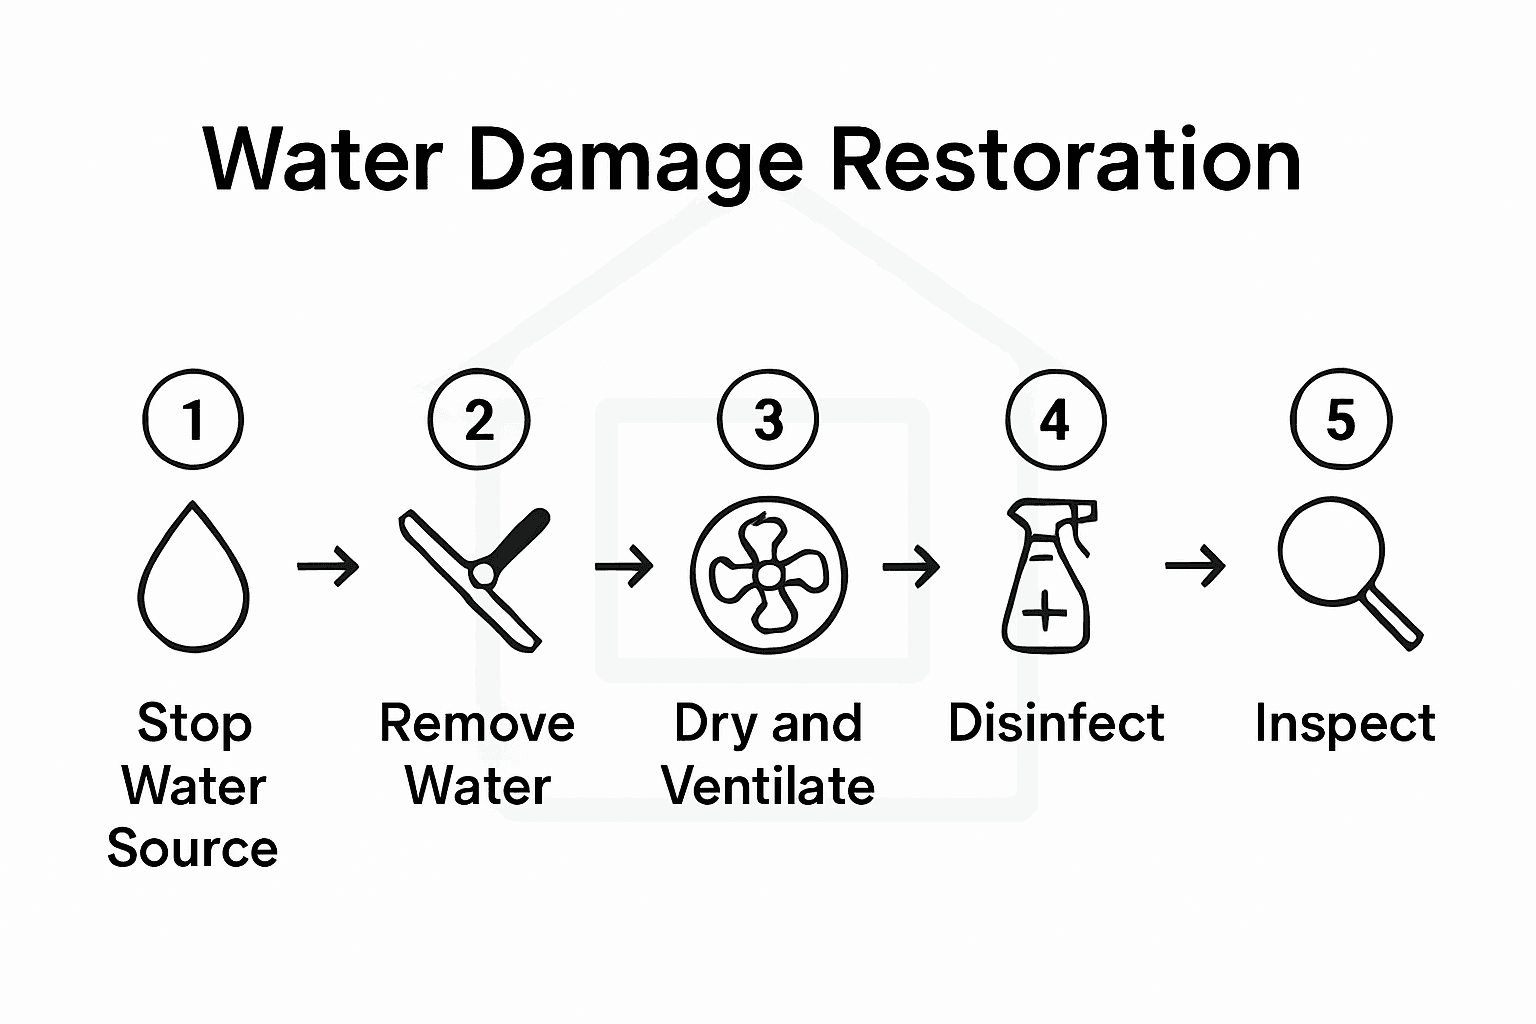
Preventing Mold After Leaks: Step-by-Step Restoration Guide
Most American homeowners face costly repairs from unchecked water damage every year. Even a small leak can lead to major problems if mold begins to grow out of sight. Acting quickly not only protects your health but also preserves your property. This guide breaks down the five practical steps that every American resident should know to minimize damage and stop mold growth before it becomes a much larger issue.
Table of Contents
- Step 1: Identify and Stop All Water Sources
- Step 2: Remove Standing Water and Excess Moisture
- Step 3: Dry and Ventilate All Affected Areas
- Step 4: Clean and Disinfect Surfaces Thoroughly
- Step 5: Inspect for Hidden Moisture and Mold Growth
Quick Summary
| Essential Insight | Detailed Explanation |
|---|---|
| 1. Identify and Stop Water Sources | Quickly locate and shut off all water entry points to prevent further damage. This includes checking the water meter and inspecting common problem areas for leaks. |
| 2. Remove Standing Water and Moisture | Swiftly eliminate all standing water to inhibit mold and bacteria growth. Use wet vacuums, mops, and professional equipment to dry affected areas effectively. |
| 3. Dry and Ventilate Affected Areas | Promote airflow with fans and dehumidifiers after initial drying. Ensure all spaces, especially hidden areas, are adequately dried to prevent mold growth. |
| 4. Clean and Disinfect Surfaces Thoroughly | After drying, clean surfaces with EPA-approved disinfectants to eliminate any potential mold spores or bacteria, focusing on porous materials. |
| 5. Inspect for Hidden Moisture and Mold | Conduct thorough inspections for dampness in hidden areas using moisture detection tools. Look for signs of mold or water damage to prevent long-term issues. |
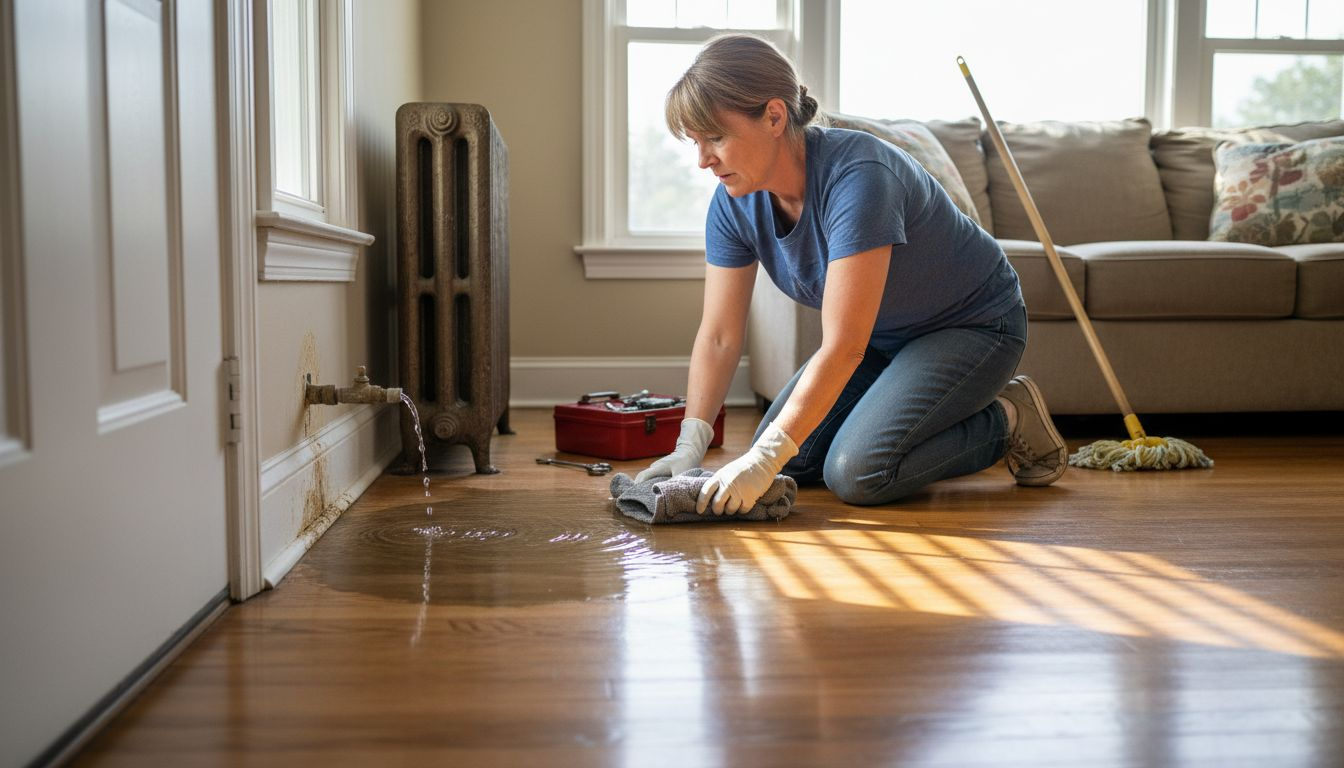
Step 1: Identify and Stop All Water Sources
Stopping water sources quickly is crucial in preventing extensive mold growth after a leak. The first step involves systematically tracking down and shutting off all potential water entry points in your property.
To detect hidden leaks, check your water meter when all water appliances are turned off. If the meter continues to register water usage, you likely have an active leak somewhere in your plumbing system. Start by examining common problem areas like toilets, faucets, and pipe connections. Look for visible signs of moisture such as water stains, warped flooring, or unexplained dampness. Pay special attention to areas behind appliances, under sinks, and near water-connected fixtures.
Once you identify a leak, immediately shut off the water supply to that specific area or use your main water valve to stop all water flow. This prevents additional water from causing more damage and gives you time to assess and repair the source. For underground leaks, watch for unexpected wet spots in your yard or unusually high water bills.
Professional tip: Keep a flashlight and moisture meter handy during your inspection. These tools can help you detect hidden moisture in walls and hard-to-reach areas that might not be immediately visible.
Step 2: Remove Standing Water and Excess Moisture
Removing standing water and excess moisture is a critical step in preventing mold growth and minimizing property damage. This process requires swift action and strategic moisture control techniques.
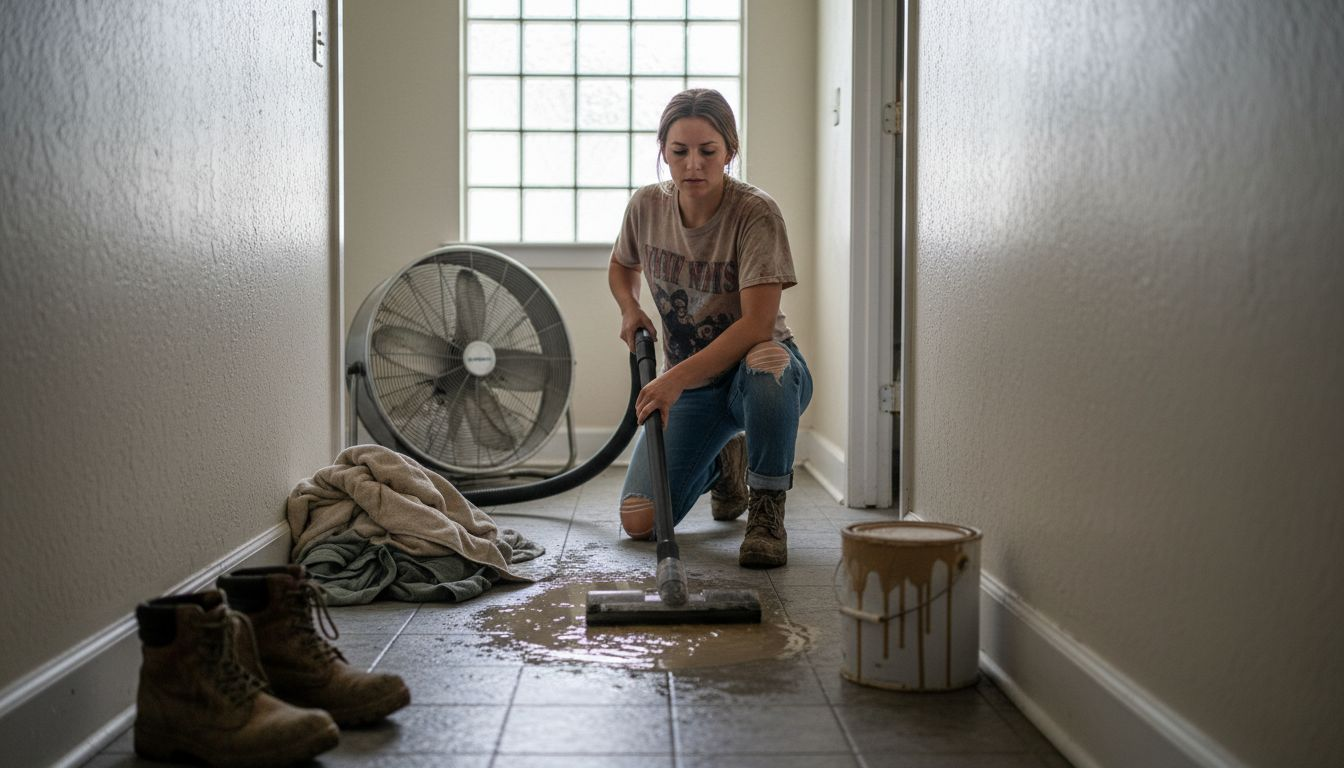
Promptly remove all standing water to prevent bacterial and mold development. Use wet vacuums, mops, towels, or professional water extraction equipment to eliminate pooled water. Focus on removing moisture from carpets, hardwood floors, drywall, and other porous surfaces. Any materials that cannot be thoroughly cleaned and dried within 48 hours should be carefully discarded to prevent potential mold infestation.
After initial water removal, implement comprehensive moisture control strategies. Use dehumidifiers and air conditioning to reduce indoor humidity levels and improve air circulation. Position fans strategically to enhance drying and prevent moisture buildup in hidden areas. Open windows and doors to promote ventilation when outdoor humidity is lower than indoor levels. Pay special attention to areas prone to moisture accumulation like basements, crawl spaces, and bathrooms.
Professional tip: Monitor humidity levels using a hygrometer and aim to maintain indoor humidity below 50 percent. This critical threshold helps prevent mold spore activation and subsequent growth.
Step 3: Dry and Ventilate All Affected Areas
Drying and ventilating water damaged areas is crucial for preventing mold growth and minimizing long term structural damage. This step requires a systematic approach to removing moisture and promoting air circulation throughout your property.
After removing standing water, use fans and dehumidifiers to dry out the building thoroughly. Focus on creating optimal air movement in affected spaces by positioning fans to maximize cross ventilation. Point fans towards walls and corners where moisture tends to accumulate, ensuring consistent airflow. Pay special attention to hard to reach areas like behind furniture, inside closets, and underneath flooring where hidden moisture can trigger mold development.
Implement targeted ventilation strategies in moisture prone areas like bathrooms, kitchens, and crawl spaces. Use exhaust fans to redirect humid air outside and keep interior spaces dry. Open windows during low humidity periods to enhance natural air circulation. For spaces with limited ventilation, consider using portable dehumidifiers to actively reduce moisture levels. Continue monitoring humidity with a hygrometer and maintain indoor levels below 50 percent to create an environment inhospitable to mold growth.
Professional tip: Rotate and reposition fans every few hours to ensure comprehensive drying and prevent moisture from becoming trapped in specific zones.
Step 4: Clean and Disinfect Surfaces Thoroughly
Cleaning and disinfecting surfaces after water damage is a critical step in preventing mold growth and eliminating potential health hazards. This process requires careful attention to detail and systematic treatment of all affected areas.
After thoroughly drying surfaces, begin a comprehensive cleaning and disinfection protocol. Start by removing any visible dirt or debris using appropriate cleaning solutions designed for different surface types. Use separate clean cloths or disposable wipes for each area to prevent cross contamination. Prioritize porous materials like drywall, carpets, and wooden surfaces that are more susceptible to microbial growth.
Implement a regular cleaning routine for moisture prone areas to prevent bacterial and mold buildup. Choose EPA registered disinfectants specifically formulated to kill mold spores and bacteria. Apply disinfectants using a spray bottle or cloth, ensuring complete surface coverage. Allow sufficient contact time as specified on the product instructions. For non porous surfaces like tiles and glass, use stronger antimicrobial solutions. Remember to wear protective gloves and ensure proper ventilation during the cleaning process.
Professional tip: Color code your cleaning materials to prevent cross contamination between different surface types and rooms.
Step 5: Inspect for Hidden Moisture and Mold Growth
Inspecting for hidden moisture and mold is a critical defense against potential long term property damage and health risks. This comprehensive examination requires careful scrutiny of both visible and concealed areas throughout your property.
Use specialized moisture detection tools to identify dampness in walls, floors, and other structural elements. Invest in a professional grade moisture meter to accurately measure water content in different materials. Pay close attention to areas that are prone to moisture retention such as baseboards, wall cavities, under carpets, and around windows and doors. Look for subtle indicators like discoloration, soft or warped surfaces, musty odors, and slight color variations that might signal underlying moisture problems.
Conduct a thorough post cleaning inspection to ensure complete moisture removal and prevent potential mold development. Check behind furniture, inside closets, underneath flooring, and in less accessible spaces like crawl spaces and attics. Use a bright flashlight to illuminate dark corners and examine surfaces carefully. Watch for early mold signs including small dark spots, fuzzy growth, or color changes on surfaces. Document any suspicious areas with photographs for potential professional assessment.
Professional tip: Wear protective gloves and a respiratory mask during your inspection to minimize exposure to potential mold spores and protect your personal health.
The table below summarizes the five crucial steps for controlling mold after water damage:
| Step | Main Goal | Example Action |
|---|---|---|
| Identify and Stop Water Sources | Prevent further water intrusion | Shut off main valve |
| Remove Standing Water/Moisture | Reduce spread of contaminants | Extract water from carpets |
| Dry and Ventilate | Eliminate residual moisture | Use fans and dehumidifiers |
| Clean and Disinfect Thoroughly | Prevent bacteria/mold regrowth | Apply EPA-approved disinfectant |
| Inspect for Hidden Moisture/Mold | Safeguard against hidden problems | Check under flooring/behind walls |
Here’s a quick reference for key tools recommended throughout water damage remediation:
| Tool | Purpose | Best Use Scenario |
|---|---|---|
| Flashlight | Detect hidden water and mold | Inspecting dark or tight spaces |
| Moisture Meter | Measure moisture in materials | Checking wall or floor dampness |
| Wet Vacuum | Remove large volumes of water | Eliminating pooled water |
| Dehumidifier | Lower indoor humidity | Drying out air post-cleanup |
| Hygrometer | Track indoor humidity level | Monitoring during and after drying |
| Protective Gloves | Shield hands from contaminants | Cleaning or inspection activities |
| Respirator Mask | Prevent inhaling mold spores | Inspecting or cleaning mold areas |
Protect Your Home From Hidden Mold Risks With Professional Help
Water leaks can cause unseen damage that leads to dangerous mold growth if not addressed quickly and thoroughly. From identifying and stopping water sources to fully drying, disinfecting, and inspecting your property, each step is critical to safeguard your health and your home. Handling these challenges alone can be overwhelming and risky.
Trust the experts at PuroClean of Northeast Sacramento to provide fast, certified water damage restoration and mold remediation services. Their 24/7 response team uses advanced technology and proven processes to stop leaks, remove moisture, and restore your property safely. Don’t wait until mold causes long-term problems or health hazards. Visit PuroClean of Northeast Sacramento now to get expert help immediately and protect your home from hidden damage.
Learn more about: Water Damage Restoration and how professional drying and cleaning can prevent mold after leaks.
Frequently Asked Questions
How can I identify leaks in my property after water damage?
To identify leaks, check your water meter while all water appliances are off. If the meter shows usage, investigate common areas like toilets, faucets, and pipe connections for visible moisture or stains.
What should I do to remove standing water from my home?
Promptly remove standing water by using a wet vacuum, mop, or towels. Focus on getting rid of pooled water within the first 24 hours to minimize the risk of mold growth.
How can I effectively dry and ventilate affected areas?
To dry and ventilate affected areas, use fans and dehumidifiers to improve air circulation. Aim to maintain indoor humidity levels below 50% to create an environment that is less conducive to mold growth.
What cleaning solutions should I use to disinfect surfaces after water damage?
Use EPA-registered disinfectants that are designed to kill mold spores and bacteria on various surfaces. Apply these solutions to all cleaned areas, allowing sufficient contact time as specified in the product instructions.
How can I check for hidden moisture and mold after conducting repairs?
Use a moisture meter to check for dampness in areas like walls, floors, and behind furniture. Regularly inspect for signs of mold, such as discoloration or a musty smell, especially in spaces prone to moisture accumulation.
What actions can I take to prevent mold growth in moisture-prone areas?
Implement regular cleaning routines and maintain good ventilation in areas like bathrooms and kitchens. Keep humidity levels below 50% and consider using dehumidifiers to reduce moisture buildup.
Recommended
- Home Mold Remediation: 10 Essential Tips to Prevent Mold Recurrence – PuroClean of Coral Gables
- Strategies to Prevent Mold Growth after Water Damage
- What to Do If Your Attic Has Mold from Roof Leaks, 5 Effective Restoration Tips for Homeowners – PuroClean Disaster Restoration
- 11 Steps To Take After Flooding: How To Begin And Ensure You Ace The Flood Restoration Process
