Remove Mold From Drywall Safely – Proven Expert Guide
Table of Contents
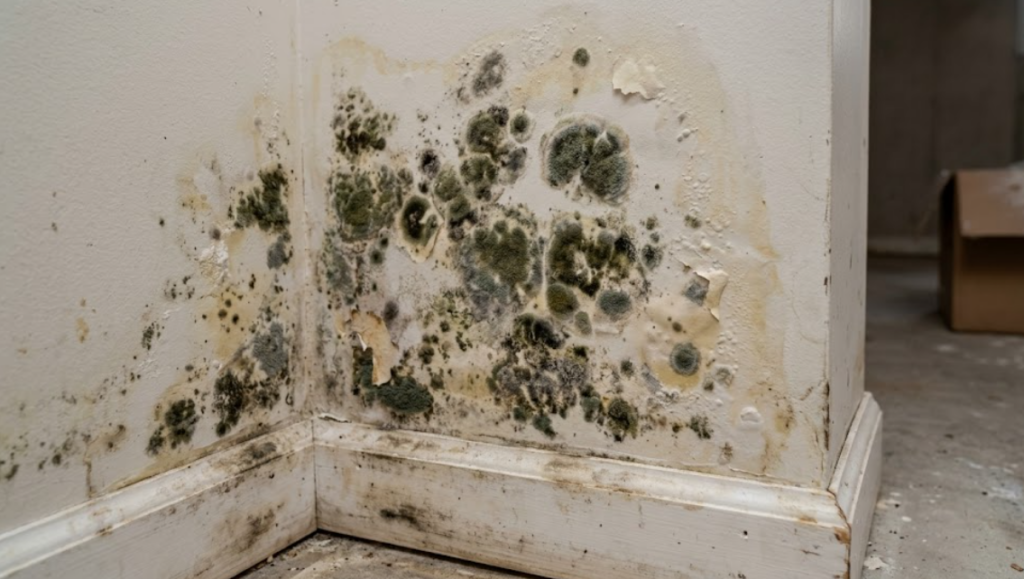
Mold on drywall is one of the most alarming discoveries a homeowner can make, and it is far more common than most people expect. Drywall is a highly porous material that absorbs moisture readily, and once mold establishes itself within the gypsum core or the paper facing, removing it safely and completely is a genuinely challenging task.
In a city like Tacoma, Washington, where elevated humidity and frequent rainfall create persistently damp conditions, the question of how to remove mold from drywall comes up regularly – and the stakes are high when the answer is handled incorrectly.
This comprehensive guide covers everything you need to know about how to remove mold from drywall: what causes it, how to assess whether removal or replacement is the right approach, the safety measures required, the step-by-step process professional restorers follow, and when the job is simply too large or too hazardous for a DIY approach. Whether you are dealing with a small isolated patch or a more extensive infestation after a water damage event, this guide provides the expert-level information you need to protect your home and your health.
Understanding Why Mold Grows on Drywall in the First Place
Before you can effectively remove mold from drywall, it helps to understand precisely why drywall is so vulnerable to mold in the first place. Standard drywall is composed of a gypsum plaster core faced on both sides with paper. That paper facing is an organic material, and organic materials are exactly what mold needs to feed and grow. Combine an organic food source with the moisture drywall readily absorbs from leaks, condensation, humidity, or flooding, and you have created conditions where mold does not just grow – it thrives.
According to the Environmental Protection Agency, mold can begin colonizing a wet surface in as little as 24 to 48 hours under the right conditions. In Tacoma’s climate, where relative humidity is elevated for much of the year and temperatures remain mild, that window can be even shorter. A single plumbing leak, a roof intrusion, a dishwasher overflow, or prolonged condensation on an exterior wall can provide all the moisture mold needs to take hold in your drywall.
It is also worth understanding that mold growth on the visible surface of drywall is frequently the tip of the iceberg. Mold spores that penetrate the paper facing can colonize the gypsum core and, in cases where moisture has persisted, extend through the drywall into the wall cavity behind it. This is why surface-only cleaning approaches so often fail – they address what you can see while leaving an established mold colony growing out of sight.
Assessing the Mold: When You Can Remove Mold From Drywall and When You Cannot
The most important decision in any mold situation is whether the affected drywall can be cleaned and treated, or whether it must be removed and replaced entirely. Getting this assessment right is foundational to a successful outcome.
Small, Surface-Level Mold Patches That May Be Treatable
In limited circumstances, it is appropriate to attempt to remove mold from drywall rather than replace it. The EPA generally considers mold patches smaller than ten square feet – roughly three feet by three feet – as potentially manageable without professional remediation, provided the underlying moisture source has been fully identified and corrected, the drywall is otherwise structurally sound, the mold has not penetrated through the surface, and the affected individual has no respiratory conditions or mold sensitivities.
Even in these cases, the process must be followed carefully, with proper personal protective equipment and appropriate containment measures to prevent spore spread during the cleaning process.
When Drywall Must Be Replaced Rather Than Cleaned
There are clear situations where attempting to remove mold from drywall through cleaning is simply not appropriate, and replacement is the only professionally sound approach. Replace drywall rather than attempting to clean it when the mold-affected area exceeds ten square feet in total, when the drywall has been wet for an extended period and has lost structural integrity, when the mold has visibly penetrated through the paper facing into the gypsum core, when the drywall is soft, crumbling, or shows signs of deterioration, when musty odors persist after cleaning attempts, or when the mold is located within wall cavities rather than only on the surface.
In Tacoma, where many homes have experienced repeated moisture intrusion events due to the region’s weather patterns, drywall that has been wetted multiple times often falls into the replacement category even if the visible mold patch appears small. Repeated wetting and partial drying cycles cause cumulative deterioration of the drywall’s structural integrity and create persistent moisture reservoirs within the gypsum core that surface cleaning cannot address.
Safety First – Essential Precautions Before You Remove Mold From Drywall
Attempting to remove mold from drywall without adequate safety precautions exposes you to a significant concentration of mold spores. When mold colonies are disturbed during cleaning or removal, they release spores into the air in large numbers.
Inhaling these spores can cause respiratory irritation, allergic reactions, and more serious health effects in sensitive individuals. The Centers for Disease Control and Prevention recommends that anyone with asthma, allergies, or compromised immune function avoid mold remediation work entirely and leave it to professionals.
For those proceeding with a small, contained mold cleaning project, the following safety measures are non-negotiable.
Personal Protective Equipment
At minimum, wear an N-95 respirator mask – not a standard dust mask, which does not filter mold spores adequately. Wear non-porous gloves, safety goggles that seal against the face, and clothing that covers your arms and legs fully. Bag and dispose of the clothing you wear during mold cleaning, or wash it immediately in hot water.
Containing the Work Area
Before disturbing any mold, seal off the work area from the rest of the home using polyethylene sheeting over doorways and HVAC vents. This prevents spores released during cleaning from spreading to unaffected rooms. Close all windows and doors in the work area, and turn off your HVAC system to prevent it from circulating spores throughout the home.
Ventilation and Air Filtration
Place a box fan in a window pointing outward to create negative pressure in the work area, drawing air out rather than circulating it into the rest of the home. If available, run a HEPA air purifier in the work area throughout the cleaning process and for several hours afterward to capture airborne spores.
The Step-by-Step Process to Remove Mold From Drywall
Professional mold remediation technicians follow a systematic process when they remove mold from drywall. The following steps reflect best practices that apply to small, surface-level mold situations where cleaning rather than replacement has been determined appropriate.
Step One – Fix the Moisture Source First
This step is non-negotiable and must happen before any cleaning begins. If you remove mold from drywall without eliminating the moisture source, mold will return within weeks or even days. Identify and repair the leak, condensation issue, or other source of moisture that caused the mold to grow. Verify with a moisture meter that the drywall and surrounding materials have returned to acceptable moisture levels – typically below 16 percent for drywall – before proceeding.
Step Two – Prepare the Cleaning Solution
Several cleaning solutions are effective for removing surface mold from drywall when used correctly. A solution of one cup of household bleach per gallon of water is one of the most common approaches for non-porous and semi-porous surfaces. However, it is important to note that bleach does not penetrate deeply into porous materials, which is one reason why it is only appropriate for surface-level mold on otherwise sound drywall. Commercially available mold-specific cleaners formulated for porous surfaces may offer better penetration and residual protection.
Do not mix bleach with ammonia or any other household cleaner. This combination produces toxic chloramine gases that pose a serious inhalation risk.
Step Three – Apply the Solution and Scrub Gently
Apply your cleaning solution to the mold-affected area using a sponge or soft brush. Work gently – aggressive scrubbing disturbs the mold colony and releases more spores into the air. Allow the solution to penetrate for ten to fifteen minutes before scrubbing lightly. Wipe away the cleaned material with a clean cloth and repeat as needed. Avoid soaking the drywall – adding excessive moisture during the cleaning process can spread the problem or weaken the drywall further.
Step Four – Dry the Area Completely and Immediately
After cleaning, the treated area must be dried as quickly and completely as possible. Use fans, dehumidifiers, and if available, a heater to accelerate drying. In Tacoma’s humid climate, drying drywall after any moisture application requires deliberate effort. Failing to dry the area completely after treatment creates ideal conditions for mold to return within days.
Step Five – Apply an Encapsulating Primer Sealer
Once the treated area is fully dry, apply a shellac-based or pigmented oil-based encapsulating primer to the affected surface. This type of sealer locks in any residual mold spores, prevents odors from re-emerging, and provides a sound base for repainting. Standard latex primers do not have the same sealing properties and are not appropriate for post-mold treatment applications.
Step Six – Monitor and Verify
After completing the treatment, monitor the area over the following weeks for any signs of mold recurrence. Check the moisture levels in the treated drywall periodically. If mold returns, or if odors persist after treatment, the drywall has likely been colonized more deeply than surface cleaning can address, and professional assessment for possible replacement is warranted.
Mold Behind Drywall – The Hidden Problem That Surface Cleaning Cannot Solve
One of the most important things to understand about drywall mold in Tacoma homes is that what you see on the surface is often a fraction of the total mold present. Mold that appears as a patch on an interior wall surface has frequently established a much larger colony in the wall cavity behind the drywall, growing on the back face of the drywall, on the wall framing, on any insulation present, and on other organic materials within the cavity.
Professional restoration companies use thermal imaging cameras and moisture meters to detect hidden moisture and mold behind drywall without requiring destructive investigation in every area. When elevated moisture readings or thermal anomalies suggest hidden mold, controlled removal of a small section of drywall allows visual inspection of the cavity. If significant mold is found in the cavity, comprehensive remediation – including removal of all affected drywall, insulation, and treatment of framing – is required regardless of how limited the surface mold appeared.
When to Call a Professional to Remove Mold From Drywall in Tacoma
There are clear thresholds at which a DIY approach to removing mold from drywall is no longer appropriate and professional remediation is required. Call a certified mold remediation professional when the total affected area exceeds ten square feet, when mold is present in multiple rooms or on multiple walls, when mold is located in the HVAC system or has been distributed through ductwork, when the mold followed a significant water damage event such as flooding or a major plumbing failure, when occupants are experiencing health symptoms potentially related to mold exposure, or when mold returns after cleaning attempts.
According to the Insurance Information Institute, mold-related claims average over $15,000 nationally and can reach significantly higher figures in the Pacific Northwest market where labor costs are elevated and the scope of mold damage tends to be larger due to the climate. Professional remediation, though a real investment, is substantially less expensive than attempting DIY treatment that fails and allows the mold colony to expand further into the structure.
Mold Prevention – Keeping Drywall Mold-Free in Tacoma’s Climate
After successfully removing mold from drywall, prevention is the priority. Tacoma’s climate means that humidity management is an ongoing concern rather than a seasonal one. Maintain indoor relative humidity below 50 percent year-round using dehumidifiers in moisture-prone areas like basements, bathrooms, and laundry rooms.
Ensure bathroom exhaust fans vent fully to the exterior and run them during and for at least 20 minutes after every shower. Inspect plumbing under sinks and behind appliances twice a year. Address any roof or window leaks immediately after storms. Check attic ventilation annually to ensure moisture is not accumulating in the roof cavity.
Installing a whole-home ventilation system or upgrading to a higher-capacity dehumidifier in persistently damp areas of your Tacoma home can dramatically reduce the conditions that allow mold to take hold in the first place. These preventive investments are far less costly than repeated mold remediation.
Remove Mold From Drywall Correctly or Pay a Much Higher Price Later
Knowing how to remove mold from drywall safely and completely is essential knowledge for any Tacoma homeowner. Done correctly, with proper safety precautions, thorough moisture elimination, appropriate cleaning solutions, and complete post-treatment drying and sealing, surface mold on sound drywall can be addressed effectively. But done incorrectly – rushing the process, skipping the moisture fix, using inadequate cleaning solutions, or missing hidden mold behind the surface – the problem almost always gets worse, not better.
If you have discovered mold in your Tacoma home and are not certain of the full extent of the problem, do not guess. Call PuroClean of Northeast Tacoma at (206) 929-0155. Their certified mold remediation specialists use advanced detection equipment to map every area of mold growth – visible and hidden – and provide complete, safe remediation that eliminates the problem rather than masking it. They work with your insurance company and stand behind their work. Call PuroClean of Northeast Tacoma today and get expert help you can trust.
