Why Mold Under Your Bathroom is a Big Deal
When you notice mold under your bathroom especially on the ceiling below it’s not just a cosmetic issue. Mold can spread quickly, damage your home’s structure, and pose health risks to you and your family.
Recently, a returning customer called us after spotting black marks on their kitchen ceiling, right below an upstairs bathroom. A quick home test confirmed the worst: the marks were mold, and they began developing a fuzzy white texture a sure sign that the mold was actively growing.
In this blog, we’ll share the entire story how to fix mold under bathroom leak, the mold remediation process explained step-by-step, and practical tips for preventing mold in your home.
The Customer’s Story: From Leak to Mold Under Bathroom
Our customer noticed discolored spots forming on the kitchen ceiling. Over time, these spots became darker, and patches of fuzzy white mold appeared. This was directly under an upstairs bathroom a red flag for a possible water leak.
To confirm their suspicions, the homeowner used a home mold test kit. The results came back positive.
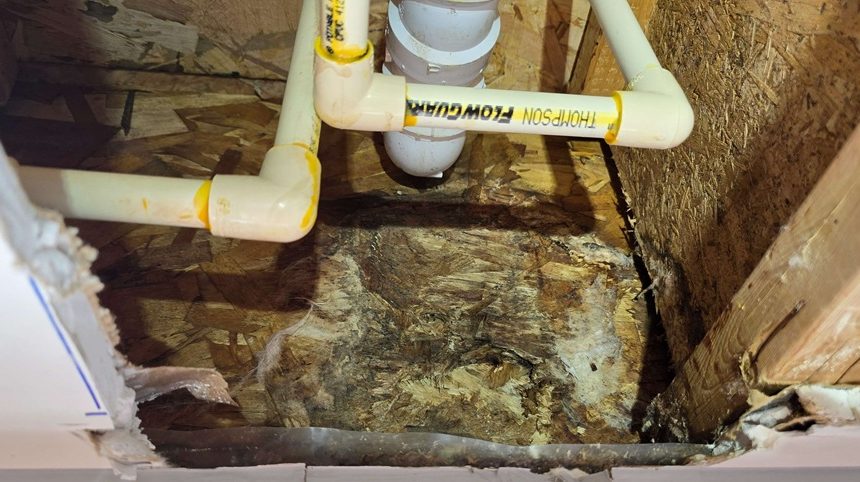
A plumber was called, and the inspection revealed the cause: a cracked PVC pipe in the bathroom’s plumbing. Moisture had seeped into the ceiling below, creating the perfect environment for mold.
The plumber:
- Replaced the cracked PVC pipe.
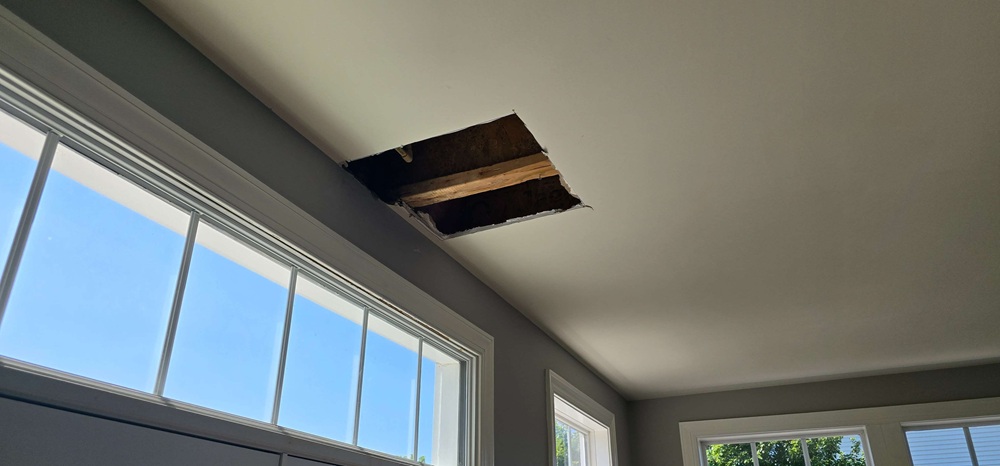
- Cut out approximately a 2×2-foot section of mold-infested drywall.
- Stopped the active leak.
With the source of moisture fixed, it was time to focus on remediation.
Fixing the Source: How a Leaky Pipe Causes Mold Under Bathroom
Leaky pipes and mold go hand in hand. Here’s why:
- Moisture + Organic Material + Poor Ventilation = Mold Growth
Drywall, wood framing, and even dust can feed mold spores once they get wet. - Bathrooms Are Mold Hotspots
High humidity, frequent water use, and hidden plumbing make bathrooms ideal environments for mold growth. - Rapid Growth Timeline
Mold can start forming within 24–48 hours of water exposure.
Stopping the leak is always the first step in the mold remediation process. Without addressing the source, even the most thorough cleanup will fail.
The Mold Remediation Process Explained
Every effective mold cleanup follows a systematic process. Here’s how it typically works:
1. Inspection & Assessment
A thorough visual check is done to locate all mold growth and water damage. Moisture meters or thermal imaging can detect hidden damp spots.
2. Containment
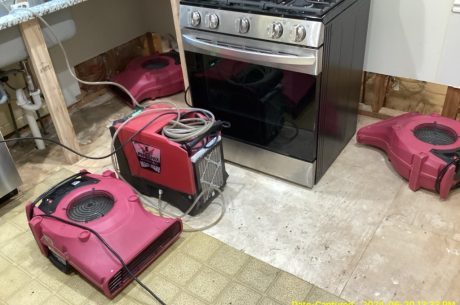
The affected area is sealed with plastic sheeting to prevent spores from spreading. Negative air pressure or HEPA filtration keeps the rest of the home safe.
3. Air Filtration
HEPA air scrubbers and vacuums are used to capture airborne spores during the cleanup process.
4. Removal of Mold-Infested Materials
Porous materials like moldy drywall are removed and safely disposed of. In this case, the plumber removed the visibly damaged drywall.
5. Cleaning & Disinfecting
Remaining surfaces are scrubbed with antimicrobial solutions to kill mold and prevent regrowth.
6. Drying the Area
Industrial dehumidifiers and fans are used to remove all moisture. This is critical to prevent the mold from returning.
7. Restoration
Drywall is replaced, surfaces are repainted, and the affected area is restored to its original condition.
Step-by-Step: How This Case Was Resolved
Here’s how we applied the remediation process to this specific case:
Step 1 – Detection:
The homeowner spotted the mold, tested it, and confirmed its presence.
Step 2 – Stop the Leak:
A plumber replaced the cracked PVC pipe and eliminated the source of water.
Step 3 – Remove Damaged Drywall:
A 2×2-foot section was cut out to physically remove the majority of visible mold.
Step 4 – Dry the Area Thoroughly:
High-velocity fans and dehumidifiers dried the surrounding materials.
Step 5 – Clean & Disinfect:
Remaining surfaces were treated with antifungal cleaning solutions to prevent regrowth.
Step 6 – Repair:
The ceiling section will be replaced, sealed, and repainted.
Step 7 – Monitor for Recurrence:
Regular inspections ensure the problem doesn’t return.
DIY vs Professional Mold Remediation
While small mold patches (less than 10 square feet) can sometimes be handled by homeowners, mold under a bathroom leak often requires professionals.
DIY Cleaning Options:
- White vinegar or hydrogen peroxide
- Protective gear (N95 mask, gloves)
- Immediate drying after cleaning
Professional Benefits:
- Complete containment to prevent spread
- Industrial drying equipment
- Ability to find hidden mold in walls or ceilings
- Safer for households with children, elderly, or immune-compromised individuals
Tips for Homeowners: Preventing Mold Under Bathroom
- Fix leaks fast: Even a slow drip can fuel mold growth.
- Control humidity: Keep it under 60% with a dehumidifier.
- Improve ventilation: Use exhaust fans in bathrooms during and after showers.
- Inspect regularly: Check ceilings under bathrooms and areas near plumbing.
- Use mold-resistant materials: When repairing, opt for mold-resistant drywall or paint.
When to Call the Professionals
You should call a mold remediation expert if:
- The mold covers more than 10 sq ft.
- People in the home have mold-related allergies or respiratory issues.
- The leak went undetected for more than 48 hours.
- You suspect hidden mold inside walls or floors.
FAQs About Mold Under Your Bathroom
Q1: How quickly can mold grow after a bathroom leak?
Within 24–48 hours of water exposure.
Q2: Can I just paint over mold?
No. Mold must be removed, surfaces cleaned, and dried before painting.
Q3: What cleaning solution works best for small mold patches?
White vinegar or hydrogen peroxide are effective for non-porous surfaces.
Q4: How do professionals remove mold safely?
By sealing the area, using HEPA filtration, removing affected materials, and cleaning with antimicrobial solutions.
Q5: Does insurance cover mold remediation after a leak?
Often yes for sudden plumbing failures, but not for long-term leaks or neglect.