Table of Contents
You’ve noticed something off. Maybe there’s a musty smell near the bathroom that won’t go away despite cleaning. Perhaps the floor feels slightly different when you walk across it, softer, almost spongy in certain spots. Or maybe a neighbor just spent $12,000 on mold remediation and now you’re wondering about your own home.
The question keeping you up at night: how do you check for mold under flooring before it becomes a catastrophic problem?
Here’s what most homeowners don’t realize: by the time visible mold appears on walls or you see obvious floor damage, extensive colonization has already occurred beneath your flooring for weeks or months. Professional remediation at that stage costs $5,000-$15,000 or more, requiring complete floor removal and subfloor treatment.
But if you catch it early, when it’s still just suspicious symptoms, you might prevent the problem entirely or address it before costs spiral out of control.
Learning how to check for mold under flooring using simple DIY detection methods combined with understanding when professional assessment becomes essential protects your Santa Rosa Beach home and your wallet from the devastating costs of late discovery.
Method #1: The Soft Spot Test (Your First Line of Defense)
The soft spot test is the simplest and most revealing way to check for mold under flooring without any equipment. Soft, soggy subflooring indicates moisture issues that often lead directly to mold growth.
How to perform the soft spot test:
Walk slowly across your floors in stocking feet, paying special attention to areas near bathrooms, kitchens, exterior walls, and anywhere water exposure occurs. Press gently with your foot, feeling for areas that feel different—softer, spongier, or that give slightly under pressure.
Normal, healthy flooring feels uniformly firm. If you find soft spots, you’ve discovered evidence of moisture penetration into subflooring. This moisture creates perfect conditions for mold growth beneath your flooring.
Mark any soft spots you discover with painter’s tape for reference. These areas require closer inspection using additional detection methods.
Warning signs during the soft spot test:
- Floor bounces or flexes more than surrounding areas
- Distinct soft or spongy feeling compared to adjacent flooring
- Creaking or cracking sounds when walking on suspected areas
- Visible warping, cupping, or buckling near soft spots
The soft spot test alone won’t confirm mold presence, but it’s your most important early indicator that moisture has compromised your flooring, and where there’s persistent moisture, mold follows within 24-48 hours.
Method #2: The Smell Test (Your Nose Knows Mold)
A musty odor indicates the presence of mold. This distinctive smell often appears before any visible signs of contamination.
When you check for mold under flooring using smell, you’re detecting volatile organic compounds (VOCs) that mold releases as it grows. The Environmental Protection Agency identifies musty or earthy odors as primary indicators of hidden mold contamination.
How to conduct the smell test:
Get down close to your floors, particularly in suspected problem areas. Smell along baseboards, in corners, and near any soft spots you’ve identified. Pay special attention to enclosed spaces like closets where odors concentrate.
The mold smell is distinctive: earthy, musty, similar to damp soil or rotting wood. It’s different from general “old house” smell or normal humidity odors. If you detect it consistently in specific areas, especially near bathrooms or kitchens, you’re likely detecting mold growth beneath flooring.
Critical smell test locations:
- Underneath sinks and around toilets
- Near dishwashers and washing machines
- Along exterior walls, especially in bathrooms
- In closets with exterior walls
- Around HVAC vents and returns
If musty odors persist despite thorough surface cleaning, the source is likely hidden—beneath flooring, inside walls, or in subflooring where surface cleaning cannot reach it.
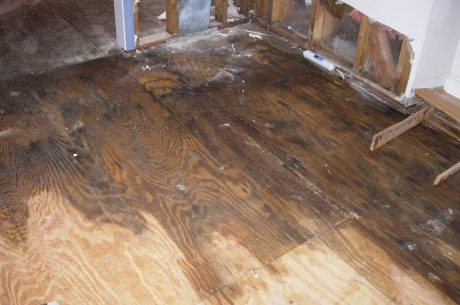
Method #3: Visual Inspection for Discoloration and Staining
The third way to check for mold under flooring involves careful visual examination of floor surfaces and edges. To check for mold under flooring, carefully lift a small section of the floor covering to inspect the subfloor for dampness or discoloration.
What to look for during visual inspection:
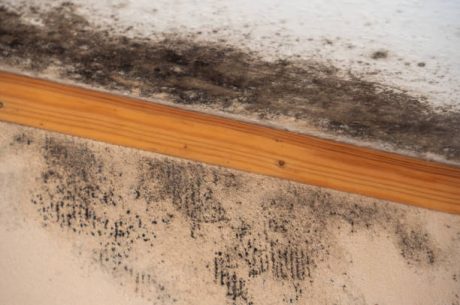
Baseboards and floor edges: Dark staining, discoloration, or fuzzy growth where floors meet walls indicates moisture wicking upward from contaminated subflooring.
Floor surfaces: Warping, cupping (edges higher than centers), crowning (centers higher than edges), or buckling all signal moisture penetration potentially accompanied by mold growth.
Transitions and seams: Gaps opening between floor planks, lifting edges, or visible moisture stains around seams show water has penetrated beneath flooring.
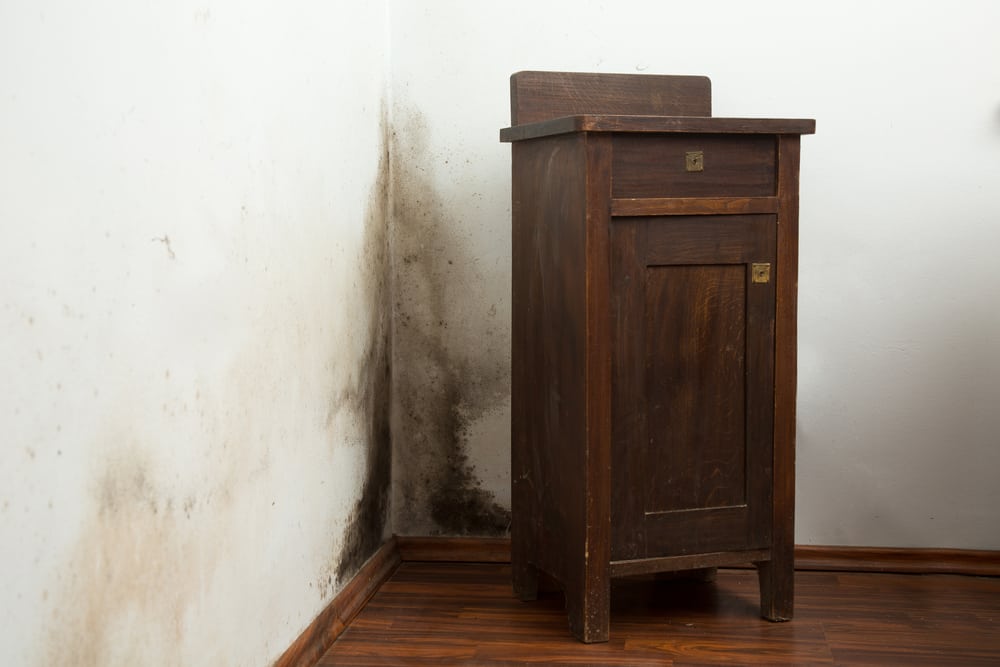
Door frames and trim: Visible mold growth on door frames near flooring suggests moisture and mold problems extending beneath floors.
For homes with removable flooring materials like carpet or vinyl planks, you can conduct more direct inspection. Carefully lift a corner in a suspected problem area and examine the underside and subfloor for dampness, discoloration, or visible mold growth.
Safety warning: If you see extensive visible mold when lifting flooring, do not disturb it further. Disturbing large mold colonies without proper containment spreads spores throughout your home. This is when you stop DIY inspection and call professionals.
Method #4: Using a Moisture Meter to Check for Mold Under Flooring
Use a moisture meter to detect hidden wet areas beneath flooring surfaces. This tool provides objective data confirming whether moisture levels support mold growth.
Moisture meters come in two types, and understanding both helps you check for mold under flooring effectively:
Pinless Moisture Meters:
A pinless moisture meter is non-invasive, made for taking quick measurements to locate moisture using radio frequencies. These meters scan surfaces without causing damage, making them perfect for finished floors.
Simply press the meter against your floor in suspected problem areas. Elevated readings indicate moisture beneath the surface. A pinless moisture meter can detect elevated moisture levels without damaging the surface material, inspect a large area in a short amount of time, and help identify areas that may be at risk for microbial growth.
Pin-Type Moisture Meters:
Pin-type meters provide quantitative readings, measuring actual moisture content within a material by gauging electrical resistance between pins. These meters require penetrating the flooring surface with metal pins, so they’re more appropriate for subflooring inspection when flooring is partially removed.
How to use moisture meters:
Scan systematically across floors, taking readings every few feet. Normal wood flooring registers 6-12% moisture content. Readings above 16% indicate conditions supporting mold growth. Concrete should read below 4%.
Create a simple moisture map by marking high readings with painter’s tape. Patterns of elevated moisture reveal extent of contamination and help professionals develop remediation plans.
Consumer-grade moisture meters cost $30-100 and provide valuable screening data. Professional-grade meters ($200-500) offer greater accuracy but aren’t necessary for basic detection.
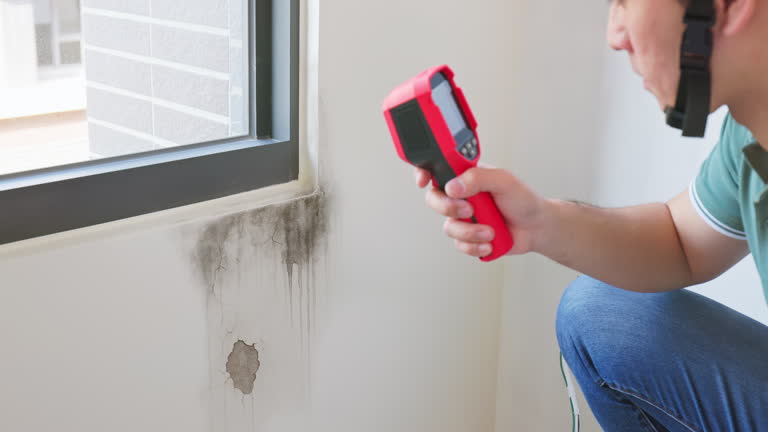
Method #5: The Thermal Imaging Approach
Infrared cameras detect temperature differences in building materials, when moisture is present, it affects thermal properties, causing materials to retain or release heat differently from dry areas.
While thermal imaging cameras are expensive ($500-$5,000), some hardware stores rent them, or you might use a smartphone thermal imaging attachment ($200-300) to check for mold under flooring using temperature differentials.
How thermal imaging reveals hidden mold:
Thermal patterns created by latent moisture become readily apparent when viewed through an IR camera—water intrusion and excessive moisture appears as cooler spots (dark areas) on thermal images.
Scan your floors systematically with the thermal camera. Cooler areas indicate potential moisture accumulation beneath flooring. Once a potential moisture problem is found using thermal imaging, it can be checked more closely using a moisture meter or taking samples to confirm mold is present.
Advantages of thermal imaging:
Non-invasive detection without tearing down walls or removing flooring, early detection of water leaks hidden within walls or under flooring, and identifying moisture sources like condensation or inadequate ventilation.
The combination of thermal imaging to locate problem areas followed by moisture meter confirmation provides the most comprehensive DIY assessment possible when you check for mold under flooring.
Method #6: Monitoring Humidity Levels
Relative humidity levels of 60% or greater create an environment conducive to mold growth. Understanding your home’s humidity patterns helps predict where mold under flooring might develop.
Using hygrometers to check for mold risk:
Digital hygrometers ($15-50) measure indoor humidity. Place them in rooms where you suspect mold under flooring: particularly bathrooms, kitchens, and basements.
Monitor readings over several days. Consistent humidity above 60% indicates conditions supporting mold growth. Even if you don’t currently have mold, these conditions guarantee it will develop once moisture penetrates flooring.
High-risk humidity patterns:
- Bathroom humidity exceeding 70% for hours after showers
- Basement humidity consistently above 60%
- Kitchen humidity spikes during cooking without adequate ventilation
- Bedroom humidity above 55% overnight
High humidity doesn’t cause mold directly, but it ensures any moisture that does penetrate your flooring will rapidly support colonization rather than drying out naturally.
Method #7: Professional Inspection with Advanced Technology
While the previous six methods help homeowners check for mold under flooring independently, professional inspection provides definitive answers using equipment and expertise beyond DIY capabilities.
What professional inspection includes:
By employing thermal imaging and a moisture meter, inspectors can locate moisture issues before they become large problems and lead to serious damage. Professionals use commercial-grade equipment providing accuracy impossible with consumer tools.
Professional moisture mapping creates detailed visual presentations of moisture content levels within specified areas, revealing both known and unknown trouble spots and showing scale of moisture issues. This data guides targeted remediation rather than guesswork.
Advanced professional detection methods:
Inspectors start with thermal imaging cameras detecting surface temperature differences in real time, follow up with pinless moisture meters confirming moisture presence without damage, then verify findings with pin-type moisture meters measuring exact moisture content inside materials.
Air quality testing identifies mold spore counts even when no visible growth appears. Elevated spore counts confirm active mold colonization requiring remediation.
When to stop DIY and call professionals:
- Your DIY tests indicate moisture problems or possible mold
- You smell persistent musty odors despite thorough cleaning
- Family members experience unexplained respiratory issues or allergies worsening at home
- You’ve discovered soft spots or visible water damage
- You’re buying or selling a home and need documentation
- Previous water damage occurred and you want verification of complete drying
Professional inspection costs $300-800 but provides comprehensive assessment preventing $10,000+ remediation expenses through early detection and targeted treatment.
Understanding the 24-48 Hour Mold Growth Window
Why does early detection matter so critically when you check for mold under flooring? Because mold colonization happens rapidly once moisture appears.
Within 24-48 hours of moisture exposure, mold spores begin germinating on suitable surfaces. By 3-12 days, visible growth appears with discoloration and musty odors. At 2-3 weeks, mold growth becomes extensive and penetrates deeply into materials, making remediation significantly harder and more expensive.
This timeline means every day of delay after moisture penetrates your flooring increases damage exponentially. The difference between catching moisture in the first week versus the third week can mean $2,000 versus $10,000 in remediation costs.
The Financial Impact of Early vs. Late Detection
Understanding costs helps explain why learning to check for mold under flooring using these seven methods protects your finances dramatically:
Early detection (soft spots, smell, slight discoloration):
- Professional assessment: $300-800
- Targeted treatment of small affected area: $500-2,000
- Possible floor saving with aggressive drying: $1,000-3,000
- Total cost: $1,800-$5,800
Late detection (extensive visible mold, structural damage):
- Professional assessment: $300-800
- Complete floor removal: $2,000-$5,000
- Subfloor mold remediation: $3,000-$8,000
- Subfloor replacement: $2,000-$5,000
- New flooring installation: $4,000-$12,000
- Total cost: $11,300-$30,800
Early detection through DIY screening followed by immediate professional response saves $9,500-$25,000 on average. Those savings more than justify the time spent learning to check for mold under flooring properly.
Common Mistakes When Checking for Mold Under Flooring
Mistake #1: Waiting for Visible Mold
By the time mold becomes visible on surfaces, extensive colonization has occurred beneath flooring for weeks or months. Don’t wait for obvious signs—use detection methods identifying moisture problems before visible growth appears.
Mistake #2: Ignoring Musty Odors
Many homeowners dismiss persistent musty smells as “normal” for older homes or humid climates. Musty odors always indicate mold growth somewhere. Find the source before damage becomes extensive.
Mistake #3: DIY Remediation Without Proper Assessment
Discovering a small mold area and immediately attempting cleanup without determining extent of contamination often spreads spores throughout your home while leaving the majority of mold untouched beneath flooring.
Mistake #4: Not Addressing Moisture Sources
Even if you successfully treat existing mold, failure to identify and fix moisture sources guarantees recurrence. Professional assessment determines why moisture penetrated your flooring, preventing repeat problems.
Frequently Asked Questions
How often should I check for mold under flooring?
Conduct basic screening (smell test, soft spot test, visual inspection) quarterly in high-risk areas like bathrooms and kitchens. After any water event—leaks, flooding, or significant spills—check immediately and continue monitoring weekly for a month. Annual professional moisture assessment provides additional peace of mind in humid climates like Santa Rosa Beach.
Can I check for mold under flooring without removing it?
Yes. Six of the seven detection methods work without removing flooring: soft spot test, smell test, visual inspection of edges, moisture meters, thermal imaging, and humidity monitoring all detect problems through finished floors. Only direct visual inspection requires partially lifting flooring, and even this can be done minimally at transitions or corners.
What moisture meter reading indicates mold risk under flooring?
For wood flooring and subflooring, readings above 16% indicate moisture levels supporting mold growth. Readings between 12-16% warrant close monitoring. Concrete should read below 4%. Normal, healthy wood flooring measures 6-12% moisture content. Any reading significantly higher than adjacent areas suggests moisture intrusion.
Is the soft spot test reliable for detecting mold?
The soft spot test reliably detects moisture damage to subflooring, which strongly correlates with mold growth. While it doesn’t confirm mold presence directly, soft spots indicate water has penetrated deep enough to damage structural materials, the exact conditions where mold thrives. Combine soft spot findings with smell tests and moisture meters for comprehensive assessment.
Should I use a mold test kit from the hardware store?
Surface mold test kits only detect mold on surfaces you swab. They cannot assess mold beneath flooring, in wall cavities, or in subflooring, where the most serious contamination often hides. Professional air quality testing combined with moisture assessment provides far more useful information than DIY surface test kits.
What should I do if I discover mold when checking under flooring?
If you find small areas (less than 10 square feet) of surface mold, EPA guidelines allow careful DIY cleanup with proper protective equipment. However, mold beneath flooring almost always requires professional remediation because you cannot adequately treat subflooring without removing finished floors, proper containment prevents spreading spores during removal, and moisture source identification prevents recurrence.
When DIY Detection Must Become Professional Remediation
Learning to check for mold under flooring using these seven methods empowers homeowners to catch problems early. But detection is only the first step, knowing when to transition from DIY screening to professional remediation protects both your health and your property.
Call professionals immediately if:
- You detect mold covering more than 10 square feet
- Mold growth involves sewage or contaminated water
- HVAC systems show mold (spreading spores throughout home)
- Family members experience health symptoms worsening at home
- Previous water damage wasn’t properly dried
- You’re uncertain about extent of contamination
Professional remediation includes containment preventing spore spread, industrial equipment extracting moisture and drying structures completely, antimicrobial treatments eliminating existing mold, subfloor replacement when materials are too damaged to save, and verification testing confirming successful remediation.
Protecting Your Santa Rosa Beach Home
Santa Rosa Beach’s 70%+ year-round humidity makes learning to check for mold under flooring especially critical. Coastal moisture creates perfect conditions for rapid mold colonization once water penetrates flooring.
Combining DIY detection methods with professional assessment when problems appear provides optimal protection. You catch issues early through regular screening, preventing small problems from becoming catastrophic, and professionals provide expertise and equipment ensuring complete remediation when needed.
Your home is your largest investment. Regular screening using these seven detection methods protects that investment from the devastating costs of late-stage mold discovery.
Professional Mold Detection & Water Damage Restoration
When your efforts to check for mold under flooring reveal concerning signs—soft spots, musty odors, moisture readings, or visual evidence—PuroClean of Santa Rosa Beach provides expert assessment and remediation services designed specifically for coastal properties.
Our IICRC-certified technicians use advanced detection technology identifying the full extent of contamination, not just visible problems. We understand how Santa Rosa Beach’s humid climate creates unique challenges for flooring and subflooring moisture control.
Why Santa Rosa Beach Homeowners Trust PuroClean:
Advanced Detection Equipment: Professional thermal imaging cameras, commercial-grade moisture meters, humidity monitoring systems, and air quality testing provide comprehensive assessment far beyond DIY capabilities.
Complete Moisture Mapping: We create detailed visual presentations showing all moisture issues throughout your property, revealing both obvious and hidden problem areas guiding targeted remediation.
Coastal Climate Expertise: Years of experience with Gulf Coast humidity means we understand moisture patterns, condensation issues, and mold growth specific to beach properties.
Comprehensive Remediation: When detection reveals problems requiring treatment, we provide complete mold remediation including proper containment, industrial drying equipment, antimicrobial treatment, subfloor replacement when necessary, and verification testing confirming successful remediation.
Insurance Coordination: Detailed documentation supports insurance claims while protecting your interests throughout the process.
Prevention Consultation: Beyond addressing existing problems, we help homeowners implement humidity control, moisture barriers, and monitoring systems preventing future mold under flooring.
Don’t wait until soft spots become structural damage or musty odors become visible mold. Whether you need professional assessment confirming your DIY detection findings or comprehensive remediation addressing confirmed contamination, PuroClean provides solutions protecting your Santa Rosa Beach home.
📞 Call PuroClean of Santa Rosa Beach: (850) 399-3380
🌐 Visit: www.puroclean.com/santa-rosa-beach-al
Early detection through proper screening combined with immediate professional response when problems appear saves thousands in remediation costs while protecting your family’s health. Call now for expert assessment that provides definitive answers about mold under your flooring—before it costs you $10,000+.
Available 24/7/365 | Contact Us Online | Google Business Profile | IICRC Certified | Insurance Preferred | Complete Water Damage Remediation Solutions