Table of Contents
How to detect mold under hardwood floors is the critical question Santa Rosa Beach homeowners must answer before hidden subflooring contamination spreads across hundreds of square feet requiring complete hardwood removal and subflooring replacement, because early detection when mold affects only 50-100 square feet costs $4,000-$8,000 for remediation compared to $25,000-$45,000 when delayed discovery allows contamination spreading to 300-500+ square feet affecting multiple rooms.
The Williams family learned the expensive consequences of not knowing how to detect mold under hardwood floors when they finally investigated persistent musty odors they’d dismissed for over a year. By the time they commissioned professional mold inspection, contamination had spread throughout their entire first floor affecting 680 square feet of Brazilian cherry hardwood across living room, dining room, and hallway.
The mold inspector’s findings were devastating: “Extensive Aspergillus and Stachybotrys colonization on subflooring undersides throughout first floor. Moisture content readings 22-28% (safe level below 15%). Air quality testing shows spore concentrations 32 times normal background levels. Based on growth extent, contamination has been developing for 18-24 months. Had homeowners known how to detect mold under hardwood floors using available tools and conducted quarterly inspections, contamination would have been identified at 60-80 square feet requiring $6,000-$10,000 remediation rather than current extent requiring complete first-floor remediation.”
The actual remediation cost: $47,500 including removal of 680 square feet of premium hardwood ($15 per square foot material cost alone = $10,200), complete subflooring replacement throughout first floor, crawl space encapsulation addressing moisture source, HVAC duct decontamination, and new hardwood installation. The project displaced the family for seven weeks.
“We noticed the musty smell eighteen months ago,” Mrs. Williams told me during remediation. “We assumed it was just ‘beach house smell’ and tried air fresheners, carpet cleaning, everything except actually investigating under the floors. If we’d known how to detect mold under hardwood floors using simple moisture meters or air quality tests, we could have found the problem when it was limited to the bathroom area where it started. Instead, our delay cost us an extra $35,000-$40,000 in remediation expenses and forced us out of our home for two months. Learning how to detect mold under hardwood floors early would have saved us a year of breathing contaminated air and tens of thousands of dollars.”
As PuroClean of Santa Rosa Beach’s mold detection specialist with over a decade teaching homeowners how to detect mold under hardwood floors throughout the 30A corridor, I’ve seen this pattern repeatedly: families suffering health symptoms and facing massive remediation bills because they didn’t understand that simple, affordable detection tools and techniques could have identified problems when remediation was still manageable and affordable.
This comprehensive guide provides step-by-step instructions on how to detect mold under hardwood floors using five professional-grade tools available to homeowners, explains what readings and indicators signal contamination requiring professional assessment, reveals the optimal detection schedule preventing extensive spread, and shows you exactly how early detection saves $15,000-$35,000 in remediation costs while protecting your family’s health from chronic mold exposure.
Understanding Why Early Detection Matters: The Cost Escalation Timeline
Before learning how to detect mold under hardwood floors using specific tools, understanding how detection timing affects costs motivates establishing regular inspection routines.
The contamination spread timeline:
Month 0 (water damage occurs): Subflooring moisture elevated to 20-30%, mold spores begin germinating within 24-48 hours. Affected area: 20-40 square feet typically. Remediation cost if detected: $2,500-$5,000.
Month 1-3: Visible colonization establishes on subflooring undersides. Contamination spreads to 60-120 square feet through moisture migration and spore distribution. First subtle symptoms may appear (faint musty odor, minor hardwood cupping). Remediation cost if detected: $6,000-$12,000.
Month 4-8: Extensive growth covers 150-300 square feet. Multiple mold species establish. Obvious symptoms appear (strong musty odors, visible hardwood warping, family health symptoms). Remediation cost if detected: $15,000-$30,000.
Month 9-18: Severe contamination affects 300-600 square feet spanning multiple rooms. Structural damage begins (subflooring weakening, potential joist involvement). HVAC distribution of spores throughout home. Remediation cost if detected: $25,000-$50,000.
Month 18+: Catastrophic contamination 600+ square feet, potential whole-floor involvement. Severe structural deterioration. Chronic health effects in family members. Remediation cost: $40,000-$80,000+.
The early detection financial equation:
Learning how to detect mold under hardwood floors and conducting inspections every 3-6 months enables detection typically at Month 1-3 timeline stage. Remediation at this stage: $6,000-$12,000 average. Waiting for obvious symptoms (musty odors homeowners can’t ignore, visible floor damage) results in detection at Month 9-18 stage. Remediation at this stage: $25,000-$50,000 average. The difference: $19,000-$38,000 in additional costs resulting from detection delay. Investment in detection tools ($200-$800 one-time equipment purchase) plus quarterly inspection time (30-60 minutes) saves $19,000-$38,000 in eventual remediation, providing 2,400-19,000% return on investment.
The health protection timeline:
Early detection limits family exposure to weeks or months. Late detection means families breathe contaminated air for 1-2 years before addressing problems. Chronic mold exposure during this extended period creates health risks that immediate detection and remediation prevent entirely. The health protection value of understanding how to detect mold under hardwood floors may exceed even the substantial financial benefits.
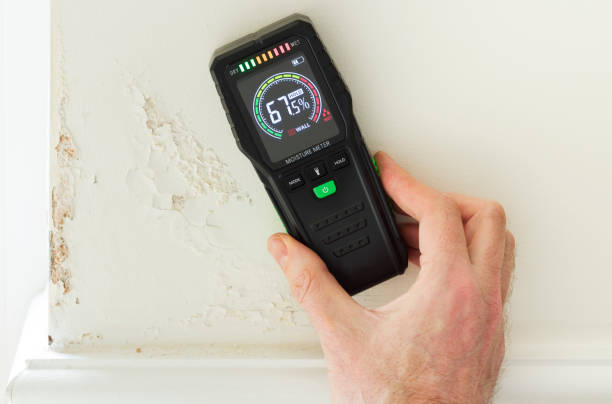
Tool #1: Moisture Meters – The Essential Foundation for Detection
The first and most important tool for understanding how to detect mold under hardwood floors is a moisture meter measuring wood moisture content.
Why moisture meters work:
Mold requires moisture above 20% in materials for rapid growth. Wood naturally maintains 8-13% moisture content at normal indoor humidity. Subflooring moisture above 15% indicates moisture problems likely supporting or soon supporting mold growth. Moisture meters detect these elevated readings before mold becomes extensive, making them essential for learning how to detect mold under hardwood floors early.
Types of moisture meters:
Pin-type meters use metal pins penetrating wood surfaces to measure electrical resistance (which correlates to moisture content). Advantages: Accurate at specific depths, measure exact penetration points. Disadvantages: Leave tiny holes in hardwood surfaces, require penetrating finished floors. Cost: $40-$200 for quality consumer models. Best for: Direct subflooring measurement when access exists (crawl spaces, basements, or during renovations).
Pinless (non-invasive) meters use electromagnetic scanning detecting moisture without surface penetration. Advantages: No surface damage, scan large areas quickly, measure through finished hardwood. Disadvantages: Less precise depth measurement, affected by metal in subflooring (nails, staples). Cost: $80-$400 for quality consumer models. Best for: Scanning finished hardwood floors from above without removal.
Recommended meters for homeowners:
General Tools MMD4E ($40-$60): Pin-type meter, 0-100% moisture range, simple LED readout, excellent value for crawl space use. Protimeter Surveymaster ($300-$400): Dual-mode meter (both pin and pinless), professional accuracy, ideal for serious homeowners. Klein Tools ET140 ($150-$200): Pinless meter, non-invasive hardwood scanning, backlit display, mid-range quality. Ryobi Phone Works ($50-$80): Pinless meter, smartphone connectivity, budget-friendly introduction to moisture detection.
How to use moisture meters to detect mold under hardwood floors:
From above (through hardwood): Use pinless meter in scan mode. Move slowly across hardwood surfaces in grid pattern covering entire room. Normal readings: 8-13% for hardwood, 10-14% for subflooring beneath (meter reads both layers combined). Concerning readings: Above 15% sustained in specific areas. Critical readings: Above 18% indicating likely active mold. Document elevated areas with floor plan marking locations.
From below (crawl space or basement access): Use pin-type meter. Insert pins into subflooring undersides in multiple locations. Test systematic grid (every 4-6 feet) plus any visually suspicious areas. Normal readings: Below 15% for subflooring. Concerning readings: 15-18% indicating moisture problem. Critical readings: Above 18% indicating probable mold. Combine meter readings with visual inspection for actual mold growth.
The detection schedule:
Quarterly inspections (every 3 months) for homes with prior moisture issues, crawl space construction, or humid climates like Santa Rosa Beach. Semi-annual inspections (every 6 months) for homes without prior issues in moderate climates. Post-water damage inspection immediately after any plumbing leaks, flooding, or moisture intrusion. Annual comprehensive inspection minimum even in low-risk homes. This schedule enables early detection when understanding how to detect mold under hardwood floors using moisture monitoring.
Interpreting readings in context:
Single elevated reading (15-17%): Retest same location after 24-48 hours. Sustained elevation indicates problem. Transient elevation may result from recent mopping, spills, or humidity fluctuations. Multiple adjacent elevated readings (15%+): Indicates moisture pattern requiring investigation. Likely active leak or moisture source. Readings above 20%: Urgent situation. Mold is almost certainly present or will be within days. Immediate professional assessment needed. Consistent 12-14% readings throughout: Normal, no current concern but continue monitoring schedule.
Cost vs. value:
Moisture meter purchase: $40-$400 one-time investment. Professional mold inspection with moisture mapping: $400-$800 per visit. Conducting own quarterly moisture checks saves $1,600-$3,200 annually in professional fees while enabling earlier detection than annual professional inspections alone. Moisture meters pay for themselves in avoided professional inspection costs within 1-2 quarters while dramatically improving how to detect mold under hardwood floors through frequent monitoring.
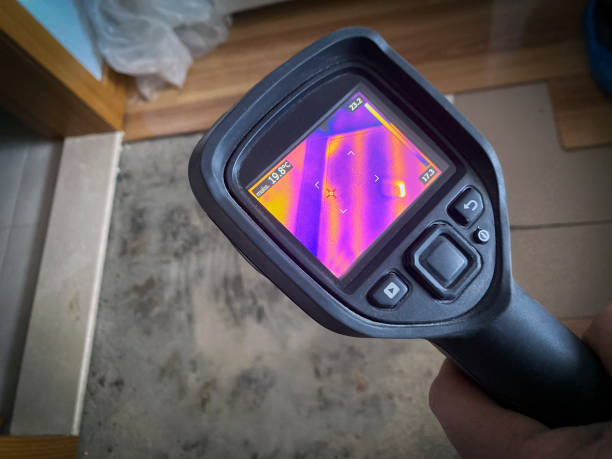
Tool #2: Thermal Imaging Cameras – Visualizing Hidden Moisture
The second advanced tool teaching how to detect mold under hardwood floors is thermal imaging technology revealing hidden moisture patterns invisible to eyes and conventional moisture meters.
How thermal imaging reveals mold:
Moisture evaporating from materials creates cooling through evaporative effect. Mold-contaminated areas often appear cooler than surrounding dry materials. Thermal cameras display temperature variations as color-coded images. Dark blue/purple areas indicate cool spots (potential moisture). Red/orange/yellow areas indicate warm spots (typically dry). Moisture patterns appear as distinct cool zones mapping contamination extent before mold becomes visible.
Why thermal imaging enhances detection:
Thermal cameras scan large areas in seconds versus point-by-point moisture meter checks requiring minutes. Moisture patterns invisible to meters (moisture within walls, under cabinets, behind appliances) appear clearly in thermal images. Documentation through thermal photos provides visual evidence for insurance claims, contractor quotes, and monitoring remediation effectiveness. Non-contact scanning avoids any hardwood surface contact or damage.
Thermal imaging options for homeowners:
Smartphone attachments: FLIR One ($200-$300 for iOS or Android), Seek Thermal ($200-$250 for iOS or Android). Advantages: Affordable, leverage existing smartphone, image capture and sharing built-in. Disadvantages: Lower resolution than dedicated cameras, smaller temperature ranges. Best for: Homeowners wanting introduction to thermal detection without major investment.
Dedicated handheld cameras: FLIR C5 ($700-$900), Seek Shot ($400-$500), FLIR E4 ($800-$1,200). Advantages: Better image resolution, wider temperature ranges, professional features. Disadvantages: Higher cost, learning curve for interpretation. Best for: Serious homeowners with multiple properties or prior moisture issues justifying investment.
Rental options: Home Depot, professional tool rental companies rent thermal cameras $50-$100 per day. Best for: Homeowners wanting capability for one-time inspection without purchase commitment.
How to use thermal imaging to detect mold under hardwood floors:
Preparation: Maintain stable indoor temperature for 2-3 hours before scanning (run HVAC maintaining consistent temperature). Close windows and doors eliminating external temperature influences. Turn off radiant heat sources (fireplaces, space heaters) 1 hour before scanning. Ideal conditions: Morning or evening when outdoor temperature similar to indoor (minimizes external wall temperature variations).
Scanning technique: Hold camera perpendicular to floor surface at consistent distance (3-4 feet typical). Scan in overlapping sweeps covering entire room systematically. Document each room with saved thermal images for comparison over time. Pay extra attention to areas near plumbing, appliances, exterior walls, and any prior moisture damage locations.
Interpreting thermal images for moisture:
Cool spots (blue/purple in typical color palettes) indicate potential moisture. Look for distinct patterns rather than uniform cool areas. Geometric cool zones (squares, rectangles) often correlate to subflooring panels or moisture migration patterns. Cool zones extending from known water sources (under sinks, near appliances) highly suspicious. Compare thermal readings with moisture meter readings for confirmation (thermal identifies areas for detailed meter testing).
Temperature differential thresholds:
3-5°F cooler than surrounding areas: Investigate with moisture meter. Likely moisture present if differential persists over time. 5-10°F cooler: Strong indication of moisture problem. Almost certainly active moisture requiring immediate investigation. 10°F+ cooler: Severe moisture situation. Likely saturated subflooring with active or imminent mold growth.
Seasonal considerations in Santa Rosa Beach:
Summer scanning (high outdoor humidity, AC running): Cool spots may be contamination or may be cool air leaks from HVAC. Combine thermal with moisture meter verification. Winter scanning (lower outdoor humidity, possible heating operation): Clearer moisture pattern visualization. Cool spots more definitively indicate moisture rather than HVAC effects. Year-round: Always confirm thermal findings with moisture meter measurements. Thermal identifies locations; meters confirm moisture.
Documentation and monitoring:
Save thermal images with date, location, and camera settings. Create baseline thermal survey of entire home for future comparison. Repeat scans quarterly comparing to baseline identifying new cool zones indicating developing moisture problems. Document remediation effectiveness by comparing before/after thermal images showing elimination of cool zones. This systematic approach makes thermal imaging powerful tool for understanding how to detect mold under hardwood floors through ongoing moisture monitoring.
The professional consultation option:
Professional thermographers charge $300-$600 for comprehensive home thermal survey. This professional service provides expert interpretation, written reports, and moisture source identification. Consider professional thermal inspection annually with homeowner quarterly scans between professional visits. This hybrid approach balances cost with professional expertise teaching homeowners how to detect mold under hardwood floors while ensuring expert validation.
Tool #3: Air Quality Testing Kits – Measuring Spore Concentrations
The third tool explaining how to detect mold under hardwood floors is air quality testing measuring airborne mold spore concentrations confirming contamination even when subflooring isn’t directly accessible.
How air quality testing works:
Air samplers collect airborne particles on collection media (sticky slides, spore traps, or culture plates). Laboratory analysis identifies mold species and counts spore concentrations. Results compare indoor spore levels to outdoor baseline or established safe ranges. Elevated indoor concentrations indicate active mold growth somewhere in home (potentially under floors).
Types of air testing available:
DIY test kits: Mold Armor ($10-$25), ProLab ($30-$50), My Mold Detective ($50-$80). Collection method: Gravity settling plates or simple air pumps. Laboratory analysis included in kit price. Turnaround: 3-7 days for results. Advantages: Inexpensive, simple collection procedure. Disadvantages: Less accurate than professional sampling, limited species identification, no expert interpretation.
Professional air quality testing: Certified mold inspectors use calibrated air pumps collecting timed samples. Laboratory analysis by accredited mycology labs. Detailed reports with species identification, concentration quantification, and interpretation. Cost: $300-$600 for typical 2-3 sample protocol (outdoor control, suspected problem area, comparison area). Advantages: Accurate quantification, expert interpretation, legally defensible documentation. Disadvantages: Higher cost, requires scheduling inspector visit.
How to use air quality testing to detect mold under hardwood floors:
DIY kit procedure: Follow kit instructions carefully (methodology varies by manufacturer). Typically: Open kit in center of room being tested. Expose collection media for specified time (often 6-24 hours). Seal and mail to lab per instructions. Receive results in 3-7 days identifying mold species and concentration ranges (typically low/medium/high rather than precise counts).
Interpreting DIY results: “Low” concentration without specific problem species: Likely normal background mold, no immediate concern. “Medium” or “high” concentration of common outdoor molds (Cladosporium, Alternaria): Possibly elevated but may reflect outdoor air infiltration. “Medium” or “high” concentration of indoor problem species (Aspergillus, Penicillium, Stachybotrys): Strong indication of indoor mold growth requiring investigation. Any detection of Stachybotrys: Warrants immediate professional assessment.
Professional testing protocol: Inspector collects outdoor sample establishing baseline (outdoor air always contains mold spores). Indoor samples from suspected problem area (room with musty odor, water damage history, suspicious moisture readings). Indoor sample from unaffected comparison area. Laboratory analysis provides specific spore counts (spores per cubic meter). Expert interpretation comparing indoor to outdoor and between rooms.
Professional result interpretation:
Indoor concentrations equal to or lower than outdoor: Generally normal, unlikely active indoor growth. Indoor concentrations 2-5 times outdoor: Moderate elevation, investigate potential sources. Indoor concentrations 5-10 times outdoor: Significant elevation, likely active growth, professional assessment needed. Indoor concentrations 10+ times outdoor: Severe contamination, immediate professional remediation required. Species not found outdoors detected indoors (Stachybotrys, Chaetomium): Definitive evidence of indoor growth regardless of concentration.
Timing air quality testing:
Annual baseline testing: Establish normal concentrations for future comparison. Post-moisture event testing: 48-72 hours after water damage, flooding, or leaks confirming whether rapid drying prevented mold growth. Symptomatic testing: When musty odors present, family members experiencing unexplained respiratory symptoms, or moisture meter readings elevated but mold not visible. Post-remediation testing: Verification that professional mold remediation successfully eliminated contamination.
Limitations of air quality testing:
Air testing reveals that mold exists but doesn’t definitively locate it (could be under floors, in walls, in HVAC ducts, etc.). Spore concentrations fluctuate based on HVAC operation, weather, activity levels (walking stirs spores). Single test provides snapshot but may not capture typical conditions. These limitations mean air quality testing works best combined with moisture meters and visual inspections, not as sole detection method when learning how to detect mold under hardwood floors.
Cost-effectiveness analysis:
DIY air test kit: $10-$80 per test. Professional air quality testing: $300-$600 per testing event (typically 2-3 samples). Value: Confirms or rules out mold contamination without destructive flooring removal. Single air test costing $300-$600 can prevent unnecessary $5,000-$15,000 exploratory flooring removal if results show no elevation (problem is elsewhere). Alternatively, positive results justify flooring removal investment to locate and remediate contamination. Air testing provides decision-making data optimizing how to detect mold under hardwood floors cost-effectively.
Tool #4: Visual Crawl Space and Basement Inspections – Direct Observation
The fourth essential method for understanding how to detect mold under hardwood floors is direct visual inspection of subflooring undersides when access exists through crawl spaces or basements.
When visual inspection is possible:
Pier-and-beam homes with crawl space construction (approximately 60-70% of Santa Rosa Beach homes). Homes with basements (rare in coastal Florida but common in some areas). Homes during renovations when hardwood or subflooring is exposed. Multi-story homes where ceiling of lower floor provides access to subflooring of upper floor. These access scenarios enable direct visual observation of subflooring conditions without floor removal.
What to look for during visual inspection:
Active mold growth: Fuzzy, powdery, or slimy patches on subflooring undersides. Colors: black, green, white, orange, yellow (species-dependent). Texture: Aspergillus appears powdery, Stachybotrys appears slimy, Penicillium appears fuzzy. Distribution: Often concentrated near moisture sources (under plumbing, at exterior walls, in poorly ventilated areas).
Water staining: Dark discoloration on wood indicating current or previous moisture exposure. Staining patterns often show moisture source direction. Fresh stains (dark, well-defined) indicate recent or active moisture. Old stains (faded, gray) may indicate past moisture now resolved.
Wood deterioration: Soft, spongy wood when pressed (indicates rot or severe mold damage). Delamination in plywood (layers separating). Wood surface roughness or fibrous texture. White or brown rot fungi (wood-destroying organisms often accompanying mold).
Condensation: Water droplets on subflooring undersides, floor joists, or insulation. Indicates humid crawl space air condensing on cool surfaces. Creates continuous moisture supporting mold growth.
Insulation condition: Wet, compressed, or contaminated insulation between floor joists. Mold-stained insulation (usually requiring replacement). Fallen or displaced insulation reducing thermal barrier.
Equipment needed for crawl space inspection:
Powerful flashlight or headlamp (150+ lumens): Essential for seeing in dark crawl spaces. Disposable coveralls and gloves: Protect from fiberglass insulation and contamination. N95 respirator mask: Prevent mold spore inhalation during inspection (critical safety measure). Moisture meter: Test suspicious areas identified visually. Camera or smartphone: Document findings with photos for professional consultation or insurance. Knee pads: Improve comfort in low-clearance crawl spaces.
Safe crawl space inspection procedure:
Inspect crawl space entry for structural soundness before entering. Use flashlight checking for electrical hazards, plumbing leaks, rodents, or insects. Wear protective equipment (coveralls, mask, gloves) before entry. Work systematically inspecting in grid pattern covering entire crawl space. Test moisture levels at any visually suspicious areas. Photograph any mold growth, water damage, or structural concerns. Document locations on floor plan for remediation planning. Exit carefully, remove and bag disposable protective equipment. Wash hands thoroughly after inspection.
Crawl space inspection frequency:
Quarterly inspection (every 3 months) for homes with prior crawl space moisture issues, history of mold problems, or high water tables typical in Santa Rosa Beach. Semi-annual inspection (every 6 months) for homes without prior issues. Post-rain inspection after heavy storms or flooding events. Annual minimum inspection even for low-risk homes. Regular crawl space inspection is crucial for understanding how to detect mold under hardwood floors in pier-and-beam construction.
Humidity monitoring in crawl spaces:
Install permanent humidity sensor in crawl space recording readings over time ($30-$80 for basic units, $100-$200 for data-logging models). Target humidity: Below 60% year-round prevents mold growth. Santa Rosa Beach challenge: Outdoor humidity 70-80% makes maintaining below 60% difficult without crawl space encapsulation and dehumidification. Readings consistently above 65%: Indicates moisture problem requiring intervention regardless of whether mold is currently visible.
When to call professionals:
Crawl space access too difficult or dangerous for homeowner inspection (very low clearance, flooding, structural concerns). Any visible mold covering more than 10-20 square feet (per EPA guidelines, extensive contamination requires professional remediation). Structural damage observed (deteriorating joists, severe subflooring rot). Uncertainty about findings (is discoloration mold or just dirt? is damage serious?). Professional crawl space inspection costs $200-$400 and provides expert assessment guiding how to detect mold under hardwood floors decisions when homeowner inspection raises concerns.
Combining visual inspection with other tools:
Moisture meter readings guide visual inspection (inspect areas with elevated moisture first). Thermal imaging from above identifies cool zones for targeted crawl space inspection from below. Air quality testing confirms whether visually observed crawl space mold is affecting living spaces above. This multi-tool approach provides comprehensive understanding of how to detect mold under hardwood floors when crawl space access exists.
Tool #5: Odor Detection and Sensory Assessment – Your Built-In Detector
The fifth and most accessible tool for learning how to detect mold under hardwood floors is sensory assessment using smell, observation, and symptom awareness available to every homeowner without any equipment purchase.
Why odor detection works:
Mold produces volatile organic compounds (VOCs) during metabolism creating characteristic musty, earthy odors. These VOCs often become noticeable before mold is visible or extensive. Human olfactory sensitivity can detect some mold VOCs at very low concentrations. Persistent musty odors in homes with hardwood floors warrant investigation even without other obvious symptoms.
Characteristics of mold odors:
Musty smell (most common): Like damp basement, old books, or wet cardboard. Earthy smell: Like soil, rotting wood, or composting vegetation. Stale smell: Like closed, unventilated spaces. Pungent smell: Sharper, more noticeable, often associated with higher contamination levels. Location-specific: Odor stronger near contamination source (particular rooms, near specific walls or floors).
How to conduct odor assessment:
Leave home for 2-3 hours allowing nose to “reset” (olfactory adaptation reduces odor detection in familiar spaces). Return and immediately assess odors upon re-entry (first impression most accurate before adaptation occurs). Move room-to-room noting any musty or unusual odors. Get close to floors, baseboards, and cabinets where odors concentrate. Document which rooms or areas have strongest odors. Compare odor intensity over time (getting worse suggests growing problem).
The olfactory adaptation problem:
Humans adapt to constant odors within 15-30 minutes (brain filters out unchanged sensory input). Homeowners living with gradual mold odor development may not notice it while visitors immediately detect it. This adaptation explains why many families with mold under hardwood floors don’t recognize odors until contamination is severe. Strategy: Ask trusted friends or family unfamiliar with your home to assess odors objectively. Their fresh perspective reveals odors you’ve adapted to.
Observable hardwood changes indicating possible subflooring mold:
Cupping: Hardwood board edges higher than centers creating concave surface. Indicates moisture absorption from below. Crowning: Hardwood board centers higher than edges creating convex surface. Sometimes occurs as cupping dries but wood doesn’t return to flat. Warping: Boards bent or twisted from original flat plane. Gaps: Separation between boards exceeding normal seasonal expansion gaps. Discoloration: Darkening especially at board edges or in patterns suggesting moisture migration. Finish deterioration: Peeling, bubbling, or clouding of polyurethane or other finishes.
Health symptom awareness:
Respiratory symptoms appearing or worsening in home: Coughing, wheezing, throat irritation, nasal congestion. Allergic reactions: Sneezing, itchy eyes, skin rashes without other explanation. Asthma exacerbations: Increased attacks or worsening control in previously stable asthma. Headaches or fatigue: Particularly when spending time in specific rooms. Symptom timing: If symptoms improve when away from home (work, vacation) and worsen upon return, environmental cause likely.
Creating sensory detection baseline:
Document current home condition: Photograph all hardwood floors from multiple angles. Record any odors, stains, or floor irregularities currently present. Note any current health symptoms in family members. Take moisture meter readings establishing baseline. Save documentation dated for future comparison.
Monthly sensory monitoring routine:
Conduct visual walk-through examining all hardwood floors for changes (cupping, staining, gaps). Reset nose (leave home 2-3 hours) and assess odors upon return. Document any new musty odors, floor changes, or health symptoms. Compare to baseline documentation identifying any progression. Flag any changes for follow-up with moisture meter or professional assessment. This monthly routine requires zero equipment investment while providing early warning of problems guiding how to detect mold under hardwood floors without sophisticated tools.
When sensory assessment warrants professional inspection:
New musty odors that persist more than 1-2 weeks. Progressive hardwood floor changes (cupping worsening, new discoloration appearing). Multiple family members developing unexplained respiratory symptoms. Odors that intensify after rain or during humid weather. Any combination of odor + floor changes + health symptoms. These indicators justify professional mold inspection ($400-$800) confirming whether mold under hardwood floors exists and determining remediation needs.
The free but valuable approach:
Sensory assessment costs nothing but provides valuable early warning. Many homeowners discover mold under hardwood floors through sensory changes months before they would have detected problems otherwise. Combining free sensory monitoring with modest investment in moisture meter ($40-$200) provides comprehensive detection capability without thermal camera or air testing expenses. For budget-conscious homeowners, sensory awareness plus moisture meter monitoring offers affordable, effective path to understanding how to detect mold under hardwood floors.
Frequently Asked Questions
What’s the most reliable way to detect mold under hardwood floors without removing flooring?
The most reliable method to detect mold under hardwood floors without removal combines three approaches: moisture meter scanning from above (pinless meter through hardwood detecting elevated subflooring moisture above 15%), air quality testing (measuring spore concentrations confirming whether contamination exists), and crawl space/basement visual inspection if access exists (direct observation of subflooring undersides). Single methods have limitations: moisture meters detect elevated moisture but not mold directly, air quality testing confirms mold presence but doesn’t locate it, visual inspection only works with subflooring access. Combining all three provides 85-95% detection reliability according to restoration industry experience. Most cost-effective combination: moisture meter ($80-$200 one-time purchase) plus annual professional air quality test ($300-$600), supplemented by quarterly crawl space inspections if access exists.
How accurate are consumer moisture meters for detecting mold under hardwood floors?
Consumer-grade moisture meters ($40-$400) are 80-90% accurate for detecting elevated moisture indicating potential mold under hardwood floors when used correctly. Key accuracy factors: pin-type meters more accurate than pinless for absolute moisture content (±2% accuracy vs ±4% for pinless), pinless meters better for scanning large areas quickly identifying suspicious zones for detailed pin testing, calibration affects accuracy (meters should be calibrated annually), and user technique impacts results (consistent pressure, perpendicular orientation, avoiding metal fasteners). Professional meters ($400-$1,200) offer 95%+ accuracy with better durability and features. For homeowner detection purposes, quality consumer meters provide adequate accuracy justifying investment. Critical understanding: meters detect moisture (mold precursor) not mold itself. Moisture above 15-18% indicates high mold probability but doesn’t confirm presence. Combine meter readings with other detection methods for comprehensive assessment.
Can I use a smartphone thermal camera to detect mold under hardwood floors?
Yes, smartphone thermal cameras ($200-$300 for attachments like FLIR One or Seek Thermal) effectively detect mold under hardwood floors by revealing moisture patterns, though with lower resolution than dedicated cameras ($700-$1,200). Smartphone thermal accuracy for mold detection: 70-85% for identifying moisture patterns suggesting subflooring mold. Advantages: affordable entry to thermal imaging, intuitive smartphone interface, easy image capture and sharing. Limitations: lower thermal resolution (80×60 pixels vs 320×240 for dedicated cameras), smaller temperature detection range, shorter detection distance. Best use: identifying suspicious areas for detailed moisture meter testing rather than definitive mold diagnosis. Optimal technique: scan early morning or evening when temperature differences most pronounced, maintain consistent 3-4 foot distance from floor, compare cool zones against moisture meter readings for confirmation. Smartphone thermal imaging works well for homeowners learning how to detect mold under hardwood floors without professional camera investment.
How often should I check for mold under hardwood floors in Santa Rosa Beach?
Santa Rosa Beach homeowners should check for mold under hardwood floors every 3 months (quarterly) due to coastal humidity creating higher risk than moderate climates. Recommended schedule: Quarterly moisture meter scans (March, June, September, December) covering all hardwood floors, semi-annual crawl space visual inspections if access exists (spring and fall), annual professional air quality testing if any concerning moisture readings or sensory indicators, and immediate inspection after any water damage, plumbing leaks, or flooding regardless of schedule. Higher risk homes (prior mold history, crawl space construction, known moisture issues) should increase to monthly moisture checks. Lower risk homes (slab construction, no moisture history, excellent humidity control) can reduce to semi-annual checks. Santa Rosa Beach’s 70-80% year-round humidity requires more frequent monitoring than 40-50% humidity climates where semi-annual or annual checks suffice. Quarterly inspection investment (1-2 hours labor every 3 months) enables early detection saving $15,000-$35,000 in remediation costs versus waiting for obvious symptoms.
What moisture meter reading means I have mold under hardwood floors?
Moisture meter readings indicating potential mold under hardwood floors: 15-17% subflooring moisture (concerning – monitor closely, retest in 1 week, likely mold if reading sustained), 18-20% moisture (probable mold – professional inspection recommended within days), 20%+ moisture (mold almost certain – immediate professional assessment and likely remediation needed). Context matters: single elevated reading may reflect recent mopping, spills, or temporary humidity spike (retest after 48 hours), multiple adjacent elevated readings indicate moisture pattern (likely active leak or contamination), sustained elevation over multiple tests confirms problem vs. transient spike, and readings must account for natural hardwood moisture (8-13% normal). Florida building science research shows mold grows rapidly above 20% wood moisture content, grows slowly at 16-20%, and rarely grows below 15%. Therefore 15% serves as action threshold for concern and investigation while 20%+ demands immediate response. Moisture meters don’t directly detect mold (mold spores don’t change moisture readings) but identify conditions where mold is likely or certain to exist.
Should I hire a professional or do DIY mold detection under hardwood floors?
Optimal approach combines DIY monitoring with professional validation. DIY detection using moisture meters ($40-$200), sensory assessment (free), and crawl space inspection if access exists (free with safety equipment $30-$50) enables frequent monitoring (quarterly recommended) at low ongoing cost while professional inspection ($400-$800 annually) provides expert validation, species identification, and legally defensible documentation. Do DIY when: establishing monitoring routine, conducting quarterly preventive checks, investigating minor concerns (subtle odors, small moisture variations), or monitoring remediation effectiveness post-professional work. Hire professionals when: moisture readings exceed 18% consistently, visible mold observed during crawl space inspection, unexplained health symptoms affecting family members, preparing for home sale or purchase (documented professional inspection), or insurance claim requires defensible documentation. Cost comparison: DIY quarterly checks cost $40-$200 equipment investment plus 1-2 hours labor per quarter versus professional quarterly inspections costing $1,600-$3,200 annually. Most homeowners optimize costs through quarterly DIY supplemented by annual professional validation, combining ongoing monitoring with expert verification of how to detect mold under hardwood floors.
PuroClean of Santa Rosa Beach: Professional Detection and Remediation
Understanding how to detect mold under hardwood floors using available tools empowers homeowners, but professional expertise remains valuable for validation, species identification, and remediation when contamination is confirmed.
PuroClean of Santa Rosa Beach provides comprehensive mold detection and remediation services throughout the 30A corridor.
Our mold detection services:
Professional mold inspection: IICRC-certified inspectors with advanced training in mold detection and moisture assessment. Comprehensive moisture mapping using professional-grade meters and thermal imaging. Air quality testing with accredited laboratory analysis and expert interpretation. Visual inspection of all accessible areas including crawl spaces and attics. Written reports with findings, photographic documentation, and remediation recommendations. Cost: $400-$800 for typical residential inspection.
Homeowner education: On-site training teaching homeowners to use their moisture meters effectively. Interpretation guidance helping homeowners understand readings and when professional assessment is needed. Crawl space inspection assistance (we inspect with homeowner present explaining findings). Free phone consultations reviewing homeowner moisture readings or sensory observations. Our goal: empower homeowners to monitor conditions themselves while knowing when to request professional help.
Follow-up monitoring: Post-remediation verification testing confirming successful mold elimination. Periodic reassessment (quarterly or annually) for high-risk properties or homeowners desiring ongoing professional monitoring. Trend analysis comparing moisture readings over time identifying developing problems before becoming extensive.
Remediation when detection confirms contamination: IICRC-certified mold remediation following S520 standards. Careful hardwood preservation when viable or professional removal and reinstallation when necessary. Complete subflooring treatment or replacement. Moisture source identification and correction. HVAC inspection and decontamination if contamination distributed through systems. Post-remediation verification testing. Written warranties on remediation work.
Why choose PuroClean for mold detection:
Technology advantage: Professional-grade moisture meters (±1% accuracy), high-resolution thermal cameras ($10,000+ value equipment), and accredited laboratory relationships for air quality analysis. Our equipment provides detection capability beyond consumer tools ensuring no contamination goes undetected.
Experience interpreting findings: We’ve inspected thousands of Santa Rosa Beach homes understanding coastal moisture patterns, typical contamination locations, and subtle indicators novice inspectors miss. Experience means accurately distinguishing serious problems from minor concerns, saving homeowners unnecessary remediation expense.
Honest assessment: We don’t profit from finding mold (remediation division separate from inspection division). Inspectors paid hourly, not per job generated. This structure incentivizes accurate assessment whether findings indicate remediation need or not. Many homeowners report we’ve saved them money by confirming minor moisture readings don’t warrant immediate remediation versus competitors recommending unnecessary work.
Comprehensive approach: We don’t just detect mold, we identify moisture sources, assess structural damage, evaluate HVAC impact, and develop complete remediation plans addressing all aspects. This comprehensive approach prevents recurrence versus competitors who remediate visible mold without correcting underlying moisture sources.
Insurance expertise: Our reports meet insurance documentation requirements for claims. We work directly with adjusters explaining technical findings and advocating for appropriate coverage. Our documentation has helped numerous homeowners secure coverage for remediation that other inspection reports failed to support adequately.
Don’t wait for obvious symptoms to investigate.
If your moisture meter shows elevated readings (15%+), if you’ve noticed musty odors or hardwood floor changes, if family members experience unexplained respiratory symptoms, or if you simply want professional validation of your DIY monitoring efforts, expert assessment confirms whether mold under hardwood floors exists and determines appropriate response.
Call PuroClean of Santa Rosa Beach at (850) 399-3380 for professional mold inspection and moisture assessment. We’ll comprehensively evaluate your hardwood floors, provide honest findings, and recommend appropriate action whether that’s continued monitoring, minor moisture control, or comprehensive remediation.
The five tools explaining how to detect mold under hardwood floors enable early detection saving $15,000-$35,000 in remediation costs while protecting your family from chronic mold exposure. Invest in detection tools, establish regular monitoring routines, and consult professionals when findings warrant expert assessment.
Let PuroClean of Santa Rosa Beach provide the professional expertise ensuring your detection efforts are accurate and your family remains safe from the hidden dangers of subflooring mold contamination.
Call (850) 399-3380 today for professional mold detection services or expert guidance on your DIY monitoring program. Early detection is your best defense against expensive mold disasters.
Available 24/7/365 | Contact Us Online | Google Business Profile | IICRC Certified | Insurance Preferred | Complete Water Damage Remediation Solutions
