Table of Contents
Water damaged wood floors can transform your beautiful hardwood investment into a homeowner’s nightmare. Whether you’re dealing with a burst pipe in Lansdale, basement flooding in Ardmore, or appliance leaks anywhere in Montgomery County, PA, understanding how to properly address water damaged wood flooring can save you thousands of dollars and preserve your home’s value.
This comprehensive guide covers everything from immediate emergency response to professional restoration techniques, helping you make informed decisions about repairing versus replacing your water damaged floors. By the end of this article, you’ll understand when DIY solutions are appropriate and when professional intervention is absolutely necessary.
Understanding Water Damage in Wood Floors: The Science Behind the Problem
Wood is a naturally hygroscopic material, meaning it readily absorbs and releases moisture from the surrounding environment. When wood flooring encounters excessive water, several damaging processes begin immediately:
The Water Absorption Process | Water Damaged in Wood Floors
Initial Contact (0-2 Hours):
- Water begins penetrating the wood’s surface finish
- Moisture starts absorbing into the wood fibers
- Surface staining may begin to appear
Expansion Phase (2-24 Hours):
- Wood fibers swell as they absorb moisture
- Individual boards begin expanding
- Cupping (edges higher than centers) becomes visible
- Finish may begin peeling or bubbling
Structural Changes (24-48 Hours):
- Significant dimensional changes occur
- Boards may begin buckling or separating
- Subfloor moisture creates additional problems
- Mold spores begin germinating in moist conditions
Long-term Damage (48+ Hours):
- Permanent structural changes to wood
- Mold growth becomes established
- Subfloor damage may require replacement
- Complete floor replacement often necessary
Types of Wood Floor Water Damage | Water Damaged in Wood Floors
Understanding the specific type of damage helps determine the appropriate repair approach:
Surface Water Damage:
- Affects only the surface finish and minimal wood penetration
- Often caused by spills or brief exposure
- Usually repairable with refinishing
- Timeline: Minutes to a few hours of exposure
Moisture Absorption Damage:
- Water penetrates into wood fibers
- Causes swelling, cupping, and dimensional changes
- May be reversible with proper drying techniques
- Timeline: Several hours to 1-2 days of exposure
Structural Water Damage:
- Affects both flooring and subfloor
- Causes buckling, warping, and separation
- Often requires partial or complete replacement
- Timeline: Multiple days of exposure or severe flooding
Contaminated Water Damage:
- Involves sewage, flood water, or other contaminants
- Requires immediate replacement for health reasons
- Cannot be safely restored regardless of exposure time
- Timeline: Any exposure to contaminated water
Immediate Response: Critical First Steps for Water Damaged Wood Floors
Your response in the first few hours after water damage occurs significantly impacts your floor’s salvageability. Here’s exactly what to do:
Safety First: Electrical and Structural Hazards
Electrical Safety:
- Turn off electricity to affected areas at the circuit breaker
- Never walk on wet floors near electrical outlets
- Use battery-powered flashlights instead of plugged-in lighting
- Have an electrician inspect before restoring power
Structural Assessment:
- Check for sagging or compromised subflooring
- Look for signs of structural damage in support beams
- Avoid walking on severely buckled or separated floors
- Document any structural concerns for insurance purposes
Water Source Control and Initial Mitigation | Water Damaged in Wood Floors
Stop the Water Source:
- Locate and shut off the main water supply if necessary
- Turn off individual fixture valves when possible
- Address burst pipes, leaking appliances, or roof leaks immediately
- Place containers to catch ongoing drips
Initial Water Removal:
- Remove standing water immediately using mops, towels, or wet vacuum
- Work quickly every minute counts in the first 24 hours
- Don’t use regular household vacuum cleaners on wet floors
- Remove area rugs and moveable furniture from affected areas
Documentation for Insurance:
- Take extensive photos and videos before beginning cleanup
- Document the water source and extent of damage
- Keep receipts for emergency services and temporary repairs
- Make written notes about timeline and damage progression
Early Assessment: Can Your Floors Be Saved? | Water Damaged Wood Floors
Before beginning any restoration work, conduct an honest assessment of the damage:
Factors Favoring Restoration:
- Clean water source (burst pipes, appliance leaks)
- Rapid response (within 24-48 hours)
- Solid hardwood floors (not engineered or laminate)
- Minimal subfloor involvement
- No signs of mold growth
Factors Requiring Replacement:
- Contaminated water source (sewage, flood water)
- Extended exposure (over 48-72 hours)
- Laminate or low-quality engineered flooring
- Significant subfloor damage
- Visible mold growth or strong musty odors
DIY Water Damaged Wood Floor Repair: When and How to Proceed
Some water damaged wood floor situations can be addressed with DIY techniques, but only under specific circumstances. Here’s when DIY repair is appropriate and how to do it safely:
When DIY Repair Is Appropriate | Water Damaged Wood Floors
Ideal Conditions for DIY:
- Surface water damage only (no wood swelling)
- Clean water source
- Immediate response (within 2-4 hours)
- Solid hardwood floors in good condition
- Access to proper equipment
Warning Signs Requiring Professionals:
- Any board buckling or separation
- Musty odors indicating potential mold
- Subfloor involvement
- Engineered or laminate flooring
- Contaminated water source
DIY Equipment and Materials Needed
Essential Equipment:
- Dehumidifiers (rental-grade, not household units)
- High-velocity air movers or fans
- Moisture meter for wood
- Wet vacuum or extraction equipment
- Plastic sheeting and tape
Materials Required:
- Wood floor cleaner/disinfectant
- Fine-grit sandpaper (120-220 grit)
- Wood stain (matching existing floor)
- Polyurethane floor finish
- Tack cloths and applicators
Step-by-Step DIY Restoration Process
Step 1: Complete Water Extraction
- Remove all standing water immediately
- Use wet vacuum on affected flooring
- Pay special attention to gaps between boards
- Continue until no visible water remains
Step 2: Initial Drying Setup
- Position dehumidifiers to maintain 30-50% relative humidity
- Place air movers to create airflow across flooring
- Open windows and doors if weather permits
- Remove baseboards if water has penetrated behind them
Step 3: Monitoring and Adjustment
- Check moisture levels daily using a wood moisture meter
- Target moisture content should be 6-9% for most wood species
- Adjust equipment positioning based on drying progress
- Maintain controlled environment for 3-7 days minimum
Step 4: Assessment and Cleaning
- Once completely dry, assess for remaining damage
- Clean entire affected area with appropriate wood floor cleaner
- Check for any signs of mold or mildew growth
- Document the condition before proceeding with repairs
Step 5: Surface Restoration
- Lightly sand affected areas with fine-grit sandpaper
- Focus on water stains and finish damage
- Clean sanding dust thoroughly with tack cloth
- Apply matching stain if needed for color consistency
Step 6: Refinishing
- Apply thin, even coats of polyurethane finish
- Allow proper drying time between coats (follow manufacturer’s instructions)
- Apply 2-3 coats for adequate protection
- Allow 24-48 hours before walking on refinished areas
DIY Limitations and When to Call Professionals
Recognize These Warning Signs:
- Boards that remain cupped after complete drying
- Any signs of mold growth during the process
- Subfloor damage becoming apparent
- Moisture readings that won’t decrease
- Strong musty or mildew odors
Cost Comparison: DIY vs. Professional
- DIY equipment rental: $100-300 per week
- Materials and supplies: $100-500
- Time investment: 40-80 hours over 1-2 weeks
- Professional restoration: $3-12 per square foot
- Risk factor: High potential for mistakes requiring complete replacement
Professional Wood Floor Water Damage Restoration: What to Expect
When DIY solutions aren’t appropriate or feasible, professional water damage restoration companies offer specialized expertise and equipment that can often save floors that appear beyond hope.
Professional Assessment and Planning
Advanced Moisture Detection:
- Thermal imaging cameras locate hidden moisture
- Pin-type and pinless moisture meters provide accurate readings
- Psychrometric measurements determine optimal drying conditions
- Documentation for insurance and warranty purposes
Structural Evaluation:
- Subfloor moisture and damage assessment
- Joist and support beam inspection
- HVAC system evaluation for moisture contribution
- Comprehensive restoration plan development
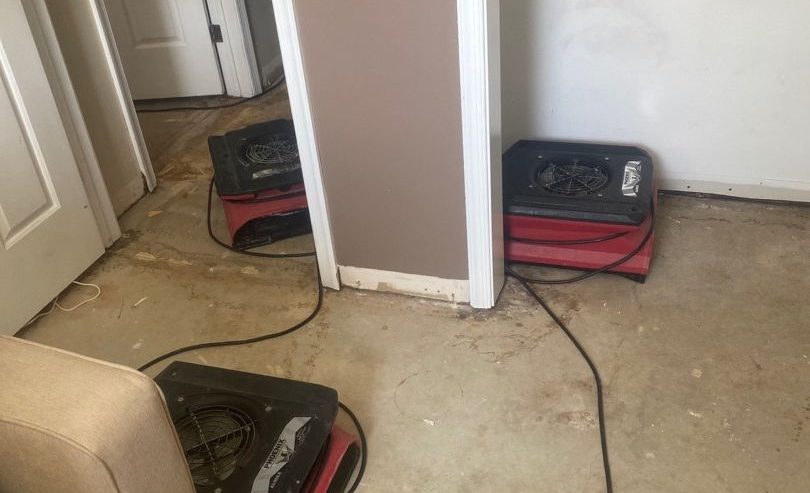
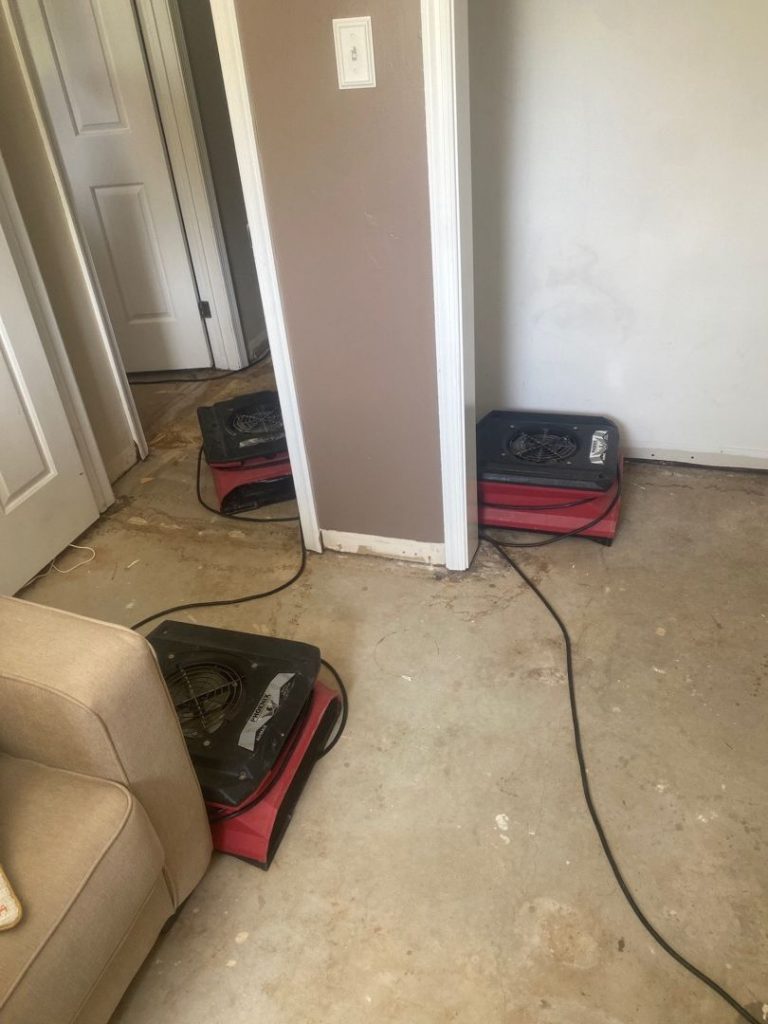
Professional Equipment and Techniques
Industrial Drying Systems:
- Truck-mounted extraction units remove maximum moisture
- Industrial dehumidifiers control humidity precisely
- High-velocity air movers create optimal drying conditions
- Specialized wood floor drying mats target specific areas
Advanced Restoration Techniques:
- Injection drying systems for subfloor moisture
- Specialized wood floor repair compounds
- Color matching and custom staining services
- Professional-grade finishing systems
The Professional Restoration Timeline
Day 1: Emergency Response
- Initial assessment and water extraction
- Equipment setup and environmental controls
- Beginning of controlled drying process
- Insurance documentation and photos
Days 2-7: Monitoring and Drying
- Daily moisture readings and equipment adjustment
- Progress documentation and reporting
- Mold prevention treatments if necessary
- Preparation for restoration work
Days 8-14: Restoration Work
- Damaged board replacement if needed
- Sanding and surface preparation
- Staining and color matching
- Multiple finish coats application
Final Week: Quality Control
- Final moisture verification
- Quality inspection and touch-ups
- Customer walkthrough and approval
- Warranty documentation and care instructions
Wood Floor Types and Water Damage Susceptibility
Different types of wood flooring respond differently to water damage, affecting both immediate response needs and long-term restoration prospects:
Solid Hardwood Flooring | Water Damaged in Wood Floors
Water Damage Characteristics:
- Most resilient to water damage when properly maintained
- Can often be restored even after significant exposure
- Expansion and contraction are reversible with proper drying
- Multiple refinishing opportunities extend lifespan
Restoration Success Factors:
- Wood species: Oak and maple more resilient than softer woods
- Board thickness: Thicker boards can withstand more sanding
- Installation method: Nail-down installations more stable than glue-down
- Age and condition: Well-maintained floors restore better
Best Practices for Solid Hardwood:
- Act within 24-48 hours for best results
- Use gradual drying to minimize checking and splitting
- Professional assessment recommended for extensive damage
- Multiple restoration attempts often possible
Engineered Hardwood Flooring | Water Damaged in Wood Floors
Water Damage Vulnerabilities:
- Thin wood veneer layer limits restoration options
- Plywood or MDF core may delaminate when wet
- Limited sanding and refinishing opportunities
- Adhesive installations particularly vulnerable
Assessment Criteria:
- Veneer thickness: Thicker veneers offer better restoration prospects
- Core material: Plywood cores more water-resistant than MDF
- Installation method: Floating floors easier to replace, glue-down harder to restore
- Age and wear: Newer floors with thick veneers best candidates
Restoration Limitations:
- Often only 1-2 refinishing opportunities
- Delaminated boards must be replaced
- Color matching can be challenging
- Professional assessment essential
Laminate Flooring
Water Damage Reality:
- Laminate flooring cannot be restored after water damage
- Even minimal water exposure often requires replacement
- MDF or particleboard core swells permanently when wet
- Photography finish layer cannot be repaired
Immediate Response for Laminate:
- Remove damaged planks immediately
- Dry subfloor thoroughly before replacement
- Check for mold growth in core materials
- Plan for complete replacement in affected areas
Replacement Considerations:
- Keep extra planks for future repairs
- Document original product information for matching
- Professional installation recommended for best results
- Consider upgrading to more water-resistant options
Water Damage Prevention: Protecting Your Wood Floor Investment
Prevention is always more cost-effective than restoration. Here are proven strategies to protect your wood floors from water damage:
Regular Maintenance and Inspection | Water Damaged in Wood Floors
Monthly Inspections:
- Check all appliances near wood floors for leaks
- Inspect plumbing fixtures and connections
- Look for signs of roof or window leaks
- Test moisture levels in basements and crawl spaces
Quarterly Maintenance:
- Deep clean and inspect floor finish condition
- Check and maintain proper humidity levels (30-50%)
- Inspect HVAC systems for leaks or condensation issues
- Ensure proper ventilation in bathrooms and kitchens
Annual Professional Services:
- Professional floor inspection and maintenance
- HVAC system cleaning and maintenance
- Plumbing inspection and preventive repairs
- Roof and gutter inspection and cleaning
Environmental Controls | Water Damaged in Wood Floors
Humidity Management:
Install and maintain whole-house
Protect Your Investment & Restore Your Peace of Mind
Don’t let water damage and potential mold growth overwhelm you. Contact PuroClean of Lansdale today at (267) 834-5900 for a free consultation. We’ll be there to guide you through the restoration process and ensure your property is restored quickly, safely, and efficiently.