Table of Contents
Candles are a wonderful way to create a cozy, inviting atmosphere in your home. Whether you’re enjoying a romantic dinner, relaxing in a bubble bath, or simply unwinding after a long day, the soft glow of a candle can transform any space.
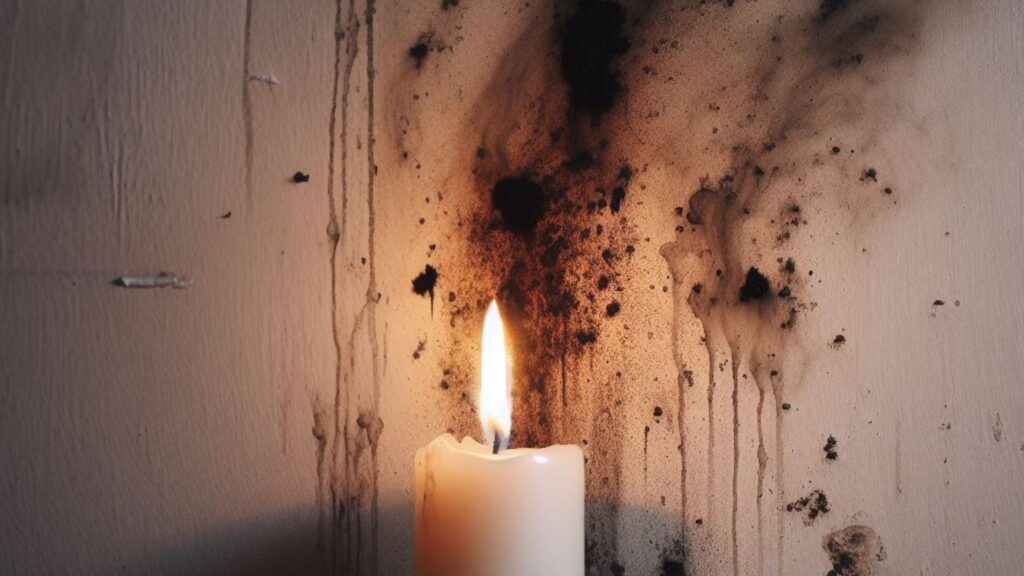
However, one downside of burning candles—especially those made from paraffin wax—is the potential for soot to accumulate on your walls. Candle soot can leave unsightly black marks that are not only unattractive but also challenging to remove if left untreated.
If you’ve noticed dark streaks or smudges on your walls after burning candles, don’t panic. With the right tools and techniques, you can effectively remove candle soot and restore your walls to their original condition. In this blog post, we’ll walk you through the process step by step.
Why Does Candle Soot Form?
Before diving into the cleaning process, it’s helpful to understand why candle soot forms in the first place. Soot is a byproduct of incomplete combustion, which occurs when a candle flame doesn’t burn cleanly. This can happen for several reasons:
Type of Wax: Paraffin wax candles are more likely to produce soot compared to natural alternatives like soy or beeswax.
Wick Issues: Candles with wicks that are too long or made from low-quality materials can create excess soot.
Drafts or Airflow: If a candle is placed in a drafty area, the flame may flicker and produce more soot.
Overburning: Burning a candle for too long can cause the wick to become unstable and release soot.
Understanding these factors can help you prevent soot buildup in the future. But for now, let’s focus on removing the existing soot from your walls.
What You’ll Need
Before you begin, gather the following supplies:
- A vacuum cleaner with a brush attachment
- Microfiber cloths or sponges
- Mild dish soap
- Warm water
- Baking soda
- White vinegar
- A bucket
- Rubber gloves
- Magic eraser (optional)
- Paint and primer (for severe cases)
Step 1: Prepare the Area
Start by removing any furniture or decor near the affected walls to give yourself plenty of space to work. Lay down a drop cloth or old towels to protect your floors from drips or falling soot. If the soot is near electrical outlets or switches, turn off the power to those areas for safety.
Step 2: Dry Cleaning
Before using any cleaning solutions, it’s important to remove as much loose soot as possible. Use a vacuum cleaner with a brush attachment to gently suction away the soot from the walls. Be careful not to press too hard, as this can smear the soot and make it harder to clean.
Step 3: Test a Small Area
Before cleaning the entire wall, test your cleaning solution on a small, inconspicuous area to ensure it doesn’t damage the paint or finish. This is especially important if you have delicate or specialty paint.
Step 4: Create a Cleaning Solution
For light to moderate soot, mix a few drops of mild dish soap with warm water in a bucket. For tougher stains, you can add a tablespoon of baking soda to the mixture for extra scrubbing power. Alternatively, you can use a solution of equal parts white vinegar and water, which is effective at cutting through grease and grime.
Step 5: Clean the Walls
Dip a microfiber cloth or sponge into the cleaning solution, wring it out well, and gently wipe the soot-stained areas. Work in small sections, using circular motions to lift the soot without spreading it. Rinse your cloth or sponge frequently to avoid reapplying soot to the walls.
For stubborn stains, you can use a magic eraser. These handy tools are great for removing tough marks, but be cautious—they can also remove paint if used too aggressively.
Step 6: Rinse and Dry
Once you’ve removed the soot, rinse the walls with a clean, damp cloth to remove any soap or vinegar residue. Allow the walls to air dry completely before inspecting your work. If any stains remain, repeat the cleaning process.
Step 7: Address Severe Stains
In some cases, soot stains may be too severe to remove with cleaning alone. If the stains persist after multiple attempts, you may need to repaint the affected area. Start by applying a stain-blocking primer to prevent the soot from bleeding through the new paint. Once the primer is dry, apply a fresh coat of paint that matches your wall color.
Preventing Future Soot Buildup
Now that your walls are clean, take steps to prevent soot from accumulating in the future:
Choose High-Quality Candles: Opt for candles made from natural waxes like soy or beeswax, which produce less soot.
Trim the Wick: Keep the wick trimmed to ¼ inch before each use to ensure a clean burn.
Avoid Drafts: Place candles in areas with minimal airflow to prevent the flame from flickering.
Use Candle Accessories: Consider using a candle snuffer to extinguish the flame instead of blowing it out, which can release soot particles into the air.
Burn Candles Responsibly: Avoid burning candles for more than 4 hours at a time to maintain a stable flame.
Final Thoughts
Removing candle soot from walls may seem like a daunting task, but with the right approach, it’s entirely manageable. By acting quickly and using the proper cleaning techniques, you can restore your walls to their original beauty and enjoy the ambiance of candles without the mess. Remember, prevention is key—so take steps to minimize soot buildup and keep your home looking fresh and clean.
With these tips, you can confidently light your favorite candles and create a warm, inviting atmosphere, knowing that you have the tools to tackle any soot-related challenges that come your way. Happy cleaning!


