Table of Contents
In the United States, nearly 25% of all homeowner insurance claims are due to water damage.
If you own your home, there’s a good chance that water damage will happen. If that has you worried, do you know how to fix a water damaged ceiling, or considered what it would take to do so?
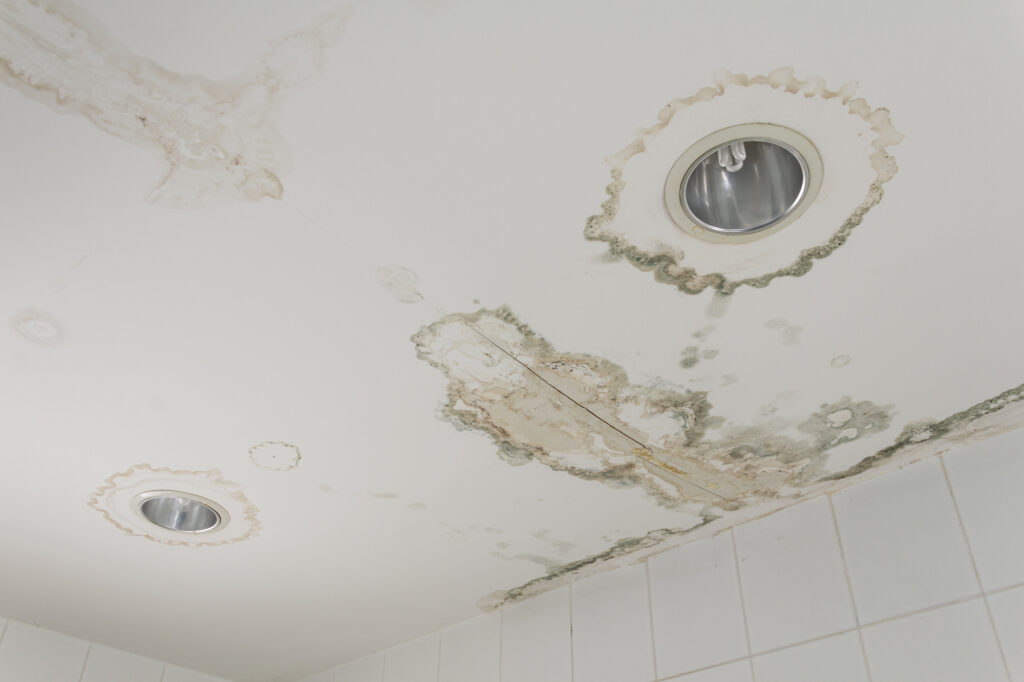
Water damage is insidious, once it begins it will continue to get worse and can lead to further complications like mold damage. The important first step is to remember that you need to start immediately, once you notice the damage. Waiting will only make the problem worse, and the damage more extensive.
Stop the Water

The first and perhaps most obvious thing is that the source of water has to be eliminated. This means finding and shutting off the pipe, or covering the hole in the ceiling, through which water is escaping or entering your home. Once that is done, you can move on to repairs.
If there is a hole in your ceiling causing the water to enter, you’ll have to wait until the weather clears up before repairing, but you want to stop the water from flowing in as soon as possible. This can be done by patching shingles over the hole, putting plastic up, or any type of waterproof barrier.
Dry It Out
The next step taken is to dry out the area that has been impacted by the water damage. This often means you’ll need a heat gun or fan or a combination of the two. Ventilation is also important for the drying process, so if you have an attic fan, for instance, it could be of great assistance.

This is done because as water accumulates it saturates the boards, and then begins to invade other areas. This can mean that you’ll have to deal with standing water. If you have standing water in your attic or inside the roof, make sure to manually dry it out with a mop, towel, or other absorbent material.
Drying the water-damaged area will prevent the damage from spreading to other, dry areas. Exposing the water damage to ventilation and drying will also help to control the possibility of mold growth. A water-damaged ceiling gets much worse when mold begins to spread.
Remove The Damage
Once the area has been dried, it is time to get rid of the water damage. For that you’ll need to have several tools, this is going to be a bit of a labor-intensive step to the cleanup. You’ll need to start by removing anything that is in the way or will prevent you from removing the damaged sections.
This means that you’ll probably be cutting out drywall, or at the very least pulling insulation out of the damaged area. Once that’s done, cut the damaged wood-free, removing it and anything that is damaged completely. For this, you can take your pick of saws, as long as you have a saw that is capable of performing.
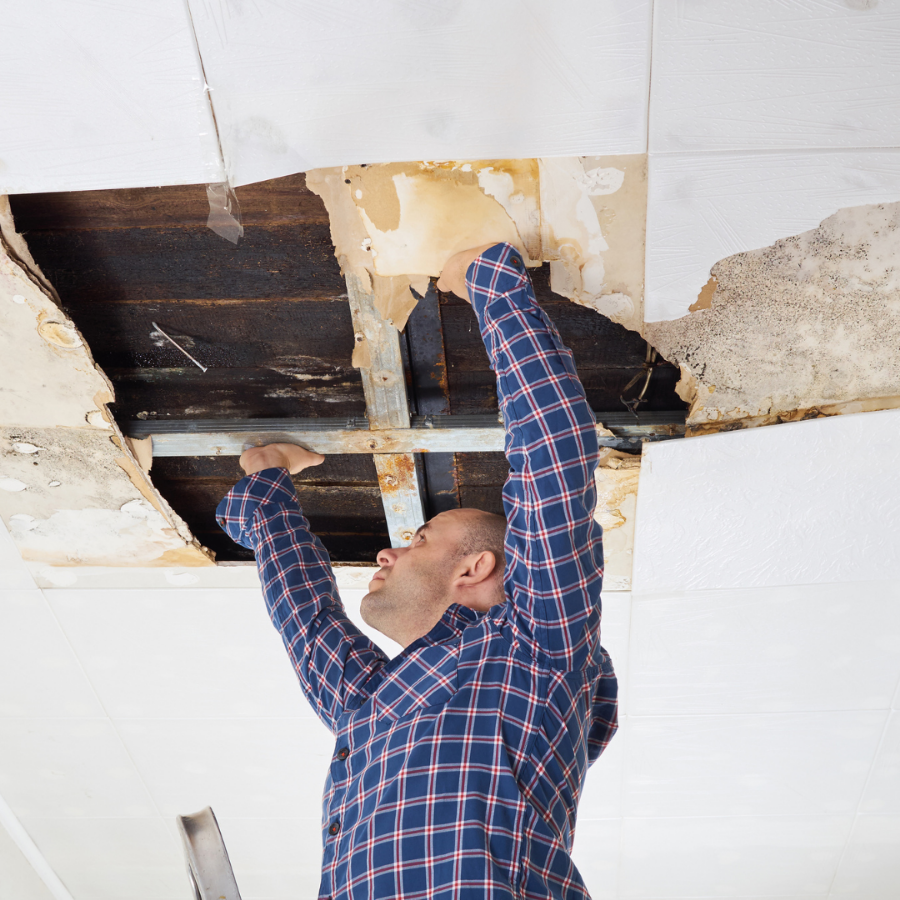
You will also want to make sure that you have any other tool you may need, including levels, hammers, and screwdrivers. You’ll be removing a lot of screws, and pieces of wood so a crowbar is going to be handy to have here as well. The key is to make sure that you have all the tools you will need ready to go.
A big problem for most comes if the damage has affected structural timbers or rafters. These sections will still need to be removed. You can either remove them completely and reinstall them, or you’ll have to remove the section that is affected and then use a scab board to connect new wood to fill the hole left behind.
Repair The Ceiling
Now that you’ve removed the damage, you have to repair what you have just done. This means you’ll need to reapply drywall, plywood, insulation, shingles, and anything else that was removed. This step can be the most difficult part of DIY fixing water damage.
What makes this aspect of fixing water damage so difficult is that it encompasses several areas, such as carpentry, roofing, and other construction methods. All of this will require tools, so make sure to make yourself a checklist so that you don’t find yourself missing a vital tool in the middle of the work.
Once that is done, you can go back over to reprime and paint the ceiling and whatever else was removed as necessary. This is the final, cosmetic step in how to fix a water-damaged ceiling. Just remember, the process will require a lot of physical labor, specific tools for each task, and the knowledge to use them.
An Alternative Approach
If you don’t have the tools or knowledge necessary to make these repairs, or perhaps even the time to do it, you are not alone. There are restoration specialists that you can rely on to get the job done for you. They will have the expertise and equipment to do the job.
One benefit to using a restoration specialist is that they have already dealt with a lot of water damage. They know what it takes, and what to look for so that nothing gets missed. The problem with missing anything is that it will turn into a bigger problem down the road, so you want the work done right and completely.
Water Restoration and You
When you’re looking into how to fix a water-damaged ceiling and considering an undertaking of this magnitude, preparation is key. If you think that the time or work it will take is beyond your ability, don’t hesitate to get help. The very last thing that you want is to not do a complete job or to leave any water damage behind for mold to grow.
If you’re in the Denver area, don’t worry about tackling the water damage. If the work seems overwhelming, we can help you. Contact PuroClean Certified Restoration Specialists, so that we can make sure the work is done right for your home. We have years of experience and can answer any questions you may have.

