A musty odor after a leak is easy to dismiss – until you notice a dark patch spreading along drywall, a tenant complaining about air quality, or a store back room that never seems to dry out. The professional mold removal process exists for exactly these moments, when moisture has moved beyond a simple housekeeping issue and into a property damage problem that needs controlled, technical remediation.
Mold is rarely the whole story. In most homes and commercial buildings, mold is a symptom of an underlying moisture issue such as a roof leak, plumbing failure, poor ventilation, condensation, or flood-related water intrusion. If that moisture source is not found and corrected, surface cleaning alone will not solve the problem for long.
What the professional mold removal process is designed to do
A proper remediation job has two goals. The first is to remove or clean mold-affected materials in a way that limits cross-contamination. The second is to restore normal, dry conditions so mold is less likely to return.
That sounds straightforward, but the details matter. Mold spores are microscopic and can spread when contaminated materials are disturbed. Some building materials can be cleaned successfully, while others need to be removed and discarded. Occupied homes, apartment units, medical offices, retail spaces, and industrial properties all require slightly different planning based on use, foot traffic, and safety concerns.
This is why professional remediation is not just spraying a chemical on visible growth. A qualified team approaches mold as a contamination event tied to moisture, structure, indoor air conditions, and occupant exposure.
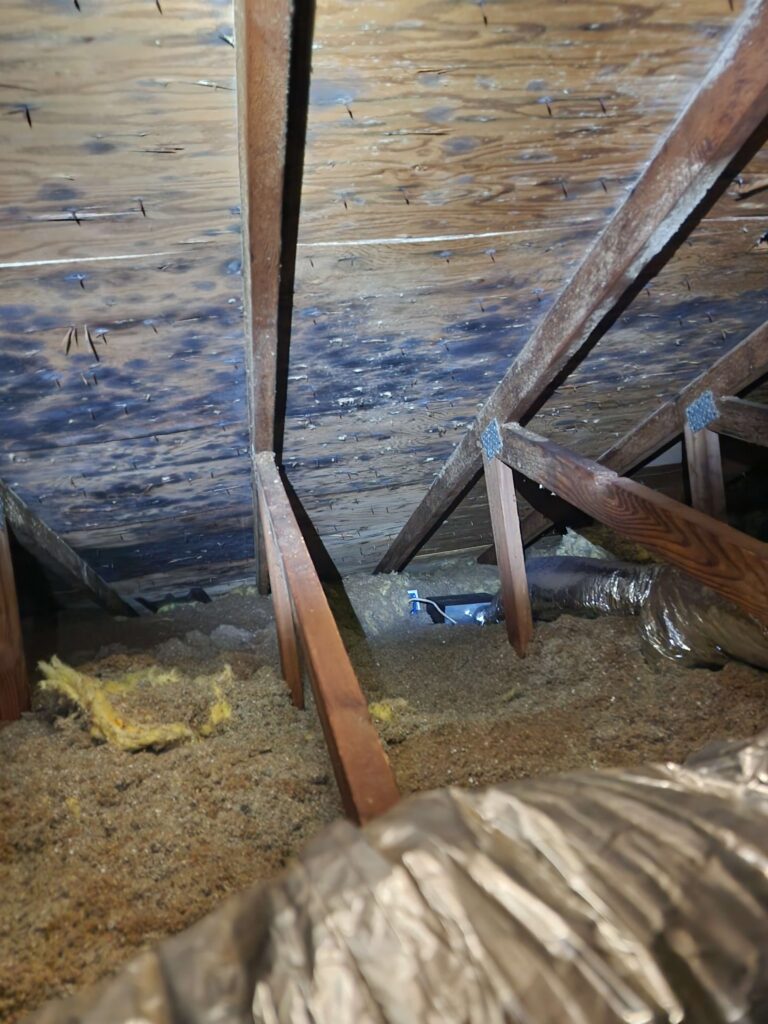
Step 1: Inspection and moisture mapping
Every effective job starts with an inspection. Technicians assess visible mold growth, water damage, staining, humidity conditions, and the likely source of moisture. They also look beyond what is obvious. Mold can grow behind baseboards, inside wall cavities, under flooring, above drop ceilings, and inside HVAC-influenced spaces where damp conditions persist without immediate visibility.
Advanced tools improve accuracy here. Moisture meters help determine how wet specific materials still are, while thermal imaging can reveal temperature differences that point to hidden moisture behind walls or ceilings. This stage is important because the scope of work should match the actual extent of contamination, not just what can be seen from the middle of the room.
For property owners, this is often the point where expectations get reset. A small stain on drywall may be tied to a larger issue in insulation, framing, or an adjacent room. On the other hand, not every discoloration is severe contamination. Good remediation starts with evidence, not guesswork.
Step 2: Containment before removal begins
One of the most important parts of the professional mold removal process is containment. If moldy materials are torn out without isolating the work area, spores can travel into clean sections of the building and create a larger problem.
Containment usually involves sealing the affected area with plastic barriers and controlling movement in and out of the workspace. In many cases, negative air pressure is used so airborne particles are captured and directed through filtration rather than drifting into adjacent rooms. This is especially important in occupied properties, multifamily buildings, and commercial spaces that need to limit business interruption.
Containment plans vary based on size and location. A small utility room with limited contamination will be handled differently than a mold loss affecting multiple offices or a finished basement with soft goods, furniture, and HVAC connections. The point is the same – control the environment before disturbing contaminated material.
Step 3: Air filtration and protective measures
Once containment is set, remediation crews put air filtration and worker safety measures in place. HEPA-filtered air scrubbers are commonly used to reduce airborne particulates within the work zone. Technicians wear appropriate personal protective equipment because mold remediation is both a contamination control task and a demolition-cleaning process.
This phase protects more than the crew. It also helps protect occupants, neighboring spaces, and the property itself while work is underway. In buildings where people are still living or working nearby, this kind of discipline is part of what separates a professional response from a rushed cleanup attempt.
Step 4: Removal of unsalvageable materials
Not all materials can be saved. Porous materials such as heavily contaminated drywall, insulation, ceiling tile, carpet padding, and some wood-based products may need to be removed if mold growth is extensive or deeply embedded.
Removal is done carefully to avoid unnecessary spread. Materials are cut out, bagged, and disposed of according to the remediation plan. Depending on the loss, this may be a small selective demolition or a larger controlled tear-out affecting several structural or finish components.
This is often the most stressful stage for owners because it makes the damage feel real. But removing compromised materials is sometimes the only responsible way to return the space to a safe and stable condition. Keeping contaminated materials in place to save time or cost can lead to recurring odor, hidden growth, and further repair later.
Step 5: Cleaning salvageable surfaces
After damaged materials are removed, remaining structural elements and salvageable surfaces are cleaned. The exact method depends on the material, the level of contamination, and whether the item is porous, semi-porous, or non-porous.
This may involve HEPA vacuuming, damp wiping, detail cleaning, and the use of appropriate antimicrobial or disinfecting products where suitable. The goal is not to paint over the issue or mask odor. The goal is to physically remove contamination from surfaces that can be successfully restored.
There is some nuance here. Not every surface with mold needs replacement, and not every surface can be cleaned to an acceptable standard. Framing lumber, concrete, and some hard surfaces are often salvageable if addressed correctly. Wet insulation and badly affected drywall usually are not. A professional team makes those calls based on condition, not assumptions.
Step 6: Drying the structure completely
Removing visible mold without drying the structure is one of the most common reasons problems come back. Moisture control is what closes the loop.
After cleanup, drying equipment may be set to reduce moisture levels in framing, subfloors, wall cavities, or other affected components. Dehumidifiers, air movers, and targeted drying systems are selected based on the materials involved and the extent of water intrusion. Moisture readings are tracked to confirm progress.
This matters in Connecticut properties where basements, crawlspaces, exterior wall systems, and seasonal humidity shifts can all contribute to recurring moisture. If the property is not dried to an appropriate standard, mold can return even after a thorough cleaning effort.
Step 7: Post-remediation cleaning and clearance
At the end of the remediation phase, the work area should receive a detailed final cleaning. Dust and debris generated during removal need to be addressed before reconstruction or re-occupancy. In some projects, especially larger or more sensitive losses, clearance testing or a post-remediation evaluation may also be part of the process.
Whether third-party testing is necessary depends on the size of the project, the building use, insurance requirements, and the concerns of the owner or occupants. For example, a healthcare-adjacent environment or a commercial site with strict indoor environmental expectations may justify more formal verification than a very limited, isolated residential loss.
What should not be optional is documentation. A professional remediation contractor should be able to explain what was found, what was removed, what was cleaned, what moisture issue was corrected, and what conditions were confirmed before the project moved forward.
Why DIY mold cleanup often falls short
Small, isolated spots on a hard non-porous surface may be manageable for an owner, but many mold situations are larger than they first appear. The risks with DIY work are usually not dramatic in the moment. They show up later as hidden spread, lingering odor, damaged materials left in place, or moisture that was never solved.
The other issue is misidentification. People often focus on the patch they can see and miss the leak above it, the condensation pattern behind it, or the wet insulation surrounding it. Professional remediation brings process, equipment, and documentation to a problem that tends to worsen when handled casually.
For homeowners, property managers, and business operators in East Bridgeport, Shelton, and Milford, quick action makes a real difference. When a trained team responds early, it is often possible to limit demolition, shorten downtime, and move more efficiently into repairs. That is the kind of disciplined, responsive approach companies like PuroClean of East Bridgeport are built to provide when mold follows a leak, flood, or persistent moisture issue.
If you suspect mold, the smartest next step is not to wait for it to spread enough to become obvious. It is to identify the moisture source, define the true scope, and let the cleanup follow a process that protects both the property and the people who use it.
