Table of Contents
This comprehensive water damage restoration checklist will guide you through every step of the recovery process, helping you protect your property and get your life back to normal.
Water damage can strike your home without warning whether from a burst pipe, flooding, or a leaking roof. The key to minimizing damage and costs lies in taking swift, organized action.
Whether you’re dealing with minor water intrusion or major flooding, this checklist provides actionable steps that homeowners, property managers, and even professionals can follow to ensure nothing gets overlooked during the restoration process.
People Also Read : How PuroClean Helped Restore a Home After a Pipe Burst in Langhorne, PA
Understanding the Three Categories of Water Damage
Before diving into your water damage restoration checklist, it’s essential to understand what type of water you’re dealing with. Water damage falls into three categories, each requiring different safety precautions and restoration approaches.
| Category | Source | Safety Level |
| Category 1 (Clean Water) | Broken water supply lines, sink overflows, melting ice or snow | Safest – No health risk if handled quickly |
| Category 2 (Gray Water) | Washing machines, dishwashers, toilet overflows (no feces) | Moderate – Contains contaminants, use caution |
| Category 3 (Black Water) | Sewage backups, flooding from rivers or streams, standing water | Dangerous – Highly contaminated, call professionals |
Important: If you’re dealing with Category 3 (black water) damage, contact professional restoration services immediately. This water damage restoration checklist focuses primarily on Category 1 and 2 situations that homeowners can safely address.
People Also Read : 10 Critical Facts About Water Damage Restoration in Maple Glen That Could Save Your Home
Immediate Actions: The First 24 Hours
The first 24 hours after water damage occurs are critical. Quick action can prevent secondary damage like mold growth, structural issues, and permanent staining. Follow this water damage restoration checklist for immediate response.
Step 1: Ensure Safety First
Before entering any water-damaged area, prioritize your safety:
✓ Turn off electricity to affected areas at the circuit breaker
✓ Wear protective gear including rubber boots, gloves, and a mask
✓ Check for structural damage before entering
✓ Avoid contact with contaminated water
✓ Evacuate if there’s significant flooding or structural concerns
Step 2: Stop the Water Source
Locate and stop the water intrusion immediately. This might mean shutting off your main water valve, repairing a broken pipe, or temporarily patching a roof leak. Every minute counts when water is actively entering your property.
Step 3: Document Everything
Before touching anything, document the damage for insurance purposes:
✓ Take photos and videos from multiple angles
✓ Record water levels if applicable
✓ Make a written inventory of damaged items
✓ Note the date and time of discovery
✓ Document any visible mold or structural issues
Step 4: Contact Your Insurance Company
Call your insurance provider as soon as possible. Many policies require prompt notification. Ask about:
• Coverage limits and deductibles
• Required documentation
• Approved restoration contractors
• Timeline for filing claims
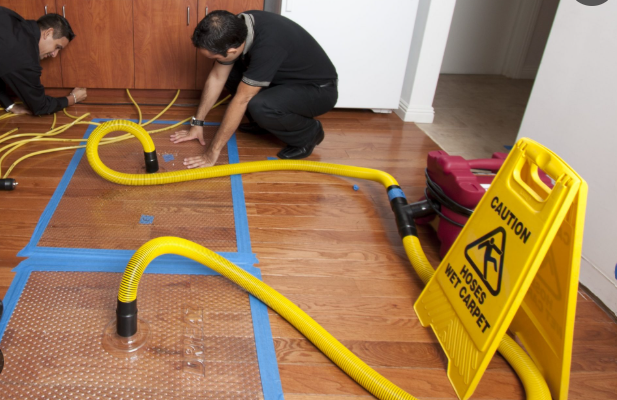
Water Removal and Extraction (24-48 Hours)
Once safety is ensured and documentation is complete, begin removing standing water. The speed of water removal directly impacts the extent of damage and potential for mold growth.
Step 5: Remove Standing Water
Choose your water removal method based on the amount of water:
| Water Level | Recommended Tool | Best For |
| Small puddles (under 1 inch) | Towels, mops, shop vacuum | Minor spills, small leaks |
| Moderate (1-3 inches) | Wet/dry vacuum, water pump | Basement flooding, appliance leaks |
| Significant (3+ inches) | Professional extraction equipment | Major flooding, call professionals |
Step 6: Remove Damaged Materials
Certain materials cannot be saved once water-damaged. Following your water damage restoration checklist, remove and dispose of:
✓ Carpeting and padding (if soaked for over 48 hours)
✓ Soaked drywall and insulation
✓ Water-damaged ceiling tiles
✓ Contaminated food items
✓ Particle board or pressed wood furniture
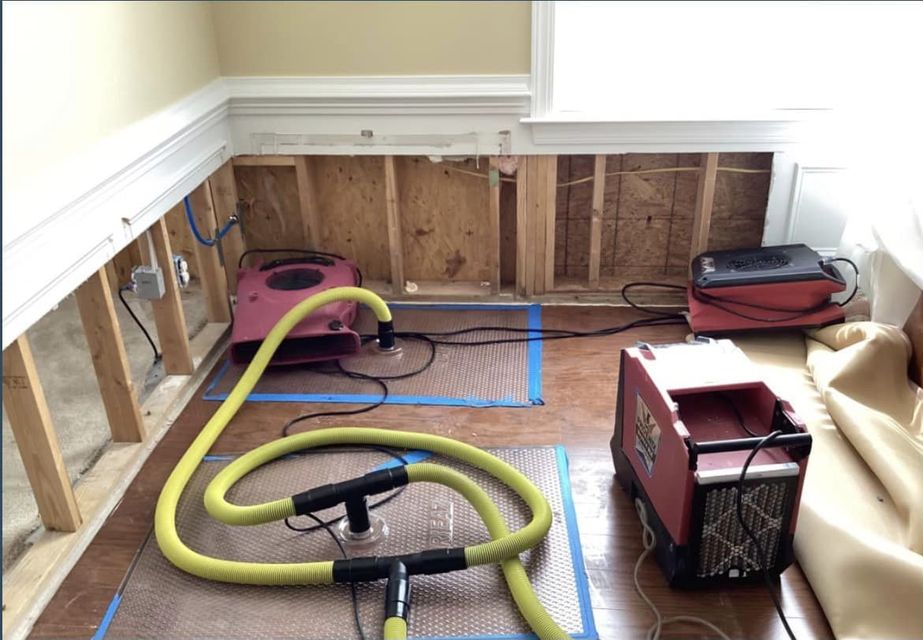
Drying and Dehumidification (Days 2-7)
Proper drying is the most critical phase in your water damage restoration checklist. Incomplete drying leads to mold growth, warped wood, and ongoing structural damage. This phase typically takes 3-7 days depending on the extent of damage.
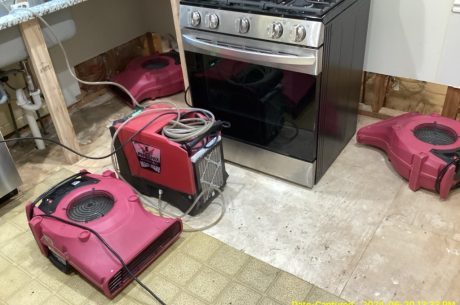
Step 7: Increase Air Circulation
Maximize airflow throughout affected areas:
✓ Open all windows and doors (weather permitting)
✓ Position fans to create cross-ventilation
✓ Use high-velocity fans aimed at walls and floors
✓ Remove furniture to allow air to reach all surfaces
Step 8: Deploy Dehumidifiers
Dehumidifiers are essential for removing moisture from the air. For effective drying, you need approximately one dehumidifier per 300-500 square feet of water-damaged space. Run them continuously until moisture readings return to normal levels (typically 30-50% relative humidity).
Typical Drying Timeline
| Material | Drying Time | Equipment Needed | Special Notes |
| Drywall | 3-5 days | Fans + dehumidifier | May need removal if saturated |
| Hardwood floors | 5-7 days | Specialized floor dryers | Cupping may occur |
| Carpet (salvageable) | 2-4 days | Air movers + extractors | Only if cleaned within 48 hrs |
| Furniture | 4-7 days | Targeted air circulation | Depends on wood type |
Step 9: Monitor Moisture Levels
Use a moisture meter to track progress. Check readings daily in multiple locations. Continue drying until moisture content returns to pre-damage levels. For most building materials, this means readings below 15% moisture content.
Cleaning and Sanitization
Even clean water can lead to bacterial growth if not properly sanitized. This step in your water damage restoration checklist ensures your home is safe and hygienic.
Step 10: Clean All Affected Surfaces
Thoroughly clean and disinfect all water-contacted surfaces:
✓ Wash walls and floors with antimicrobial cleaner
✓ Disinfect all salvageable belongings
✓ Clean HVAC vents and ducts if water entered the system
✓ Sanitize appliances that had water contact
✓ Steam clean or professionally clean upholstered items
Step 11: Prevent Mold Growth
Mold can begin growing within 24-48 hours of water exposure. Apply EPA-approved antimicrobial treatments to vulnerable areas. Focus on:
• Corners and crevices where moisture accumulates
• Behind and under cabinets
• Basement walls and foundations
• Areas with poor ventilation
Restoration and Repair
With the area clean and dry, you can begin restoring your home to pre-damage condition. This final phase of your water damage restoration checklist involves repairs and reconstruction.
Step 12: Assess and Plan Repairs
Create a detailed repair plan that prioritizes:
1. Structural repairs (foundation, framing, load-bearing walls)
2. Electrical and plumbing systems
3. Drywall and insulation replacement
4. Flooring installation
5. Painting and finishing work
Step 13: Complete Repairs
Execute your repair plan systematically. For major reconstruction, consider hiring licensed contractors who specialize in water damage restoration. They understand building codes and can ensure work is completed correctly.
Typical Restoration Costs
Note: These are average costs and can vary significantly based on location, extent of damage, and contractor rates.
| Repair Type | DIY Cost | Professional Cost |
| Water extraction (per room) | $100-$300 | $500-$1,500 |
| Drywall replacement (per sheet) | $15-$30 | $75-$150 |
| Carpet replacement (per sq ft) | $2-$6 | $6-$15 |
| Mold remediation (per sq ft) | Not recommended | $10-$25 |
| Complete restoration (average home) | $1,500-$4,000 | $3,000-$10,000+ |
Prevention: Protecting Your Home from Future Water Damage
The best water damage restoration checklist is one you never need to use. Implement these preventive measures to protect your home from future incidents.
Regular Maintenance Checklist
Monthly:
✓ Check for leaks under sinks and around toilets
✓ Inspect washing machine hoses for cracks or bulges
✓ Clean gutters and downspouts
Quarterly:
✓ Test sump pump operation
✓ Inspect roof for damaged or missing shingles
✓ Check basement for signs of moisture or cracks
Annually:
✓ Have HVAC system professionally serviced
✓ Inspect and clean chimney and flashing
✓ Replace water heater if over 10 years old
✓ Grade soil away from foundation (minimum 6-inch slope)
When to Call Professional Restoration Services
While this water damage restoration checklist helps homeowners handle many situations, some scenarios require professional expertise. Contact certified restoration specialists when:
• Water damage covers more than one room or floor
• You’re dealing with Category 2 or 3 (gray or black) water
• Mold growth is visible or suspected
• Structural damage is present or suspected
• Water has entered electrical systems or wall cavities
• The source of water cannot be easily stopped
Professional restoration companies have industrial equipment, specialized training, and insurance to handle complex situations safely and efficiently.
Quick Reference: Your Complete Water Damage Restoration Checklist
Use this condensed version of the water damage restoration checklist for quick reference during an emergency:
| Phase | Action Items |
| Immediate (0-24 hrs) | Ensure safety, stop water source, document damage, contact insurance, remove standing water |
| Extraction (24-48 hrs) | Complete water removal, remove unsalvageable materials, begin drying process |
| Drying (2-7 days) | Maximize ventilation, run dehumidifiers, monitor moisture levels continuously |
| Cleaning (After drying) | Disinfect all surfaces, apply antimicrobial treatments, prevent mold growth |
| Restoration (Ongoing) | Replace drywall, install flooring, complete structural repairs, restore finishes |
Working with Insurance: Maximizing Your Claim
An essential part of any water damage restoration checklist is understanding how to work effectively with your insurance company. Most homeowners policies cover sudden and accidental water damage, but knowing how to document and present your claim can significantly impact your settlement.
Documentation Best Practices
Thorough documentation strengthens your insurance claim. Keep a detailed record including:
✓ Time-stamped photos before any cleanup begins
✓ Video walkthroughs showing the full extent of damage
✓ Receipts for all cleanup supplies and equipment rentals
✓ Written estimates from restoration contractors
✓ A detailed inventory with original purchase prices when possible
✓ All correspondence with your insurance company in writing
Common Coverage Issues
Understanding what your policy covers helps you navigate the claims process. Standard homeowners insurance typically covers:
Covered: Burst pipes, appliance malfunctions, roof leaks from storms, accidental overflow
Not Covered: Flooding from external sources, gradual leaks, maintenance-related damage, sewer backups (without endorsement)
If you live in a flood-prone area, consider purchasing separate flood insurance through the National Flood Insurance Program. Standard policies exclude flood damage, which can leave you financially vulnerable.
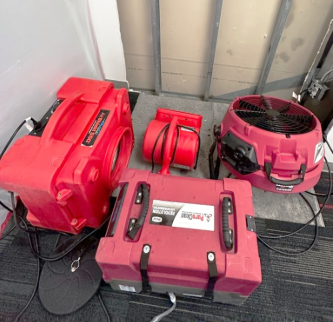
Essential Equipment for Water Damage Restoration
Having the right tools makes your water damage restoration checklist more effective. Here’s what you’ll need for different scenarios:
Basic Home Equipment
For minor water damage (Category 1, small area):
• Wet/dry shop vacuum (6-gallon minimum)
• Box fans (at least two for cross-ventilation)
• Residential dehumidifier (30-50 pint capacity)
• Moisture meter (pin-type or pinless)
• Rubber gloves, boots, and N95 masks
• Heavy-duty trash bags for disposal
Professional-Grade Equipment
For extensive damage or when you want faster results, consider renting professional equipment:
| Equipment | Purpose | Daily Rental | Coverage Area |
| Commercial dehumidifier | Remove moisture from air | $50-$80 | 2,500 sq ft |
| Air mover/blower | High-velocity air circulation | $20-$40 | Per unit |
| Submersible pump | Remove standing water quickly | $30-$50 | Basements |
| HEPA air scrubber | Filter airborne contaminants | $40-$70 | 1,000 sq ft |
Pro tip: Many equipment rental companies offer package deals for water damage restoration. A typical package including dehumidifier, air movers, and moisture meter costs around $100-150 per day, which is more economical than renting items separately.
Common Mistakes to Avoid During Water Damage Restoration
Even with a thorough water damage restoration checklist, homeowners often make critical errors that worsen damage or create new problems. Avoid these common pitfalls:
1. Delaying Action
Every hour you wait increases damage exponentially. Start your water damage restoration checklist immediately, even if it means temporarily addressing the problem at 2 AM. Mold begins growing within 24-48 hours.
2. Ignoring Hidden Moisture
Water travels behind walls, under floors, and into cavities you can’t see. Use a moisture meter to check adjacent areas. Just because a surface looks dry doesn’t mean it is dry.
3. Using Household Fans Without Dehumidification
Fans alone merely circulate humid air. Without dehumidifiers removing moisture from the air, you’re just moving water vapor around. Always pair fans with dehumidifiers for effective drying.
4. Saving Contaminated Materials
Porous materials like drywall, insulation, and carpet padding that contacted Category 2 or 3 water cannot be adequately sanitized. Attempting to save them risks your health and creates ongoing contamination.
5. Closing Windows to Save Energy
Ventilation is crucial during drying. Yes, running dehumidifiers with windows open seems wasteful, but it prevents moisture from becoming trapped indoors. The cost of mold remediation far exceeds a few days of higher energy bills.
Final Thoughts on Water Damage Restoration
Water damage restoration can feel overwhelming, but following this comprehensive water damage restoration checklist will guide you through each critical step. Remember that speed is essential—the faster you act, the less damage your property will sustain and the lower your restoration costs will be.
Whether you choose to tackle the restoration yourself or hire professionals, this checklist ensures you understand the complete process and can make informed decisions about your property’s recovery. Keep this water damage restoration checklist accessible, share it with family members, and review it annually as part of your home maintenance routine.
Most importantly, prioritize safety throughout the restoration process. When in doubt about electrical hazards, structural integrity, or contamination levels, always consult with licensed professionals. Your health and safety are more important than any property or possession.
By following this water damage restoration checklist and taking preventive measures, you’ll be well-prepared to handle water emergencies and protect your home for years to come.
Connect With UsEmpty heading
Stay informed about property protection, restoration tips, and emergency preparedness:
For directions and more information, visit our location.