How to Document Water Damage for Insurance: Full Guide
A water damage event is stressful enough without the added burden of navigating an insurance claim. But the quality of your documentation – what you photographed, what you wrote down, when you reported it, and what you preserved – has a direct and significant effect on the outcome of your claim. Insurance adjusters make coverage and payment decisions based on the evidence in front of them.
The homeowners who receive the most complete settlements are not necessarily those with the most severe damage. They are the ones who documented that damage thoroughly, systematically, and in a format that the claims process can use.
Knowing how to document water damage for insurance before you need to do it is the kind of preparation that pays for itself many times over. This guide provides a complete, step-by-step framework for documenting a water damage event from the moment you discover it through the final stages of restoration – covering what to capture, how to capture it, what records to keep, and how to structure your documentation to support the strongest possible claim. Whether your damage comes from a burst pipe, a roof leak, a monsoon storm, an appliance failure, or a slab leak, the documentation principles in this guide apply directly to your situation.
Why Documentation Quality Determines Claim Outcomes
Understanding why documentation matters so much to the insurance claims process helps you approach it with the right level of priority and thoroughness.
The Adjuster Works From Evidence
The insurance adjuster assigned to your claim has not seen your home before the damage occurred. They arrive at the scene with no baseline knowledge of your property’s pre-loss condition and must piece together the scope, cause, and extent of the damage entirely from the physical evidence they observe and the documentation you provide.
A claim with comprehensive, timestamped, well-organized documentation tells a complete and compelling story to an adjuster. A claim where significant damage was cleaned up or discarded before the adjuster arrived, where the source of the water is ambiguous, or where the affected areas were not fully photographed leaves the adjuster to make assumptions – and those assumptions are rarely in the policyholder’s favor.
Documentation Prevents Disputes
Many insurance claim disputes arise not because the damage was not covered but because the scope of damage cannot be agreed upon after the fact. An adjuster who sees water staining on one ceiling and is told that adjacent rooms were also affected but have already been cleaned has no way to verify the broader scope. Documentation created at the time of discovery – before anything is cleaned, removed, or repaired – is the only evidence that establishes the pre-remediation scope definitively.
Documentation Supports Personal Property Claims
The contents portion of a homeowner’s insurance claim – furniture, electronics, clothing, appliances, and personal items damaged by water – requires specific documentation of each item, its approximate value, and its condition before and after the damage. Without documentation, contents claims are frequently undervalued because the adjuster can only confirm what they personally observe, which by the time of their inspection may be far less than the full extent of personal property that was affected.
Step 1: Stop the Water Source and Ensure Safety First
Before documentation begins, your immediate priority is stopping the active water source and ensuring that the environment is safe to enter. Shut off the supply valve to the failing fixture, the main water supply to the home, or the HVAC system if it is the source. Turn off electrical circuits in water-affected areas before entering spaces where standing water is present. Do not enter areas where structural instability – sagging ceilings, compromised floor sections, water-damaged electrical equipment – presents an immediate safety risk.
Document your safety actions as part of your timeline record – note when you identified the source, what you did to stop it, and when the water flow was stopped. This timeline demonstrates the mitigation steps you took and is relevant to the insurance carrier’s assessment of whether you acted reasonably to prevent additional damage.
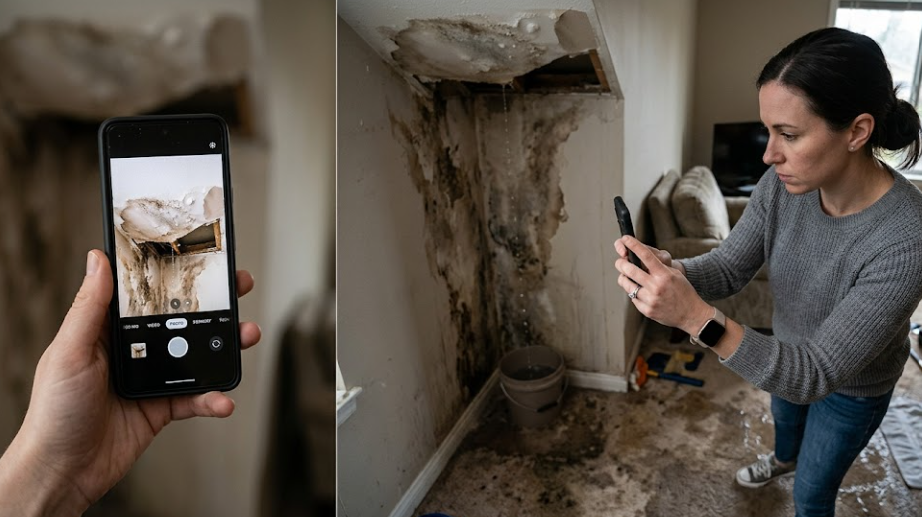
Step 2: Photograph and Video Everything Before Touching Anything
This is the most important documentation step, and it must happen before any cleanup, removal, or movement of affected items begins. A photograph taken after furniture has been moved, water has been mopped up, or damaged materials have been removed is worth far less than a photograph taken in the immediate aftermath of discovery. The pre-cleanup documentation establishes the true initial condition of the loss.
What to Photograph
Comprehensive visual documentation of how to document water damage for insurance covers every visible dimension of the damage:
- Wide-angle overview shots of each affected room showing the overall extent of water presence, staining, and damage – take these from multiple corners of the room to establish context
- Close-up shots of standing water with something in the frame for scale – a ruler, a shoe, a common object – so the depth and extent of the water is clear
- Detailed photographs of all water staining on ceilings, walls, and floors, capturing the full extent of each stain including its edges
- Close-up photographs of the source of the water damage – the failed pipe fitting, the cracked supply line, the point of roof penetration, the overflowed appliance – before anything is touched or repaired
- Photographs of all damaged personal property in place – furniture, electronics, clothing, appliances – before any items are moved out of the affected area
- Photos of damage to flooring materials including warping, buckling, staining, and any visible subfloor damage where flooring has been lifted
- Close-up documentation of any visible mold growth, noting its location and approximate coverage area
- Photographs of exterior damage if the water source was storm-related – damaged roofing, missing tiles, failed flashing, storm debris – taken from ground level and using zoom where direct access is not safe
- Photos of any building materials that will need to be removed – marked walls showing where demolition will be required, damaged insulation visible through open access panels
Video Walkthrough
In addition to still photographs, a video walkthrough of the entire affected area provides context that still photos cannot fully capture. Walk through each affected room slowly, narrating what you see – the extent of the water, the affected materials, the source location. The narrated video establishes a comprehensive record of conditions at the time of discovery that can be referenced throughout the claims process. Record the date and time verbally at the beginning of the video.
Metadata and Timestamps
Photograph and video timestamps are valuable evidence of when the documentation was created. Ensure that the date and time settings on your smartphone or camera are correct before beginning documentation. If you are documenting on a smartphone, the metadata embedded in each image file will record the exact time and in many cases the GPS location of the photo. Do not edit or alter photos in ways that affect their metadata.
Step 3: Create a Written Damage Inventory
Visual documentation captures the condition of the property, but a written inventory captures the specific items affected and establishes a record that can be used to calculate the value of the loss. The written damage inventory is one of the most overlooked and most valuable documentation tools in how to document water damage for insurance.
Room-by-Room Inventory Format
For each affected room or area, record the following in writing:
- The room name and its location in the home
- The type and approximate extent of structural damage – water staining on ceiling (note dimensions), buckled flooring (note square footage), wet drywall (note affected wall sections)
- Each item of personal property that was damaged, with a description, approximate age, and estimated replacement value or original purchase price
- Any fixed improvements or betterments that were damaged – custom cabinetry, upgraded flooring, built-in fixtures
- The date and approximate time the damage was discovered in this area
Personal Property Documentation
For higher-value items damaged by water, supplement the written inventory with additional documentation:
- Photographs of serial numbers and model numbers on appliances and electronics before they are moved or powered off
- Receipts or purchase records where available – search email for order confirmations or warranty registrations that confirm purchase dates and prices
- Brand, model, and age information for furniture, rugs, and furnishings
- Photographs of clothing labels, book titles, artwork, and other personal property that was damaged
Step 4: Document the Water Source and Cause
Establishing the cause of the water damage is critical for determining whether the event falls within your policy’s covered perils. How to document water damage for insurance must include clear evidence of the source, because coverage determinations frequently hinge on whether the damage was sudden and accidental versus gradual, or whether it originated from a covered source versus an excluded one.
- Photograph the source of the water – the failed pipe, the overflowed appliance, the damaged roof section, the failed window seal – before any repair work begins
- If a plumber or roofing contractor identifies the source during an initial assessment, obtain a written statement identifying the cause and the approximate age of the failure
- Note the date and time that the damage was first discovered and the date and time that the source was identified and stopped – this timeline helps establish that the damage was sudden and recently discovered rather than long-standing and neglected
- If storm damage is the source, document the storm event itself – note the date, time, and character of the storm, save any weather service alerts or reports that confirm the event, and photograph outdoor conditions before and after the storm if possible
- If the water source is inside the home, document whether any recent plumbing service, appliance installation, or home maintenance activity preceded the event – this information may be relevant to the carrier’s investigation of the cause
Step 5: Document Your Mitigation Actions
Most homeowner’s insurance policies require the policyholder to take reasonable steps to mitigate further damage once a water event is discovered. Documenting the mitigation steps you took protects your claim from any suggestion that you allowed damage to worsen through inaction.
- Note in writing the exact date and time that you shut off the water source or HVAC system
- Photograph any temporary measures you took – tarps placed over roof damage, buckets collecting drips, furniture moved out of the water path, rugs removed from flooded areas
- Keep receipts for any emergency materials purchased for mitigation – tarps, sandbags, wet vacuums, fans, plastic sheeting
- Record the date and time that you contacted your insurance carrier to report the loss
- Record the date and time that you contacted a professional restoration company and the date they arrived on site
Step 6: Preserve Damaged Materials Until Inspection
Do not discard, remove, or repair any damaged materials before the insurance adjuster has completed their inspection, unless health or safety requires immediate action. Preserving damaged materials is one of the most important steps in how to document water damage for insurance because the adjuster’s ability to verify your scope of damage depends on their ability to see the affected materials.
If materials must be removed for safety or health reasons – flooring with sewage contamination, severely damaged ceilings at risk of collapse – photograph them extensively before removal, keep samples where possible, and document in writing the reason for emergency removal before the adjuster’s inspection. Notify your insurance carrier before performing emergency material removal and request their guidance.
Step 7: Maintain a Written Claims Diary
From the day you discover the damage through the final settlement of your claim, maintain a written diary of every action taken and every communication with the insurance carrier, restoration contractors, and other parties. This claims diary is one of the most powerful tools available for resolving disputes and accelerating the claims process.
- Record every phone call with your insurance carrier – date, time, name of the representative, and a summary of what was discussed and agreed
- Save all written communications with the carrier – emails, letters, claim status updates, coverage confirmations, and payment notifications
- Document all visits by the adjuster – date, time, duration, areas inspected, and any verbal statements made by the adjuster about coverage or scope
- Record all communications with the restoration contractor – dates of work performed, daily moisture readings reported, materials removed, and costs incurred
- Keep a running log of any out-of-pocket expenses related to the damage – hotel stays, meals during displacement, laundry, storage, and emergency purchases
Step 8: Work With Your Restoration Company on Documentation
A professional water damage restoration company is a key documentation partner throughout the claims process. IICRC-certified restoration contractors generate detailed technical documentation that supports your insurance claim in ways that homeowner documentation alone cannot replicate.
- Moisture maps – detailed records of moisture meter readings throughout the affected area taken at the start of the project, daily during drying, and at completion – provide objective evidence of the scope and depth of water intrusion
- Thermal imaging reports showing temperature anomalies from moisture inside wall cavities and ceiling assemblies document hidden damage that was invisible during the adjuster’s visual inspection
- Daily drying logs that track the progressive reduction in moisture content across all affected materials establish the timeline and complexity of the restoration
- Scope of work documents that itemize all materials removed, equipment deployed, and labor performed in the format required by insurance carriers
- Post-restoration moisture readings that confirm all materials have reached dry standard levels verify that the restoration was complete and professionally performed
When selecting a restoration company, ask specifically about their documentation practices and whether they have experience preparing documentation packages for insurance claims. A restoration company that works regularly with insurance carriers understands the format and specificity that adjusters require.
Step 9: Document Pre-Existing Conditions
One common point of dispute in water damage claims is whether specific damage was caused by the current event or was pre-existing. If you have photographs of your home’s interior taken before the water event – from real estate listings, home improvement projects, family gatherings, or routine documentation – these images establish a baseline condition that distinguishes pre-loss appearance from damage caused by the current event.
Going forward, photograph each room of your home annually and store those images in cloud backup outside the home. This proactive documentation practice creates a readily available pre-loss baseline for any future insurance claim and eliminates one of the most common sources of claim disputes.
Step 10: Understand What You Are Entitled to Claim
Complete documentation supports a complete claim. Make sure you are claiming all categories of loss that your policy covers:
- Structural damage to the building – walls, ceilings, floors, framing, insulation, and fixed components
- Personal property – furniture, electronics, clothing, appliances, and other contents
- Additional living expenses – hotel, meals, laundry, and incidental costs incurred while displaced from the home during restoration
- Loss of use – rent payments made for temporary housing during a restoration period
- Code upgrade costs – if reconstruction requires bringing building systems up to current code standards that exceed the original construction, these costs may be covered under code upgrade provisions in your policy
- Professional services – public adjuster fees, engineering reports, and independent inspections may be recoverable under some policy provisions
Documentation Is Not Optional – It Is How You Get Paid
The question of how to document water damage for insurance has a simple underlying answer: document everything, document it immediately, document it completely, and preserve it throughout the claims process. Every photograph you take before cleanup begins, every item you add to your damage inventory, every communication you record in your claims diary, and every technical report your restoration company generates is evidence that supports your claim and protects your financial recovery.
Arizona’s Premier Restoration Specialists at PuroClean are not just restoration technicians – they are documentation partners who generate the technical evidence that insurance carriers require and who have the experience to structure that documentation in a way that supports your claim from first notice to final settlement. Leaders in recovery. Calm in the Chaos. When the situation is overwhelming, PuroClean helps you document it right from the start.
Water Damage Discovered? Call PuroClean for Expert Restoration and Insurance Documentation
PuroClean’s certified restoration specialists provide the professional moisture mapping, drying documentation, scope-of-work reporting, and claims support that Arizona homeowners need to maximize their insurance recovery. We respond 24/7 throughout the Phoenix metro area and West Valley communities. Arizona’s Premier Restoration Specialists. Leaders in recovery. Calm in the Chaos.
Call PuroClean now at (480) 767-5588. Fast response. Proven results. Complete peace of mind.
Document right from the start. With PuroClean, you never have to figure out the process alone.


