Discovering bubbling paint on your walls is more than just an aesthetic problem it’s often a warning sign of underlying water damage that needs immediate attention. Those unsightly blisters and bulges aren’t just cosmetic issues; they indicate that moisture has penetrated your wall’s surface and is compromising the integrity of your paint and potentially the structure beneath.
Water Damage in Melbourne, FL
Whether you’ve noticed a few small bubbles or large sections of peeling, blistered paint, understanding what causes this problem and how to fix it properly can save you thousands of dollars in future repairs. This comprehensive guide will walk you through everything you need to know about paint bubbles caused by moisture, from identification to repair and prevention.
What Are Paint Bubbles and Why Do They Form?
Paint bubbles, also called blisters or blistering, occur when the paint film lifts away from the underlying surface, creating a raised, bubble-like appearance. These bubbles form when something breaks the bond between the paint and the wall surface, and in the case of water damage, that “something” is moisture.
When water infiltrates the layers of paint or the wall material behind it, it causes the paint to lose adhesion. The water becomes trapped between the paint layers or between the paint and the wall, creating pockets that appear as bubbles. As moisture continues to accumulate, these bubbles grow larger and eventually burst, leaving behind peeling, flaking paint.
The Science Behind Paint Blistering
Paint adheres to surfaces through both mechanical bonding (gripping into pores and irregularities) and chemical bonding. When moisture enters the equation, several things happen:
Hydrolysis: Water breaks down the chemical bonds that hold paint to the surface, weakening the adhesion.
Expansion: Water causes certain materials to expand, creating pressure that pushes paint away from the wall.
Vapor Pressure: As moisture tries to escape through the paint film, it creates pressure that lifts the paint, forming bubbles.
Substrate Deterioration: Water can damage the wall material itself (drywall, plaster, wood), causing the surface to crumble or deteriorate beneath the paint.
Common Causes of Moisture-Related Paint Bubbles
Understanding the source of moisture is crucial for effective repair. Paint bubbles from water damage can originate from various sources:
1. Plumbing Leaks
Hidden plumbing problems are among the most common culprits behind paint bubbles:
- Leaking pipes within walls can go undetected for months or years
- Slow drips from pipe joints or connections
- Deteriorating pipe seals in older homes
- Frozen and burst pipes during cold weather
- Sweating pipes that create condensation buildup
Plumbing leaks often manifest as vertical lines of paint damage that follow the path of hidden pipes. You might notice bubbles appearing on walls adjacent to bathrooms, kitchens, or laundry rooms.
Read Also: What Happens If You Breathe In Fire Extinguisher Powder: Safety Guide and Health Effects
2. Roof Leaks
Water entering through your roof can travel along rafters and beams before appearing as wall damage far from the actual leak point:
- Missing or damaged shingles allowing rain penetration
- Deteriorated flashing around chimneys, vents, or skylights
- Ice dams in winter causing water backup
- Clogged gutters leading to overflow and water intrusion
Roof leaks typically cause paint bubbles on upper walls, near ceilings, or in upstairs rooms. The damage often worsens after rainstorms.
3. Foundation Issues and Rising Damp
Moisture from the ground can wick up through foundation walls and into your home’s interior:
- Poor drainage around the foundation
- Cracked foundation walls allowing water seepage
- Missing or inadequate vapor barriers
- High water table in your area
- Capillary action pulling groundwater upward through porous materials
Rising damp typically affects lower sections of walls, with bubbles and damage appearing near baseboards and floor level.
4. Condensation Problems
High humidity and poor ventilation create ideal conditions for condensation-related paint damage:
- Bathroom moisture from showers and baths without proper ventilation
- Kitchen humidity from cooking and dishwashing
- Basement dampness due to poor ventilation
- Thermal bridging where cold spots on walls attract condensation
- Inadequate insulation causing temperature differentials
Condensation issues often affect bathrooms, kitchens, basements, and exterior walls, especially in homes with poor ventilation.
5. Window and Door Leaks
Water can infiltrate around poorly sealed openings:
- Deteriorated caulking around window frames
- Faulty window seals allowing rain penetration
- Improper flashing during original installation
- Condensation on single-pane windows running down walls
Read Also: How Much Does It Cost to Fix Water Damage in Melbourne, FL?
Window-related damage appears around frames and may extend downward in vertical streaks.
6. HVAC and Appliance Issues
Climate control systems and appliances can be hidden sources of moisture:
- Air conditioner condensation leaking from drain pans
- Furnace humidifier problems creating excess moisture
- Water heater leaks affecting nearby walls
- Washing machine hoses developing slow leaks
7. External Water Intrusion
Sometimes the problem originates outside your home:
- Improper grading causing water to flow toward the house
- Broken sprinkler systems spraying water on exterior walls
- Splash-back from hard rain hitting the ground near walls
- Flooding from storms or natural disasters
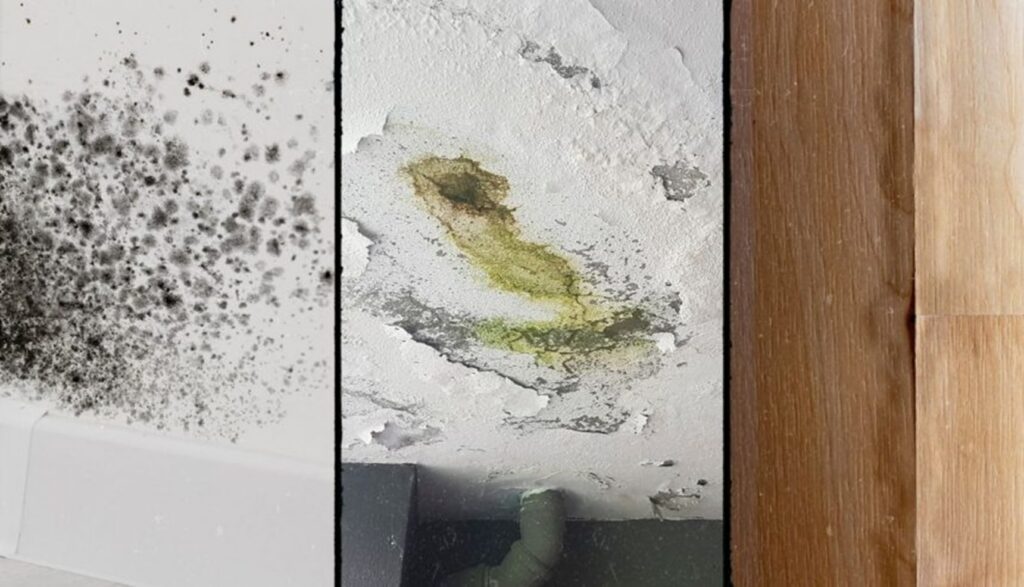
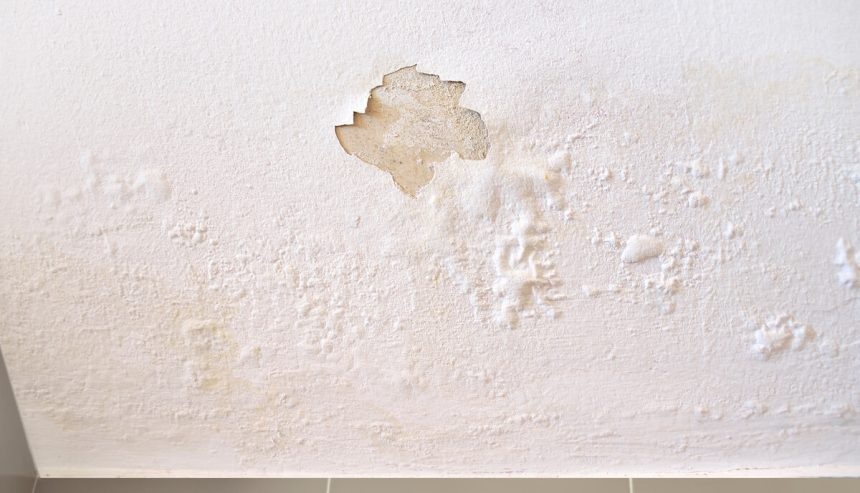
Identifying Water Damage Behind Paint Bubbles
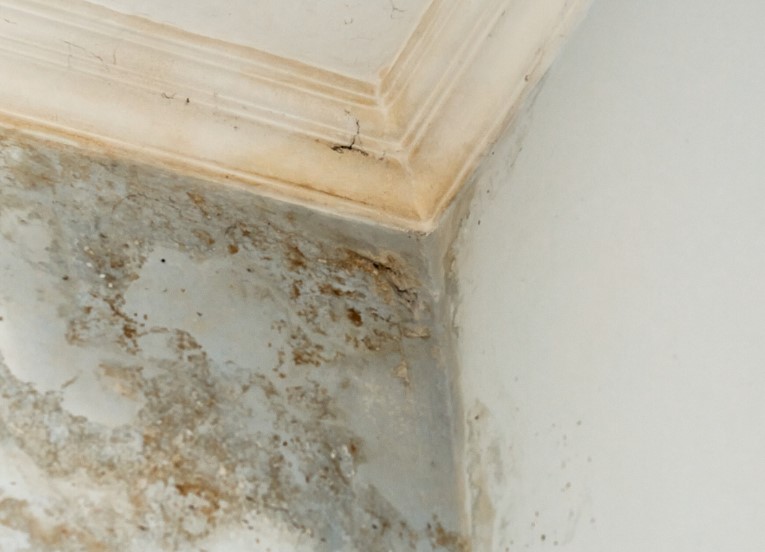
Before you can fix the problem, you need to assess its extent. Here’s how to evaluate water damage behind bubbling paint:
Visual Inspection Checklist
Look for these additional signs that often accompany paint bubbles:
- Discoloration: Yellow, brown, or gray stains on walls or ceilings
- Soft or spongy walls: Drywall that gives when pressed
- Musty odors: The distinctive smell of mold or mildew
- Peeling or cracking paint: Often surrounding bubble areas
- Visible mold growth: Black, green, or white fuzzy patches
- Warped baseboards: Indicating water at floor level
- Efflorescence: White, powdery mineral deposits on walls
Touch Test
Gently press on bubbled areas:
- Firm bubbles: Usually contain air or moisture between paint layers
- Soft, spongy areas: Indicate water-saturated drywall or plaster
- Crumbling texture: Suggests advanced deterioration requiring replacement
The Moisture Meter Test
For a definitive assessment, use a moisture meter (available at hardware stores or through professional restoration services). This tool measures moisture content in walls and helps identify:
- The full extent of water damage beyond visible areas
- Whether walls are still actively wet or have dried
- Hidden moisture pockets that aren’t yet visible
Read Also: How to Detect Hidden Signs of Water Damage in Walls
When to Call a Professional: Call PuroClean of Melbourne
Consider professional water damage assessment if:
- Bubbles cover large areas (more than a few square feet)
- Multiple walls or rooms are affected
- You can’t identify the moisture source
- There’s visible mold growth
- The wall feels soft or deteriorated
- Electrical outlets or switches are in affected areas
- You suspect plumbing or structural issues
Health Risks: Why Quick Action Matters
Paint bubbles from moisture aren’t just cosmetic concerns they can pose serious health risks:
Read Also: How to Tell if Water Damage Is New or Old
Mold Growth
Moisture behind paint creates ideal conditions for mold proliferation. Mold can:
- Trigger allergic reactions and asthma attacks
- Cause respiratory problems
- Produce mycotoxins that affect health
- Spread rapidly to other areas of your home
Mold can begin growing within 24-48 hours of water exposure, making swift action critical.
Indoor Air Quality
Water damage and mold release spores and volatile organic compounds (VOCs) into your home’s air, potentially causing:
- Headaches and fatigue
- Irritation of eyes, nose, and throat
- Difficulty concentrating
- Worsening of existing respiratory conditions
Structural Damage
Prolonged moisture exposure can:
- Rot wooden framing and supports
- Deteriorate drywall and plaster
- Compromise structural integrity
- Create safety hazards
Step-by-Step Guide to Fixing Paint Bubbles from Water Damage

Repairing water-damaged paint requires addressing both the symptom (bubbles) and the cause (moisture source). Here’s a comprehensive repair process:
Step 1: Stop the Water Source
This is the absolute first priority. No repair will last if active water intrusion continues:
- Fix leaking pipes or have a plumber address the issue
- Repair roof damage or seal window leaks
- Improve drainage around your foundation
- Install or repair gutters and downspouts
- Address HVAC or appliance leaks
Step 2: Dry the Affected Area Completely
Proper drying is essential before any repairs:
Immediate Actions:
- Remove wet insulation if accessible
- Increase ventilation by opening windows
- Use fans to promote air circulation
- Deploy dehumidifiers to extract moisture from the air
Professional Drying Methods: For significant water damage, professional restoration services use:
- Industrial dehumidifiers
- Air movers strategically placed for optimal drying
- Moisture meters to verify complete drying
- Thermal imaging to detect hidden moisture
Drying Timeline:
- Minor surface moisture: 24-48 hours
- Wet drywall: 3-5 days
- Saturated walls: 7-14 days or more
Never proceed with repairs until walls are completely dry (moisture content below 16% for wood, below 1% for drywall).
Step 3: Assess and Repair Structural Damage
Once everything is dry, evaluate what needs replacement:
Minor Damage: If drywall is intact with only surface damage, you may only need to:
- Scrape away loose paint
- Sand the area smooth
- Apply primer and repaint
Moderate Damage: For soft spots or minor deterioration:
- Cut out damaged drywall sections
- Replace with new drywall
- Tape and mud seams
- Sand smooth and prime
Severe Damage: Extensive deterioration may require:
- Complete wall section replacement
- Framing repair or replacement
- Insulation replacement
- Professional restoration services
Step 4: Address Mold Issues
If you discover mold during your repairs:
Small Areas (less than 10 square feet): You can handle this yourself:
- Wear protective equipment (N95 mask, gloves, eye protection)
- Use a solution of 1 cup bleach to 1 gallon water OR specialized mold cleaner
- Scrub affected areas thoroughly
- Allow to dry completely
- Discard materials that can’t be cleaned (drywall, insulation)
Large Areas or Hidden Mold: Professional mold remediation is recommended for:
- Mold covering more than 10 square feet
- Mold in HVAC systems
- Mold behind walls or in inaccessible areas
- Any situation involving health-compromised individuals
Step 5: Prepare the Surface
Proper preparation ensures your paint repair lasts:
- Scrape away all bubbled, peeling, or loose paint using a putty knife or paint scraper
- Sand the edges where old paint meets exposed wall to create a smooth transition
- Fill any gouges or holes with spackling compound or joint compound
- Sand smooth with fine-grit sandpaper (120-150 grit)
- Clean the surface with a damp cloth to remove all dust
- Allow to dry completely
Step 6: Prime the Affected Area
Priming is crucial for proper paint adhesion and stain blocking:
Choose the Right Primer:
- Stain-blocking primer: Essential for water stains (Kilz, Zinsser BIN, or similar)
- Mold-resistant primer: If mold was present or moisture is a concern
- Oil-based primer: For severe stains and maximum protection
- Water-based primer: Acceptable for minor repairs in dry conditions
Application Tips:
- Apply primer generously to all repaired areas
- Extend primer beyond the visible damage area
- Allow full drying time (check manufacturer’s instructions)
- Apply a second coat if stains bleed through
Step 7: Repaint
Now you’re ready for the final cosmetic repair:
- Match your paint: Bring a chip of existing paint to a paint store for color matching
- Choose quality paint: Invest in moisture-resistant or bathroom/kitchen formula for high-humidity areas
- Apply thin, even coats: Two thin coats are better than one thick coat
- Feather the edges: Blend new paint into old for seamless results
- Allow proper drying time between coats
Step 8: Monitor for Recurrence
After repairs are complete:
- Check the area weekly for the first month
- Look for any signs of new bubbling or discoloration
- Monitor moisture levels if problems were severe
- Address any recurrence immediately
Preventing Future Paint Bubbles from Moisture
Prevention is always easier and less expensive than repair. Here’s how to protect your walls:
Read Also: How to Protect Your Home Against Spring Flooding in 2026
Control Indoor Humidity
Maintain indoor humidity between 30-50%:
- Use dehumidifiers in damp areas like basements
- Run exhaust fans during and after showers (at least 20 minutes)
- Vent bathrooms and kitchens to the exterior, not the attic
- Use kitchen exhaust fans when cooking
- Consider a whole-house ventilation system if humidity is consistently high
Regular Maintenance
Stay ahead of problems with routine inspections:
- Inspect roofs annually and after major storms
- Check plumbing for signs of leaks or corrosion
- Maintain gutters: Clean at least twice yearly
- Inspect window and door seals regularly
- Monitor basement for signs of water intrusion
- Check HVAC systems and condensate drains seasonally
Improve Drainage
Keep water away from your home’s foundation:
- Grade soil to slope away from the house (6 inches over 10 feet)
- Install or repair gutters and downspouts
- Extend downspouts at least 5-10 feet from the foundation
- Consider a French drain system for persistent problems
- Keep plantings away from foundation walls
Use Proper Paint Products
Choose paint designed for your specific conditions:
- Moisture-resistant paint: For bathrooms and kitchens
- Mold-resistant paint: Contains antimicrobial additives
- Exterior-grade paint: For high-moisture areas
- Quality primer: Always prime before painting, especially after repairs
Ensure Proper Ventilation
Good airflow prevents condensation and moisture buildup:
- Install adequate exhaust fans in bathrooms (rated for room size)
- Ensure attic ventilation is sufficient
- Don’t block air vents with furniture
- Open windows regularly for fresh air exchange
- Consider an ERV or HRV system for whole-house ventilation
Address Problems Immediately
The moment you notice issues:
- Investigate any water spots or stains
- Fix small leaks before they become big problems
- Don’t ignore musty odors
- Respond to early signs of bubbling paint
- Keep emergency contact information for plumbers and restoration services handy
When to Call Professional Water Damage Restoration Services
Some situations require professional expertise:
Call Professionals When:
- Large-scale water damage affects multiple rooms or walls
- Category 2 or 3 water is involved (contaminated water, sewage)
- Structural concerns arise from water damage
- Extensive mold growth is discovered
- Hidden water damage is suspected behind walls or under floors
- Electrical hazards are present in affected areas
- You’re overwhelmed by the scope of damage
- Insurance claims need proper documentation
What Professional Restoration Includes:
Professional water damage restoration services typically provide:
- Emergency response (often 24/7 availability)
- Water extraction using industrial equipment
- Structural drying with commercial dehumidifiers and air movers
- Moisture detection using thermal imaging and moisture meters
- Mold prevention and remediation if needed
- Content restoration for affected belongings
- Reconstruction services to return your home to pre-damage condition
- Insurance assistance with documentation and claims processing
The Cost of Ignoring Paint Bubbles
While it’s tempting to simply paint over bubbles or ignore them, this approach always backfires:
Short-Term Consequences:
- Problem worsens and spreads to larger areas
- Paint continues to peel and bubble
- Mold begins growing behind walls
- Unpleasant odors develop
Long-Term Consequences:
- Structural wood begins rotting
- Drywall deteriorates and requires replacement
- Mold spreads throughout the home
- Property value decreases
- Health problems develop from mold exposure
- Repair costs multiply exponentially
A $200 repair ignored today can easily become a $5,000-10,000 problem within months.
Read Also: How to Avoid Water Damage During the Holidays in Melbourne, FL
Special Situations: Region-Specific Considerations
Florida and Coastal Areas
Living in Florida’s humid climate presents unique challenges:
- High humidity year-round requires constant moisture management
- Hurricane and tropical storm damage causes sudden water intrusion
- Aging stucco exteriors can allow water penetration
- Coastal salt air affects paint durability
- Flat roofs common in Florida are prone to ponding and leaks
Florida homeowners should:
- Invest in high-quality dehumidification
- Use mold-resistant paint and materials
- Inspect homes after every storm
- Maintain exterior surfaces meticulously
- Consider whole-house ventilation systems
Older Homes
Homes built before modern building codes face additional risks:
- Lack of vapor barriers in walls
- Original plumbing may be deteriorating
- Poor insulation creates condensation problems
- Outdated materials more susceptible to water damage
- Settlement and foundation issues create entry points for water
Conclusion: Call PuroClean of Melbourne for Flood Cleanup and Water Damage Restoration in Melbourne, FL

Paint bubbles on walls from moisture are never just a cosmetic issue they’re a clear signal that water has compromised your home’s protective barriers. Whether caused by plumbing leaks, roof damage, condensation, or foundation issues, these bubbles demand immediate attention to prevent extensive damage, mold growth, and health hazards.
The good news is that with proper diagnosis, thorough repairs, and preventive maintenance, you can protect your home from future water damage. Remember the key steps: identify and stop the water source, dry everything completely, repair damaged materials, use proper primers and paints, and implement moisture control strategies.
For minor bubbling in small areas, a DIY approach may be sufficient. However, don’t hesitate to call professional water damage restoration services for extensive damage, hidden moisture, or situations involving mold or structural concerns. The investment in professional help often saves money in the long run by ensuring repairs are done correctly the first time.
Your home is likely your largest investment protect it by taking paint bubbles seriously and addressing moisture problems promptly. With vigilance and proper maintenance, you can keep your walls beautiful, dry, and structurally sound for years to come.
If you’re dealing with water damage, paint bubbles, or moisture issues in your Melbourne or Palm Bay, Florida home, PuroClean of Melbourne provides expert water damage restoration services 24/7. Our IICRC-certified technicians use advanced equipment to locate hidden moisture, dry your property completely, and prevent mold growth. Call (321) 378-2400 for immediate assistance.
Connect With Us on Social Media!


