Table of Contents

Water bursting through frozen pipes is not uncommon once the temperature starts to drop in the winter. You’d be surprised how often water damage restoration companies, like us, get calls every winter to restore properties affected by burst and frozen pipes. Keep on reading to find out how pipes freeze, how to prevent frozen pipes, and how to unfreeze pipes — all while avoiding water damage before it’s too late:
Why do pipes freeze?
Freezing and expanding water makes pipes very vulnerable to damage. Outdoor hose bibs, swimming pool supply lines, and water sprinkler lines are just some examples of the water lines that freeze due to harsh cold weather exposure. Pipes in unheated interior areas such as basements, crawl spaces, attics, garages, and kitchen cabinets, and those that run against exterior walls with little to no insulation are also susceptible to freezing.
Several variables contribute to frozen pipes:
- Building construction type
- Quality and quantity of insulation
- Decline in temperature
- Direction and force of the wind
- Other weather-related conditions are all contributing factors
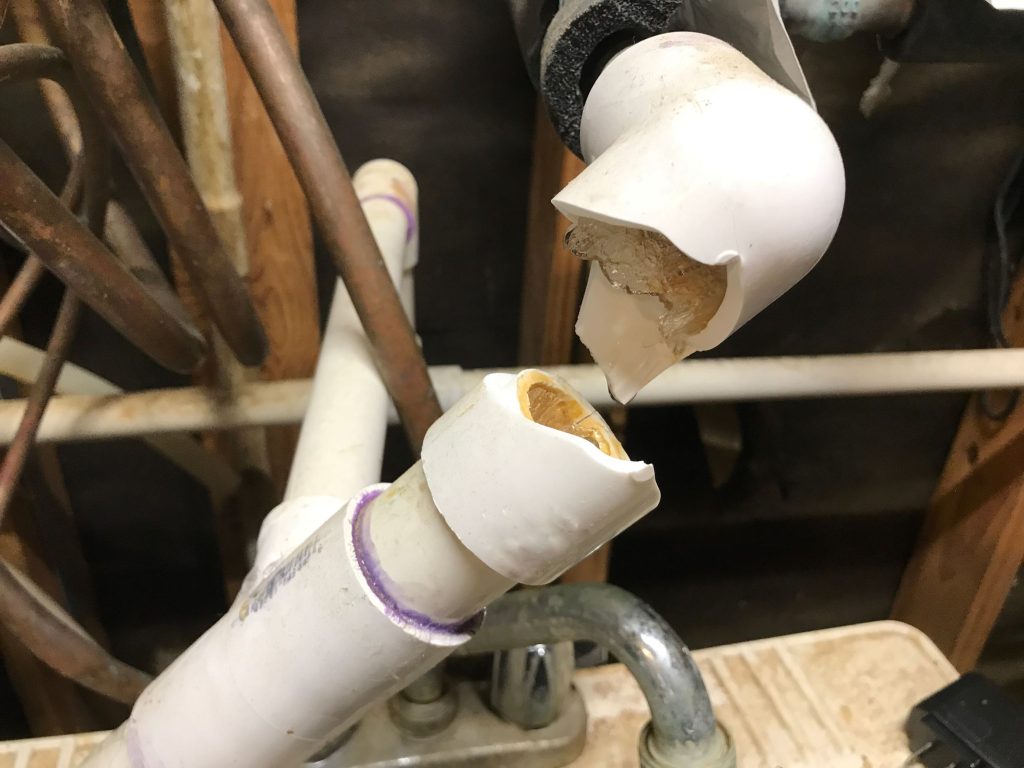
Furthermore, buildings that have a poor design and are unable withstand severe weather can be conducive to their own damage. Another factor is the type and age of the plumbing system. Rust and corrosion weakens pipes, making leaks more likely to occur. Corroded pipes often split open when freeze-expansion takes place. Damage also tends to occur after thawing begins and/or when the water is turned back on.
During the renovation of older homes, blown-in or foam insulation is sometimes added to wall cavities between interior and exterior wall surfaces and also between studs. This process may actually insulate heat away from pipes adjacent to the exterior wall surfaces, making them more susceptible to freezing.
Surprisingly, frozen pipes can also be a problem in the warmer climates of southern states. In these areas, buildings are more likely to be inadequately constructed for cold weather conditions. Pipes often run through non-insulated or under-insulated attics, crawl spaces, and walls. If the temperature drops below freezing for even a day, these pipes can freeze and break.
After the water supply is turned back on, is when damage commonly takes place. Because most modern plumbing lines are inside walls, homeowners usually don’t detect a leak until after water has damaged floors, carpet, walls, or ceilings. Every now and then, an occupant will hear the sound of spraying water, but by then it is usually too late. At this point, the leak has already caused some level of damage.
How water pipes freeze
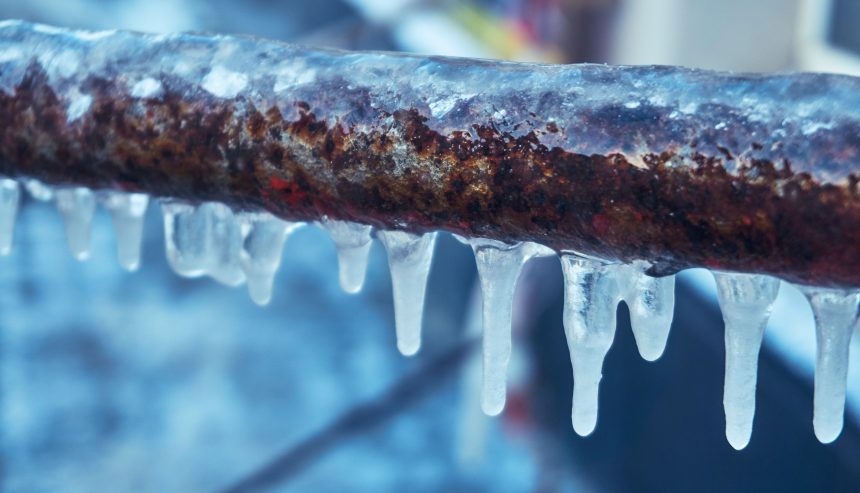
Water is a special element. As with most substances, when water cools, its density increases, and it settles to the bottom of a container. However, when it reaches 32º F, it expands and, therefore, its density decreases! This is why ice floats.
This expansion increases the volume of water by about 11% and creates tremendous pressure on its container (between 50,000 and 114,000 psi). Such containers include metal and plastic pipes. No matter the strength of a material, expanding water will cause it to break.
Frozen water pipes can result in extreme water damage, and the cost to repair is generally just as extensive. Read the tips below to learn how to prevent pipes from freezing and thaw those that are already frozen.
How to prevent frozen pipes
- Drain the water from your swimming pool and water sprinkler supply lines. Make sure to follow the manufacturer’s or installer’s directions. Refrain from putting antifreeze in these lines if possible (antifreeze is environmentally harmful, and is very dangerous to humans, pets, wildlife, and landscaping).
- Drain your plumbing system thoroughly. If water lines sag or bow, there may be low spots that are difficult to efficiently drain. To be most effective, use compressed air to blow out the lines. If not properly done, some amount of water will remain in the low points of the lines that can freeze.
- Disconnect, drain, and put away hoses used outdoors. Close inside valves supplying outdoor hose bibs. Open the outside hose bibs to allow water to drain. Remember to keep the outside valve open so that any water still in the pipe can expand without causing it to break.
- Check in the basement, crawl space, attic, garage, and under kitchen and bathroom cabinets where water supply lines are located in unheated areas.
- Insulate both hot and cold water pipes in these areas to help prevent freezing. Use specific products for insulating water pipes like a “pipe sleeve” or installing UL-listed heat tape, heat cable, or similar materials on exposed water pipes.
- Turn a faucet on in your home so that it drips slightly. Moving water (even a drip) will help prevent pipes from freezing.
- If there are water supply lines in your garage, make sure to keep the garage doors closed.
- Open the kitchen and bathroom cabinet doors to allow warmer air to circulate around the plumbing. Be sure to move any harmful cleaners and household chemicals out of the reach of children.
When leaving home for more than a few days
If you plan to be away from home for an extended period during cold weather, follow these steps:
- Leave the heat on in your home. Set the thermostat no lower than 55° F.
- Shut off your water supply, drain pipes and appliances.
- Leave all taps open after shutting off the main water supply. If the home loses power, the open valves will help prevent pipes from bursting. Also, shutting off the master valve will ensure that even if there is a break, the damage will be less significant, compared to an open line running wild!
- Even if you do all the above, it’s important to have a neighbor, friend or family member to walk through your home once each day – just to help monitor against unforeseen events. FEMA states that it only takes 24-48 hours for mold to start growing on a damp surface, so the quicker water damage is spotted, the better! This is especially true, living in the lowcountry – in Charleston, SC and the surrounding areas!
- Have emergency numbers handy such as a plumber, electrician, roofer, and PuroClean (reach us at 843-972-4200) in case something does go wrong.
- Have your HVAC system serviced by a trained professional.
- Turn off your water heater. Follow your owner’s manual for instructions.
- Install storm windows and/or close shutters to keep the heat in and the cold out.
- Clean gutters and downspouts to ensure proper water drainage.
- Service your sump pump to make sure it is operating properly. Adding a backup power source is wise.
- Unplug all unneeded electric appliances.
- Notify local police if you will be out of town.
How to unfreeze pipes
- Locate the Frozen Pipe – If you’re not sure which pipe is frozen, turn on all faucets in your home. Check which faucet is only trickling or not releasing water at all. The pipe leading to that faucet is likely frozen. Make sure to check all of the faucets in your home to find out if you have additional frozen pipes. If one pipe is frozen, there is a chance others are frozen as well.
- Turn on the Faucet – Once you’ve located the frozen pipe, open the faucet leading to the frozen pipe. Turn on both the hot and cold handles. This will allow water to flow once you start thawing the pipe.
- Start Thawing Near the Faucet – When thawing a frozen pipe, it is best to start closer to the faucet then work your way down to the frozen section. If you start closer to the blockage, the melting ice could possibly get stuck behind the blockage. This increases the chances of the pipe breaking, due to the added pressure.
- Thawing Exposed Pipes – There are several ways to thaw pipes that you can access:
- Point a hairdryer at the frozen pipe, starting near the faucet. Follow proper safety precautions for the dryer and don’t come in contact with water when using the dryer.
- Wrap hot towels, which have been dipped in hot water, around the frozen pipe. This method is slower but potentially safer than the ones above.
- Apply electric heat tape directly to the pipe. This tape insulates the pipe, defrosting it. You can leave the heat tape on the pipe and turn it on/off when you need to.
- Thawing Enclosed Pipes – You can thaw pipes that you don’t have direct access to in a few different ways:
- Turn up the heater in your home. This will cause the frozen pipe to thaw as the temperature inside your home increases.
- Place an infrared lamp in front of the section of the wall where the frozen pipe is located. The heat from the lamp could penetrate the wall and help the pipe defrost.
- As a last resort, cut out the section of the drywall in front of the frozen pipe for easy access. You can then use the previously listed methods for thawing exposed pipes.
- Know the Risks:
- When trying to thaw a frozen pipe yourself using a heat source, you run the risk of injury and fire.
- Make sure to take proper safety measures when using electrical equipment.
- Start thawing near the faucet. If you don’t, the pipe could burst and cause water to flow into your home.
- DO NOT use a blowtorch, kerosene heater, propane heater, charcoal stove, or any other open flame devices!
- After pipes have thawed, turn off all water to faucets and the icemaker, and monitor the water meter for any unseen leaks.
What to do if a pipe bursts
If a pipe bursts, shut off the water at the main valve. Call a plumber (keep an emergency number nearby for quick access). Then call us at (843) 972-4200 to evaluate and remediate any water damage that occurred. Our technicians stand ready to provide water damage restoration services to your property 24/7 in Charleston, SC and the surrounding areas.