Table of Contents
The 7 water damage remediation steps you must take in the first 24 hours are:
(1) stop the water source, (2) cut power to flooded areas, (3) document everything before touching it, (4) assess the water category, (5) extract standing water immediately, (6) strip all saturated materials, and (7) deploy drying equipment while calling a certified restoration professional.
Acting within the first hour dramatically reduces total restoration cost, prevents mold colonization, and strengthens your insurance claim. Every hour you wait makes each of these steps harder and more expensive.
Most Homeowners Lose the Battle Before They Even Know It Started
Here is something most water damage guides will not tell you outright.
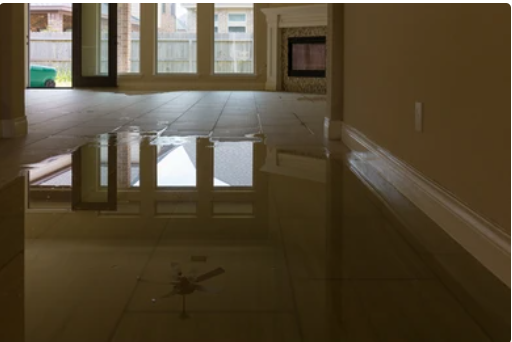
By the time you notice the water, smell the mustiness, or find the discolored ceiling ; the damage has already been spreading for hours, sometimes days. The standing water you can see is only a fraction of the problem. The moisture that has already moved silently into your subfloor, into the paper backing of your drywall, into the insulation inside your walls ; that is where the real destruction is building.
Water damage is one of the most deceptive emergencies a homeowner can face. It looks containable. It looks like a cleanup job. And so people waste critical hours mopping floors, moving furniture, running fans from the hardware store ; all while the structural clock ticks quietly behind the walls they cannot see.
The water damage remediation steps in this guide are sequenced deliberately. They are built on the same protocols used by IICRC-certified technicians who do this work every day across Schwenksville, Lansdale, Harleysville, and the rest of Montgomery County, PA. If you follow them in order, starting now, you give your home the best possible chance of a full recovery. If you improvise, skip steps, or wait until morning ; you are handing moisture a head start it will not give back.
Let’s get into it.
1. Why the First 24 Hours Are the Only Hours That Truly Matter
The reason professional water damage restoration companies talk about 24-hour response windows is not marketing. It is biology, physics, and building science working against you simultaneously.
Here is what is actually happening inside a structure during the first 24 hours of water intrusion:
Porous materials begin absorbing immediately. Drywall ; which is paper-faced gypsum ; can absorb water along its entire length through capillary action. A baseboard that is sitting in half an inch of water is wicking moisture upward through the drywall above it at the same time the water is spreading laterally across your floor. Within two to three hours of sustained exposure, that drywall has absorbed enough moisture to begin losing its structural integrity.
Wood framing swells and begins to deform. Hardwood floors that have been in contact with water for more than six hours will already show early signs of cupping ; where the edges of each board begin to rise above the center as the bottom face absorbs moisture faster than the top. Door frames warp. Subfloor panels begin to soften along their seams. None of this is visible yet from the surface. That is exactly the problem.
Mold spores ; which are present in every home in ambient air ; begin colonizing damp organic material within 24 to 48 hours. They do not need a lot. They need moisture, a food source (which drywall paper, wood, and carpet backing all provide), and darkness. Inside a wall cavity, they have all three.
After 48 hours, the cost and complexity of remediation increases sharply. Industry data from restoration professionals consistently shows that projects addressed within 24 hours of water intrusion cost significantly less, involve less material removal, and require shorter drying times than projects where homeowners waited even one additional day.
The IICRC S500 Standard for Professional Water Damage Restoration ; the industry’s governing document for how this work is done ; does not offer a grace period. Neither does moisture.
2. Understanding Water Categories Before You Touch Anything
Before you take a single physical remediation step, you need to know what kind of water you are dealing with. This is not a technicality. It determines your personal safety, what materials can be dried versus demolished, and how your insurance claim will be evaluated.
Category 1 ; Clean Water This comes from a sanitary source: a burst supply line, a leaking water heater, an overflowing sink with clean water, or rain intrusion. Category 1 is the least hazardous to your health, but it is not harmless. Left untreated, it degrades rapidly into Category 2 within 24 to 48 hours as it contacts building materials and organic matter.
Category 2 ; Grey Water This includes overflow from dishwashers, washing machines, aquariums, or toilet overflow without solid waste. Grey water contains biological or chemical contaminants that can cause illness upon contact or ingestion. Materials soaked by Category 2 water require more aggressive treatment and some must be discarded rather than dried.
Category 3 ; Black Water This is the category that demands you stop all DIY efforts immediately. Black water includes sewage backup, rising floodwater from outdoor sources, and any water that has been sitting long enough to become heavily contaminated. It contains human waste, pesticides, heavy metals, and pathogenic microorganisms. Walking through it without proper protective equipment is a genuine health hazard. Materials contaminated by black water ; including flooring, drywall, and insulation ; are typically classified as biohazardous waste and must be removed, not dried.
If you are reading this and suspect your water damage involves Category 3 water, please stop and call a certified emergency water damage restoration professional right now. The water damage remediation steps below are written primarily for Categories 1 and 2, with Category 3 notes where applicable.
3. The 7 Water Damage Remediation Steps ; Explained in Full
Step 1: Stop the Water Source ; And Do Not Move Past This Step Until You Have
This sounds so basic that people sometimes read it and move on without actually doing it. Do not do that.
If the water is coming from a supply line, your main water shutoff valve needs to be off before anything else happens. In most homes built before 2000 in Montgomery County, that valve is in the basement near where the main line enters the foundation, or at the water meter near the street. Know where yours is before you need it. If you are reading this during an active leak and you do not know where your shutoff is ; find it right now, before you read another word.
If the source is a storm or roof penetration, your options are limited to diversion: towels at the entry point, buckets under drips, and tarping if conditions are safe. Do not go onto a roof during active rain or high wind. The physical entry of water cannot always be stopped immediately, but your goal is to reduce the volume entering the structure as much as possible.
If the source is a malfunctioning appliance, locate the appliance shutoff valve (typically behind or beneath the unit) and close it first. If you cannot locate it or it fails, go to the main shutoff.
No remediation step that follows this one will work if water is still entering the structure. Step 1 is not optional.
Step 2: Cut Power to Every Affected Area
Water and electricity do not negotiate. This step is about your life, not your property.
Go to your breaker panel and shut off power to every room or zone that has standing water, visible moisture on walls or ceilings near outlets, or any proximity to electrical appliances. If you are uncertain which breakers control which rooms, shut off the main breaker. Your insurance claim can absorb the inconvenience of a temporary power outage. It cannot absorb an electrocution.
Do not use electrical appliances ; including standard household fans ; to begin drying until an electrician or certified restoration professional has confirmed the space is safe. Do not wade through standing water before the power is confirmed off.
Some restoration teams use thermal imaging cameras to check for electrical hotspots before entering a flooded space. This is part of why professional assessment at this stage has real value beyond equipment.
Step 3: Document Everything Before Touching Anything Else
This step is where homeowners most consistently cost themselves money on their insurance claim, and it happens because of urgency. The impulse to start cleaning up immediately is completely understandable. Resist it for fifteen minutes.
Pull out your phone and document the following before moving, removing, or discarding a single item:
- The full extent of standing water in every room, shot from the doorway
- The visible source of the water (burst pipe, window, appliance connection, etc.)
- Every affected surface: floors, walls, ceilings, baseboards
- Every impacted piece of furniture, appliance, or personal property
- Any visible structural damage: sagging ceilings, buckled flooring, deformed door frames
- Water lines on walls that indicate height of water intrusion
- Serial numbers and model information on any damaged appliances or HVAC equipment
Take both photos and video. Walk slowly. Narrate in the video what you are seeing and when you discovered it. The timestamp on your phone media is part of your documentation.
This record becomes the foundation of your water damage restoration insurance claim. Adjusters work from documentation. The more complete yours is, the less room there is for disputes about scope, timing, or extent of damage.
[For homeowners in Ambler and Blue Bell who have navigated the insurance process, our detailed breakdowns of insurance claim restoration in Ambler and insurance claim restoration in Blue Bell walk through exactly what adjusters look for and where claims commonly fall apart.]
Step 4: Extract Standing Water Immediately
Once documentation is complete and power is confirmed off in the affected area, standing water extraction begins. Speed is everything here; every additional minute that water sits on your floor, it is migrating deeper into the subfloor and further along the base of your walls.
For smaller volumes, a wet/dry vacuum with extraction capability is your most practical tool. Empty it frequently ; water is heavy and a full canister significantly reduces suction power. For significant standing water (more than one inch across a large area), a submersible pump is more effective.
A few things that matter here:
Do not use a standard household vacuum. It is not designed for water extraction and can become an electrical hazard. Do not use fans before water is extracted ; you are not drying, you are just circulating humid air. Do not underestimate the volume of water; what looks like a thin film on tile has already soaked through grout lines and into the concrete slab or subfloor beneath.
Prioritize lower areas first. Water follows gravity and will continue migrating downward through floor assemblies into basement spaces even after the visible source on the upper floor is addressed.
[If you are dealing with a flooded basement specifically, our basement flooding cleanup service guide covers the additional complications that come with below-grade water intrusion.]
Step 5: Assess and Remove All Saturated Materials
This is the step that requires the most difficult decisions, and the ones that matter most for long-term outcomes.
The materials that must be evaluated include:
Carpeting and carpet padding: Carpet padding is a sponge. It holds enormous volumes of water and cannot be effectively dried in place. If it has been saturated, it comes out ; period. The carpet itself can sometimes be saved if it was in contact with Category 1 water for a short time, dried quickly, and shows no signs of mold or odor. But the padding it was sitting on goes regardless.
Drywall: The general professional standard is that drywall saturated above the first few inches from the base should be cut out and replaced rather than dried in place. Wet drywall loses structural integrity, and even if it dries out, the paper face has often already been compromised enough to become a reliable surface for mold growth within the wall cavity. Cutting the wall at 12 to 18 inches above the visible water line exposes the cavity for drying and gives a clean edge for the repair drywall to meet.
Insulation: Fiberglass batt insulation that has been soaked is effectively useless. It does not dry well, it compresses and loses its R-value when wet, and it holds moisture against the framing behind it. It comes out.
Cardboard, particle board, and MDF: These do not survive significant water contact. Dispose of them rather than attempting to dry them. They are a mold risk and will not return to structural usefulness.
Solid wood furniture and solid hardwood flooring: These have a better survival rate and are worth the effort to dry aggressively and quickly. More on hardwood floors in our dedicated guide below.
[Our guide on water damage restoration in Harleysville includes a detailed breakdown of material assessment decisions that came up in real local restoration projects.]
Step 6: Deploy Drying Equipment ; And Understand What “Dry” Actually Means
This is where most DIY remediation efforts fail, even when homeowners have done everything else right. Getting the visible water out is the first half of the job. Getting the moisture that has already been absorbed out of the building materials is the second half ; and it is harder, takes longer, and requires equipment most people do not own.
Here is the distinction that matters: a surface can feel dry to the touch while the moisture content of the material behind it remains dangerously elevated. Drywall that reads 16% moisture content on a calibrated meter looks and feels dry to a hand pressed against it. But at 16%, it is well above the safe threshold for mold growth (which is approximately 12 to 13% for most building materials). That wall will grow mold. It is just a matter of time.
Professional restoration companies use three categories of equipment simultaneously:
High-velocity air movers: These are not fans. They move a focused column of high-velocity air across wet surfaces to accelerate evaporation. Multiple units are placed strategically to create a controlled airflow pattern across walls, floors, and into ceiling cavities where needed. The positioning matters ; it is not random.
Industrial dehumidifiers: The moisture that evaporates from building materials has to go somewhere. Industrial dehumidifiers ; refrigerant or desiccant depending on the temperature and humidity conditions ; pull that moisture from the air and discharge it as condensate. A single commercial desiccant dehumidifier removes dramatically more moisture per hour than the largest consumer-grade unit available at a hardware store.
Moisture meters and thermal imaging cameras: Used daily throughout the drying period to track progress inside wall cavities, beneath flooring, and in the subfloor. These readings, documented over multiple days, are what allow a restoration professional to certify that a structure has reached dry standard ; the target moisture levels specified for each material type.
If you are using household fans and a dehumidifier from a big-box store, understand that you are not matching the drying capacity of professional equipment. In many cases, this extends the drying period long enough for mold to begin establishing itself in cavities that would have been dry with professional equipment deployed immediately.
[For emergency response across Montgomery County, PuroClean of Lansdale provides emergency water damage restoration 24 hours a day with commercial-grade equipment deployed to your location.]
Step 7: Call a Certified Restoration Professional ; Ideally While You Are Doing Steps 1 Through 6
This step appears last in the sequence because the preceding steps are things you genuinely need to start before any professional can arrive. But it should not be the last call you make.
The right time to call a certified restoration company is immediately ; while you are shutting off the water, cutting power, and beginning documentation. A professional arriving on scene within the first two to four hours dramatically changes the outcome for the following reasons:
They bring the equipment that actually dries structures. Not fans and dehumidifiers, but calibrated systems that have been positioned by technicians trained in psychrometrics ; the science of air, moisture, and temperature relationships in enclosed spaces.
They provide an assessment that protects your insurance claim. A certified restoration company documents scope, moisture readings, affected materials, and remediation protocols in a format that insurance adjusters recognize and accept. This documentation closes the gap between what you experienced and what your insurer is obligated to pay.
They identify the damage you cannot see. Thermal imaging cameras reveal cold spots behind walls where evaporation is occurring. Moisture meters catch elevated readings in subfloor cavities that look fine from above. Missing these hidden moisture pockets is exactly how homeowners end up with mold problems two months after they thought everything was handled.
PuroClean of Lansdale’s Certified Priority Response (CPR) Program means that when you call, you are not just getting a service call ; you are getting a team that operates under pre-established protocols that your insurance company already recognizes. Scope pre-approvals, documented certification standards, and direct insurance coordination. Less friction. Faster resolution. Lower out-of-pocket exposure for you.

4. The Hidden Damage Timeline: What Is Happening Inside Your Walls Right Now
Understanding the timeline of what moisture does to a structure helps explain why every hour of delay is not just inconvenient ; it is structurally and financially consequential.
0 to 2 Hours: Water spreads laterally across flooring and begins vertical wicking into drywall at the base of walls. Subfloor materials begin absorbing. Surface water is the dominant visible feature, but subsurface migration is already underway.
2 to 6 Hours: Drywall has absorbed moisture several inches above the visible waterline. Furniture legs and wooden cabinetry are beginning to wick. Carpeting backing is saturated. Odor may not yet be present, but biological activity is beginning in warm conditions. Any dust or settled organic material in wall cavities is becoming a mold food source.
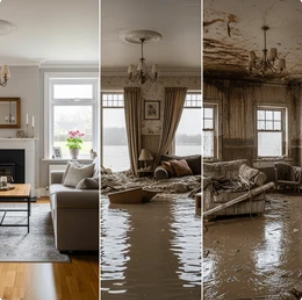
6 to 24 Hours: Wood framing begins to swell. Hardwood flooring shows early cupping at board edges if flooring is involved. Wall cavities have reached significant moisture levels. In warm weather (above 70°F), early mold colonization is possible within cavity spaces by the end of this window.
24 to 48 Hours: Mold is actively establishing itself on organic surfaces inside wall cavities, beneath flooring, and in insulation. Structural softening of saturated particle board and MDF is extensive. Drywall that has not been cut and removed is now significantly more difficult to dry without demolition. Remediation costs have increased meaningfully compared to what they would have been at 6 hours.
48 to 72 Hours: Widespread mold is likely. Secondary damage ; meaning damage caused by the initial water intrusion rather than the water event itself ; is now the dominant concern. Structural members may show signs of deformation. Odor is now pronounced. Any Category 2 water has likely degraded toward Category 3 conditions.
Beyond 72 Hours: Demolition and reconstruction, rather than drying and restoration, is increasingly the realistic path forward for significant portions of the affected area. Projects that could have been completed in 3 to 5 days with early intervention are now weeks-long reconstruction efforts.
[Homeowners in Skippack and North Wales have navigated exactly this kind of timeline escalation. Our water damage restoration in Skippack and water damage restoration in North Wales guides detail what that progression looks like in real homes and what could have been done differently at each stage.]
5. How to File a Water Damage Restoration Insurance Claim That Actually Holds Up
Filing a water damage restoration insurance claim feels like a separate problem when you are standing in a flooded room. It is not. The decisions you make in the first few hours directly affect how your claim is evaluated.
Here is how to approach it systematically:
Contact your insurer or agent as soon as the water source is controlled. Most policies have language requiring “prompt notice” of a loss. That means the same day, or as close to it as possible. Do not wait until Monday if this happens on a Saturday night.
Know your policy type before you call. Standard homeowners policies typically cover sudden and accidental water damage from internal sources ; burst pipes, appliance failures, HVAC overflow. They typically do not cover gradual leaks, maintenance failures, or rising groundwater (flooding). Flood insurance is a separate policy, federally administered through NFIP or private carriers. Knowing which applies before you call helps you frame the conversation correctly.
Lead with documentation. Have your photos and video ready. Give your adjuster the timestamp of when the loss occurred, the source, and the scope as you understand it from your walk-through. Do not speculate about cause if you are not certain ; just describe what you observed and when.
Do not dispose of damaged materials before documentation by an adjuster or third-party inspector. Even saturated carpet padding. Even soaked drywall that you have cut out. Stack it in the garage or outside the home where it can be photographed. Many claims are disputed because the insurer cannot verify the scope of material loss.
Work with a restoration company that coordinates directly with insurers. This is not a minor convenience. PuroClean of Lansdale’s CPR Program is built around exactly this coordination ; pre-agreed protocols, scope pre-approvals, and documentation that adjusters recognize. It shortens the gap between loss event and claim settlement, and it reduces the likelihood of disputed line items.
[Our guides on insurance claim restoration in Abington and insurance claim restoration in Center Square walk through the claim process in detail for homeowners in those communities.]
PuroClean of Lansdale works with Nationwide, Encompass, Alacrity Services, Crawford Contractor Connection, Vericlaim Repair Solutions, and Nexxus ; nationally recognized networks that your adjuster already knows. That familiarity matters when it comes to getting your claim processed accurately and efficiently.
FEATURED IMAGE ; Position 4 (After the insurance section)
- Photo description: A homeowner sitting at a kitchen table reviewing paperwork with a PuroClean technician in uniform, both looking at a tablet showing documentation photos of damage. Calm, professional, collaborative atmosphere. Kitchen in background showing minor water damage that is being managed.
- Alt text: “water damage restoration insurance claim documentation with PuroClean of Lansdale homeowner”

6. What Separates a Good Restoration Company from One That Leaves You With Lingering Moisture Problems
This is a question that homeowners rarely know to ask until they have had a bad experience ; and by then, the mold growing behind the freshly painted drywall is already the answer.
Not all water damage restoration service providers operate at the same standard. Here is what to look for and ask about:
IICRC certification. The Institute of Inspection, Cleaning and Restoration Certification sets the standard for how water damage restoration work is performed. Technicians who are IICRC-certified in Water Damage Restoration (WRT) have completed formal training in psychrometrics, moisture science, equipment deployment, and documentation protocols. Ask directly whether the technicians who will be in your home are certified ; not just the company as a whole.
Daily moisture monitoring with documented readings. A professional drying job is not finished when the surfaces feel dry. It is finished when daily meter readings across all affected materials have reached target moisture levels for three consecutive days. Ask your restoration company whether they provide written moisture logs.
Thermal imaging as a standard tool, not an upsell. Thermal cameras should be part of every assessment, not something you have to request or pay extra for. They reveal moisture concentrations that meter probes alone cannot reliably locate.
Clear communication about what is being dried versus what needs to come out. A restoration company that dries everything in place without evaluating which materials actually can and cannot be restored through drying is cutting corners. Drywall that should come out will become a mold problem. A company that tells you which materials must go and why is operating at a higher standard.
Direct insurance coordination. If your restoration company cannot speak your adjuster’s language and submit documentation in the format adjusters work with, you are going to spend weeks managing that gap yourself.
[You can read emergency water damage restoration and emergency water damage mitigation on PuroClean Lansdale’s site to understand what a professional emergency response actually looks like from start to finish.]
7. Areas PuroClean of Lansdale Serves Across Montgomery County
PuroClean of Lansdale operates out of 2033 Lucon Rd, Bldg. Rear, Schwenksville, PA 19473, providing 24/7 emergency water damage restoration services across Montgomery County and surrounding communities.
Service areas include: Abington, Ambler, Blue Bell, Center Square, Fort Washington, Harleysville, Horsham, Kulpsville, Lansdale, Maple Glen, Montgomeryville, North Wales, Prospectville, Roslyn, Schwenksville, Skippack, Spring House, Spring Mount, Willow Grove, and Woxall.
Services cover Water and Flood Restoration, Environmental Hazard Remediation, Fire Damage Remediation, Mold Remediation, Storm and Fire Damage Restoration, Reconstruction Services, and 24/7 Emergency Response.
For additional community-specific resources:
- Water damage restoration in Spring Mount
- Water damage restoration in Spring House
- Water damage restoration in Fort Washington
- Water damage restoration in Willow Grove
- Water damage restoration in Montgomeryville
Follow PuroClean of Lansdale for storm alerts and restoration tips: Instagram |Facebook |LinkedIn |X (Twitter)
Read verified local reviews and get directions: PuroClean of Lansdale on Google Maps

Conclusion: The Question Every Montgomery County Homeowner Should Be Able to Answer Before Disaster Strikes
Here is what fifteen years of watching homeowners navigate water damage teaches you: the ones who recover fastest and spend the least are almost never the ones who knew the most about plumbing or construction. They are the ones who acted first, documented thoroughly, and called professionals before they convinced themselves they could handle it alone.
The seven water damage remediation steps in this guide are not a complete substitute for professional restoration. They are what you do in the first hour while you are also making the call that gets a certified team to your door. Every step matters. Every hour you skip one costs you more on the back end.
The mold does not care that it is Saturday night. The moisture creeping up your drywall does not wait for a convenient appointment window. The insurance claim that falls apart because documentation was incomplete does not care that you were overwhelmed and stressed when you forgot to do it.
So here is the question worth sitting with honestly before the next storm rolls through Montgomery County:
If water started pouring into your home tonight at midnight ; would you know exactly what to do in the first ten minutes? And do you already have the number of a certified restoration team saved in your phone?
If the answer to either part of that question is no, now is the time to fix it.
PuroClean of Lansdale is available 24 hours a day, 7 days a week, 365 days a year.
PuroClean of Lansdale | 2033 Lucon Rd, Bldg. Rear, Schwenksville, PA 19473 | (267) 834-5900

